

Would you ever guess that a collection of odds and sods can turn into a cool DIY Earring Holder?
This was one of those spontaneous projects with no real plan, hatched when Hubs was weeding out sewing machines in the garage that are too forgone to work again! Around here, at Birdz of a Feather, we call that a flip on the fly. But in this instance, more appropriately, we’re playing it by “ear”. I’m challenging myself to upcycle a hand wheel from a sewing machine into an earring carousel that can turn! And all from stuff we already have!
It makes a unique gift idea for a mom, sister, or friend!
We’ve also got some unique ideas from the International Bloggers Club today too, so there’s something for everyone!

IBC – Mystic Makes
It’s time for another International Bloggers Club (IBC) challenge and this month our theme is Mystic Makes. As you’ll read later, our project is initially a cheat on the theme.
The IBC is a group from all over the world who challenge each other every month to make something using a common theme. You’ll find our friends’ mystic ideas at the bottom of the post. So don’t forget to check them out before you go. And if you don’t have time to browse today, pop back in later in the week to pick up where you left off.
Before we get into the tutorial, don’t forget to get your craft mojo on at Birdz of a Feather and subscribe to our newsletter:
You can also follow us on Pinterest, Facebook, YouTube and Instagram.
When we showed you how to use Gemstone Mousse on a cast iron sewing base, the sewing machine was too far gone to repair. Hubs is an amazing mechanic, but water damage and rust unfortunately make many old Singer sewing machines unusable.
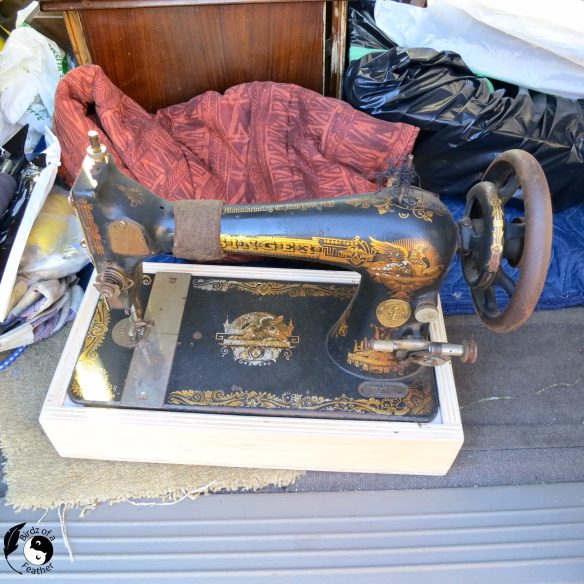 Most machines like this, he ends up scrapping. However, there’s no reason not to salvage parts like the hand wheel (which sadly I didn’t do last year with this particular machine). I guess hindsight is 20/20 because the wheel I’m using for this project is from the same model machine!
Watch DIY Earring Holder Video!
Clean DIY Earring Holder Parts
Instead of getting the metal wet and encouraging more rust, I clean the metal with hand cleaner. You can also try this method instead – How to Remove Rust on Metal; it works like a charm on cast iron to easily remove heavy rust!

There’s a hundred years of grime on that wheel!
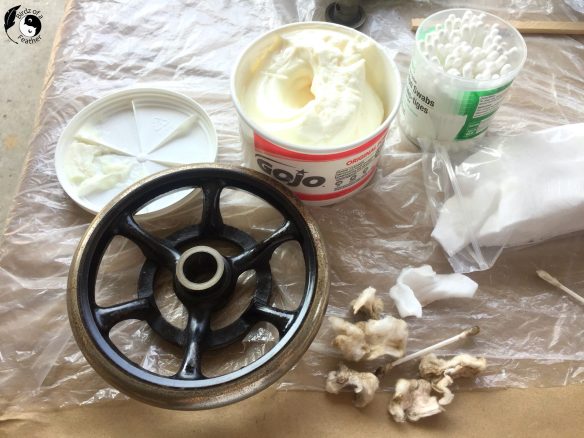
I also use Autosol to polish the chrome with a piece of cotton t-shirt fabric.

I’m not going for a new slick look; just a bit more shine.

We also salvage the spindle that the wheel spins on. It’s the part you see at the end of this sewing machine:

Optional; while I was playing around with the concept, I cut a piece of dowel to fit the depth of the candlestick and then tighten the set screw to hold it in place.

The spindle goes back onto the hand wheel.

Glue with Epoxy
Then the dowel can sit inside the silver plated candle stick. You actually don’t need the dowel if there is enough of a lip to make good contact. In that case, just fasten metal to metal with epoxy for a permanent bond.
Since you want the hand wheel to spin on this spindle, if there isn’t enough glue surface, you can glue both the end of the dowel and the metal rim for added security. 
I actually love how the black tarnish looks with the vintage hand wheel, so I’m not going to polish it (gasp). But if you DO want that shiny silver look, read our post on how to remove tarnish from silver!
Alternatively, you can paint the metal instead, just like we did with this wall planter diy!
Now that the metal is taken care of, let’s move on to the fun and functional part!
Assembling the DIY Earring Holder
Truth be told, I’m cheating in the mystic challenge this month. To be truly mystical, my preference is to use Tarot Cards. But I already have a deck of playing cards that’s missing cards and can’t be used. So I’m doing the responsible thing by using what I have! Let’s just call this project a mystic make wannabe!
Supplies
* [If you’re looking for some of the things we used, we’ve got you covered (disclosure): Clicking on the affiliate links below means we may receive a commission. But don’t worry, you don’t pay a cent more and it helps us make more unique crafts to share with you! Thanks for helping to support our blog!]
- 8 cards (preferably tarot cards, like this classic colourful deck if you’re going for a mystical make or try a deck with architectural wonders of the world)!
- Silver candle stick
- Hand wheel from sewing machine (salvage from a vintage machine that doesn’t work)
- The Beadsmith 1.5 mm hole punch
- 8 alligator clips
- 8 earth magnets
- Wine stopper (the one I use is from the upper finial of a wine stopper that has a screw bolt like this one so you can interchange the top) or a lamp finial like this glass ball one to keep with the mystical theme
- Cotton pads, cotton swabs and cotton T-shirt fabric for cleaning and polishing
- Gojo hand cleaner, original
- Autosol metal polish
All these supplies are things we have kicking around. The candlestick was my Moms’, the cards my grandmother’s and the alligator clips were used as part of the placeholders at our wedding. Hubs constantly gets free sewing machines. You’ll likely have much different things to upcycle, so see what you have lying around and get creative too!
This set of cards is two cards short of a full deck. I know a few people like that :).

Playing cards, alligator clip and earth magnets
Punch Holes
Use an earring card for the template, if you have one. Otherwise, make your own template out of cardboard to punch consistent holes each time. Place over the playing card and punch two holes with The Beadsmith.

After punching all the cards, open the alligator clip and attach to the cards as you see below.

Insert earrings into the holes. Then attach the alligator clips to the hand wheel with an earth magnet.
Although I don’t show it here, you can easily punch more holes anywhere on the same card so you can display both drop earrings, like this, and stud earrings too! Customize it to suit yourself.

Repeat with adding the magnets and cards all the way around.

Finishing the Earring Carousel
Unscrew the top of the wine stopper (or improvise with anything you can find like a finial or drawer pull).

Lastly, place the finial on top to hide the hole. Again glue it on with epoxy. But only attach to the hand wheel (not the dowel if you used one) or it won’t spin properly on the spindle.

Earring holder stand
Earring Carousel Reveal
And there you have it! A DIY earring holder that spins! A pretty unique way to display your favourite earrings, eh?

Earring organizer DIY
Mystical Make
After sleeping on it, I swapped out a component on the carousel earring holder to better represent the mystic make challenge. I’d still love to use tarot cards though!
Instead of a finial, upcycle a crystal door knob. Natural crystal has mystical qualities that are said to promote healing.
In the background is a Hamsa (here’s the tutorial for the Hamsa Wall Decor). An ancient spiritual symbol popularized in places like North Africa and the Middle East, a Hamsa is a protective mystical palm-shaped amulet that blocks negative energy and is reputed to bring its owner happiness, luck, health and good fortune. Yes, please; I’ll have more of that! Read more about the Hamsa hand meaning here.

DIY Earring Display
More Jewelry Organizer Ideas
This DIY Jewelry Display is another unique idea if you want to store necklaces AND earring together. Or try this Jewelry Storage DIY idea if you want to keep your silver pieces tarnish free! More recently, this Pallet Shelves DIY is an eye catching way to display your favourite baubles!
Cast Iron Upcycles
In addition to jewelry organizers, we seem to be on a real roll with Cast Iron Upcycle Ideas. One particular favourite is this thread holder from a unique vintage find!
Fall Into Fabulous
One of the things I love most about blogging is connecting with other makers , and this Fall we’ve created something truly inspiring together.
Grab 16 digital goodies from top creators — planners, recipes, colouring books & more — including our Beginner Crochet e-Book!
Every dollar of our commission goes straight to Alzheimer’s research — a cause close to our hearts. Your purchase through this link means you’re not just treating yourself; you’re making a real difference.
Grab it now — the bundle is only available for a limited time! Let’s make this Fall fabulous and full of hope. 💜

Pin DIY Earring Holder

Mystic Makes Challenge – IBC
Don’t forget to visit these awesome ‘Mystic Makes‘ projects from our creative friends below for more unique ideas!
- Crescent Moon Wreath – A Crafty Mix
- Buddha Planter – Unique Creations by Anita
- DIY Earring Holder (that’s us)

DIY Earring Holder FAQs
Here are some frequently asked questions about earring holders.
What is the easiest way to store earrings?
I find that storing earring on a carousel, like the one in this project, is the easiest way to store earrings because you can find the pair you want by rotating. Not only is it easy, but a carousel made with upcycled parts makes a cool decor piece to display!
How do you make a homemade jewelry holder?
Look for items to upcycle. For instance, punch some holes in playing cards and hang them on a homemade carousel for easy access and a great display piece. See the instructions above.
How do you make stud earring holders?
Punch several holes in the playing cards used in this jewelry holder DIY and you can display more than one pair of earrings on the card!
How do you make paper earring holders?
Use a deck of playing cards, tarot cards, or the like, and simply punch holes through them to insert your earrings. They are extremely durable because they are made to be handled a lot! You can display the cards on a carousel, or use them as actual packaging if you make and sell earrings!
I know a few people like that too 😀 😀
Brilliant upcycle, Sara. I would love to know how you come up with things like this. It’s such an unusual way to showcase earrings and turn (excuse the pun) throw away stuff into something functional.
Lol! I’d like to know how I come up with this stuff too!
I think a big part is that I hate to see anything go to waste. So even if the metal sewing machine can be recycled, the sense of urgency when something is about to be scrapped gets the ideas flowing. It’s fun to have a seedling of an idea and see if I can make it work.
I’m pretty sure that deck of cards is one I used to play with my grandmother (not sure how the deck was short). And the alligator clips are actually from the table number holders at our wedding. So it’s also nice to incorporate things that have sentimental value.
Nothing lost by trying to make ideas work :).
Brilliant idea and very cool use of recycled items. I love the sewing machine wheel.
Thanks Anita. Those things were built to last. Not like the plastic sewing machines you get these days!
Oh wow, Sara, what a cool idea for earring storage and such a clever way to repurpose a sewing machine wheel!
Thanks so much Marie! It was fun to MacGyver this together lol.
What a terrific idea! The jewelry could be exchanged with photos or altered cards. I’m enthused – thanks for the inspiration!
So glad you liked it Andrea! Thanks for leaving a comment.