

Hubs is a professional paint sprayer so you better believe he has all the tips and tricks on how to paint using a spray gun! In this post, he shows us some cool paint jigs and even teaches me how to use a paint gun. So whether you’re a beginner or have a few spray gun painting techniques under your belt, there’s something for everyone!

We showed you how to spray paint this drink station, this Hudson’s Bay Point Blanket Inspired Upcycle, milk can decor, and the base of this coffee table makeover. Today we’re giving you tips on how to paint pegboard. And I’m going to turn this scrap piece into a really cool project that you’ll see in the reveal!

Types of Paint Sprayers
You can buy airless paint sprayers, electric paint sprayers, HVLP sprayers and even go cordless. The sprayers we use are HVLP. HVLP stands for high volume, low pressure. The way it works is to convert the high pressure from an air compressor to a lower pressure which controls the volume of paint spray. An HVLP sprayer is ideal for spraying furniture, cabinets and anything else you would normally paint by hand.
Although Hubs uses this professional Devilbiss paint gun with a 1.8 tip, he bought me my very own reasonably priced Vaper gun from Princess Auto. And you know what? I’ll get the same professional looking finish with this cheaper paint gun. So you don’t have to break the bank! When spraying water based paint, the tip on the Vaper gun is 2.3 mm which is a nice big opening for the paint to come through.

What Materials do I Need for Spray Painting with a Sprayer?
* [If you’re looking for some of the things we used, we’ve got you covered (disclosure): Clicking on the affiliate links below means we may receive a commission. But don’t worry, you don’t pay a cent more and it helps us make more unique crafts to share with you! Thanks for helping to support our blog!]
- DeVillbis Spray Gun
- Porter Cable Air Compressor
- Sand paper
- Pegboard or small paint project
How to Paint Using a Spray Gun
For this particular project, I’m learning how to paint using Hub’s Devilbiss spray gun. A paint sprayer makes quick work of painting any project! To get used to spraying paint, there are four things to keep in mind:
- Position the nozzle perpendicular to the work. If you angle the paint gun, you’ll only get a bit of paint onto the surface. So be sure you’re holding the gun straight up and down.
- Position the nozzle 6″-8″ above the surface of your work.
- When you lightly press the trigger, air comes out; and
- When you fully press the trigger, paint comes out.
We’ll go into more written detail in the step-by-steps below, but watch this video on how to spray using a paint gun to see these principles in action:
1. Sand
Pegboard sometimes comes pre-finished on one side. But the one we’re using below is as plain as it gets. It has a shiny, almost waxy surface on one side. So we always do a light scuff, then remove the dust with a damp rag.

Tip: Sanding can cause static to build up, which will attract dust onto your paint surface after spraying with a paint gun. So be sure to remove sanding dust with an ever so slightly damp rag – or recycle an old sock like us!

2. Prime
If your project needs primer, go ahead and add it. When you progress to spraying mahogany furniture, for example, tends to bleed through the paint with red streaks so you have to prime first. In that instance, we recommend a shellac primer like Zinsser B-I-N.
In our case, we’re using a PPG paint called BreakThrough and we often use it without a primer when the surface already has a painted or clear base. However, on bare wood, it’s advisable to prime first. You can either roll or spray the primer. When dry, also give it a light scuff and remove all sanding dust as described above.
3. Place Item to be Painted on Jig
Tip: Use a paint jig to spray on. Hubs makes various sizes of jigs for different paint spraying projects but they all have one thing in common: pre-drilled holes with dowels.
The one you see below is totally configurable. Hubs drilled holes with a drill press every inch. Because project sizes vary, he has the option to install the dowels anywhere he wants to accommodate the size of the project.

The jig you see below is for larger projects. It only has holes in the 4 corners. The advantage of have your work suspended on dowels is that you won’t get spray-back of paint on the underside of your work.

However, I’m starting on a small project using a piece of pegboard scrap. So we’re using the smaller paint jig:

First, cover the base of the jig with kraft paper to keep the overspray off of the empty holes for future use.

Position your dowels onto the jig where it will best fit the size of your project by pushing them through the paper.

As you’ll see if you watch the video, Hubs also covers the top of the dowels with masking tape to keep paint off them. That will extend the life of your dowels. With paint buildup over time, they’ll no longer fit into the holes!

Stay tuned for an upcoming post on how to make a portable turntable for spraying on. Rather than move yourself into position to spray, you can simply spin the piece!
4. Strain Paint into Paint Gun
Tip: Always strain your paint to prevent paint gun clogs.
When putting your paint into the paint gun, strain it first through a paint strainer. It only takes a little bit of debris or dried paint to clog a paint gun.

Below, we’re actually straining the paint before we put it in the gun. Because the paint in the can is old and the can is rusty, we’ll strain it twice (into a new container and then into the paint sprayer).

Putting the paint through the strainer is also a good indication of whether the paint is thin enough to spray.
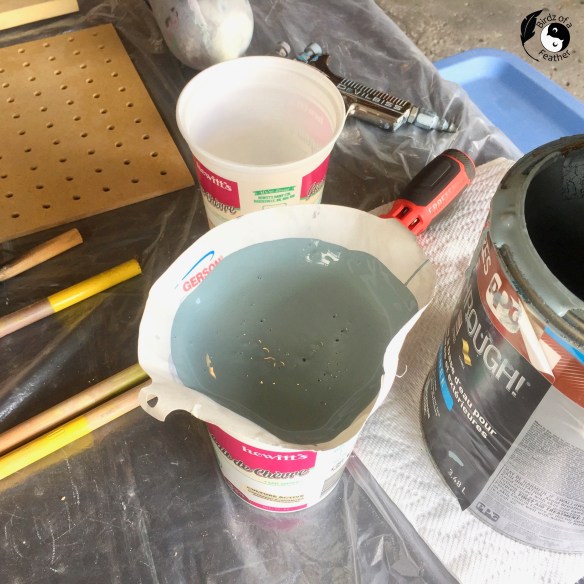
If it streams through the filter too slowly when you lift it, you’ll need to thin your paint out with some water.

For this small amount of paint, we’re only adding an ounce or so of water to thin the paint. Stir thoroughly.

5. Attach Sprayer to Compressor
Unless you have a filtering system on your air compressor, every time you use it, you should open the valve at the bottom to release water build up in the tank.

As you see on the video, we didn’t heed our own advice and were a bit overdue for this maintenance step.

Despite that, the resulting rusty water will likely happen no matter what; manufacturers don’t protect the inside of the tanks and they eventually rust.

Plug in the compressor and let it come up to full pressure. Set the pressure and connect the paint gun. Consult the manual for your particular gun to set the pressure on the compressor. Some paint guns also have a pressure on them so you can set the pressure at the cup gun instead.
Adjust the width of the paint spray by opening or closing the nozzle; see this explained on the video. Test the paint spray fan width on a scrap first to ensure the paint sprayer is in working order before proceeding to spray your project.
6. Spray Paint with Paint Gun
If painting in a confined space, it’s a good idea to wear a mask so you don’t inhale paint fumes.
Our Devilbiss cup gun has two adjustment knobs. The bottom knob can adjust the trigger to manage the amount of paint that comes out of the gun. The upper knob adjusts how big the fan width is. It can be tiny or as big as 6″. Typically if you take the width of your hand, at roughly 6″ away, you want the width of a 6″ paint brush. Therefore, 6″ out, you want a 6″ fan of spray. In the second and third pics, my husband is testing the spray on a scrap piece of board before I start painting our actual (pegboard) project.

Paint Gun Spray Technique
Start with air coming out of the gun – off the project – by lightly pressing the trigger. With the paint gun 6-12″ above the surface, ensure that it is perpendicular to the work – straight up and down, not at an angle.
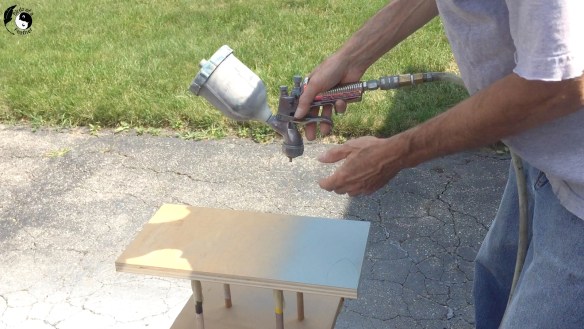
Then as you move toward the edge, fully press down the trigger to release paint. As you come off the other edge, lessen the pressure so once again only air is coming out of the paint sprayer. Then repeat in the other direction, overlapping the last pass by 50% to get even coverage.

Now we switch places so Hubs can teach me how to use a paint sprayer using this piece of pegboard.

The best way to get great paint coverage is to spray first in one direction.
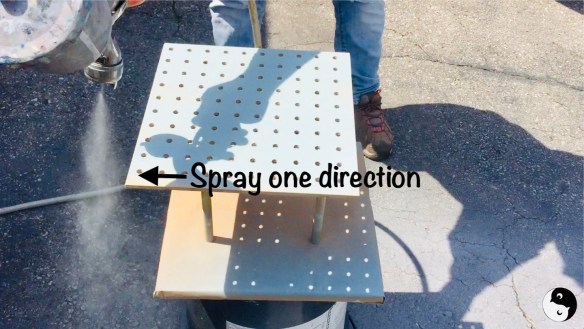
Then turn 90 degrees and paint your project again as described above.

Be sure to watch the video above too see all these principles explained and shown in real time :).
7. Clean Paint Sprayer
Once finished painting, clean the paint from the gun with plenty of fresh water.
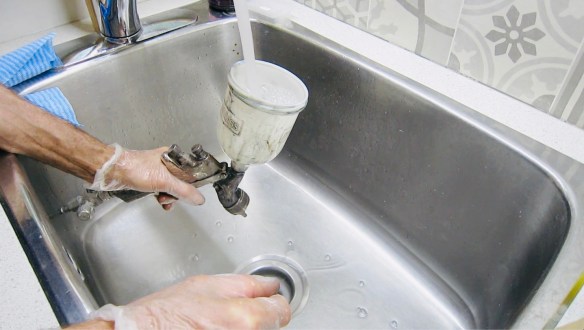
Then run some clear water through the sprayer with the air compressor attached.

We generally find that when using a high quality paint, such as PPG BreakThrough, we don’t need another coat. However, depending on the paint you use, you may want to spray another coat after it dries. Refer to your paint can for re-coat times.
Here is the scrap piece of pegboard I practiced spray painting:

Can a Beginner Use a Paint Sprayer?
If my very first paint sprayer project is any indication, a beginner can master painting with a spray gun using all the tips we shared! What I love about this jewelry pegboard display stand is that it keeps my necklaces and earrings together in the same place!

We’ll have the full tutorial for this jewelry display stand in our next post. But we hope you stay tuned because we have more unique pegboard storage projects coming up soon. You won’t believe how awesome and functional these upcoming pegboard projects are! I’m beaming with excitement to show you!
FAQs – Using a Paint Sprayer
Do I need to thin paint for a sprayer?
Like we showed in the video, if you don’t get good flow through the filter you use to strain the paint, you should thin it with some water. Always test on a scrap first before painting your actual project.
Is it Better to Use a Paint Sprayer or Roller?
A paint sprayer will give you a smooth flawless finish without brush marks or ‘orange peel’ texture you can get from a roller. A spray gun is faster than brushing or rolling paint by hand.
In the long run, paint sprayers are also economical when you consider that brushes and rollers will wear out and need replacing.
Is it Easy to Use a Paint Sprayer?
Yes, it is! To recap, just remember these key principles of spraying with a paint sprayer:
- Position the nozzle of the paint gun perpendicular to the work. If you angle the paint gun, you’ll only get a bit of paint onto the surface. Hold the gun straight up and down.
- Position the nozzle 6″-8″ above the surface of your work.
- When you lightly press the trigger, air comes out; and when you fully press the trigger, paint comes out. Practice triggering so when you spray past the edge, only air, not paint, is being released from the gun.
- Spray past the edges to prevent paint build-up.
- Overlap your passes by 50%.
- Paint at right angles to the first direction you painted.
Do You Use More Paint with a Paint Sprayer?
It depends. If you spray outside on a windy day, paint will be lost to the air. But generally, while the paint from a gun does atomize as air passes through, you can exert a lot of control by following the steps above.
Ultimately, you likely end up using less paint. Paint can soak into brushes and rollers, but leftover paint from a paint gun can be poured back and used again.
Do You Need Special Paint for a Spray Gun?
No, you don’t need special paint, however you may need to thin water based paints with water. Depending on the type of paint gun you have, you may also be able to purchase different sizes of tips for the gun that works better with certain paints and clear coats.
More Paint Sprayer Projects
This may be my first paint sprayer project but it’s not the first at Birdz of a Feather! Check out this Hudson’s Bay Point Blanket Inspired Upcycle. We show you how to get perfectly spray painted stripes! We also use a paint gun for this Singer Sewing Table Makeover, the base of this coffee table makeover and even for this milk can decor project.
Of course a spray gun is also great for spray painting on a clear finish too, like we did for this tiered plant stand DIY!
Fall Into Fabulous
One of the things I love most about blogging is connecting with other makers, and this Fall we’ve created something truly inspiring together.
Grab 16 digital goodies from top creators — planners, recipes, colouring books & more — including our Beginner Crochet e-Book!
Every dollar of our commission goes straight to Alzheimer’s research — a cause close to our hearts. Your purchase through this link means you’re not just treating yourself; you’re making a real difference.
Grab it now — the bundle is only available for a limited time! Let’s make this Fall fabulous and full of hope. 💜

Pin How to Paint Using a Spray Gun

Okay, this was definitely worth reading. It was so full of useful tips and I can’t wait to read about making a portable turntable. That’s going to be a game changer for me.
It’s a game changer for me too! I can’t believe it took me this long to learn. It’s actually really fun – and so fast! I can crank out more upcycles in no time :)!
Such great tips! Your jewelry holder turned out great too!
Karin
Thank you Karin!
Great spray paint tutorial!
Have a great week.
Hugs,
Kippi
Thanks Kippi! Hope you have a great week too :).
Love it! Great tips, too. I haven’t used a sprayer, but my husband is a big fan. They do make easy work of certain jobs for sure!
Thanks Kim! The spray gun probably the one and only tool we didn’t have duplicates of when we married – lol!
Such good information
Thanks Janet!
Super helpful! Your jewelry holder is very cute.
Thank you Marie!