

I wanted poinsettias for the winter season, and boy did I get them with this tiered plant stand DIY! Stencilled in a really cool houndstooth pattern, our planter table makes a beautiful indoor plant stand for multiple plants!
However, this raised planter can also go outdoors in the Spring! If you do use it outside, it would be best to keep this in a covered area unless you use a clear coat rated for outdoor use. An added bonus is that the whole thing rolls since it’s already on wheels!
Do it Over Designers
Today we’re taking part in the Do It Over Designers blog Hop hosted by Ann at The Apple Street Cottage.
We’re a group of bloggers who take something old and/or unused and ‘do it over’ into something new. These items can be found in closets, barns, garages, yard sales, thrift stores, you name it! In our case, it’s usually a curb side find, like the one we have for you today. Don’t forget to check out the other projects at the bottom of this post. And be sure to drop back in throughout the week to visit them all!
Before we get into the tutorial, don’t forget to get your DIY mojo on at Birdz of a Feather and subscribe! You can also follow us on Pinterest, Facebook, YouTube and Instagram.
Materials
[If you’re looking for some of the things we used, we’ve got you covered (disclosure): Clicking on the affiliate links below, means we may receive a commission from Amazon. But don’t worry, you don’t pay a cent more and it helps us make more unique DIYs to share with you! Thanks for helping to support our blog!]
- Houndstooth Stencil
- Stencil brush
- Poinsettias
- Liquid rubber (optional)
- Trofast container
- Painters tape
- Poly Coated Freezer Paper
- Vintage sewing machine base (with a rounded drip pan)
Scrap of wood Mineral spirits and black colourant - Paint (we used PPG Break-Through)
- Clear coat (we used Varathane Diamond Wood Finish – Matte)
Tiered Plant Stand DIY
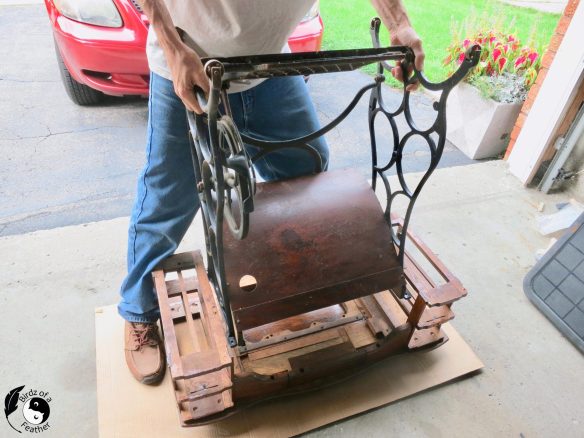
It all starts with this vintage sewing machine base. It was just about to pour rain when Hubs saved it from being tossed in a dumpster.

We put it on its back for disassembly when I saw it.

That little quarter round underbelly piqued my interest! And I knew this upcycle was going to be another two-parter just like our previous sewing machine table makeover! We set aside the top for another time.
Tiered Plant Stand DIY – the Base
To start we hose down the metal.

Then Hubs and I sand away the loose rust.

After wiping the metal clean, Hubs sprays on a few coats of Tremclad clear to seal and protect.

Tiered Plant Stand DIY – the Belly
Now we deal with the under belly. If anyone knows the real name for this part, let us know!

We tape off the edges.

I originally intend to plant right into the piece, so I’m using liquid rubber to seal the wood against water damage. It’s the same product I used to seal our guitar planter.

We also wrap the exterior with poly coated freezer paper just in case of spills. The inside is still quite dusty so we blow it out and clean it.

Liquid rubber is perfectly safe to plant in. As you’ll see later, I actually change strategies on this. But I still think it’s a good idea to protect the inside regardless.

We brush on two coats, allowing it to dry in between.

Sanding
Afterwards, I’m giving the wood a light scuff. The back is in rough shape and the sides look like they were never finished or sealed. That’s probably because the sides don’t see the light of day when it’s attached to its original counterpart.

Apply Houndstooth Stencil
We’re all about showing you how to overcome stencilling challenges! In previous posts, we showed you how to stencil on an uneven surface and how to avoid paint bleed on a grain sack stencil. We even showed you our behind the scenes paint testing to ensure success on our outdoor garden decor. Today, we have five new stencilling tips for you!
I’m crazy about this Houndstooth stencil from Funky Junk’s Old Sign Stencils! It will give me just the right amount of vintage character on this old piece!

Stencil Tips
The houndstooth stencil is available in two sizes. Choose the scale that works best for your piece. I chose the largest scale.

Tip #1: Working horizontally isn’t practical with the awkward shape of the belly, so these clamps help hold the stencil onto the vertical surface.

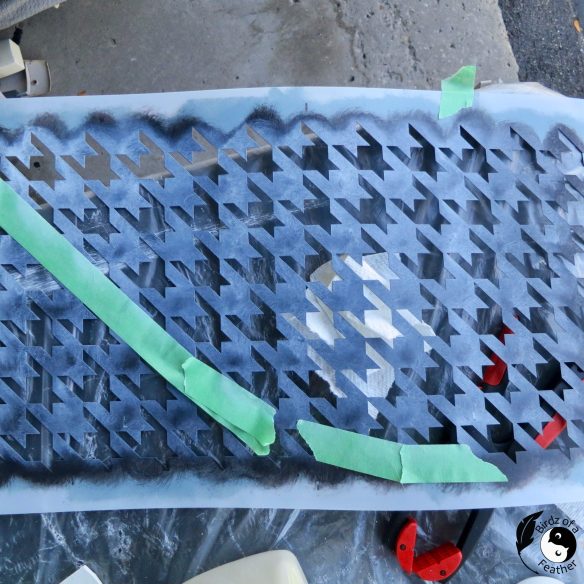
The first colour I apply is black (I’m using PPG Break-Through paint). After seeing this result, you might be saying to yourself ‘Blech, Sara! What were you thinking? This doesn’t look great‘.

But fear not! As with all our stencilled pieces, I’m trying something a little different. I’m going for a three-toned effect: black, white and wood.
Tip #2: Normally with a houndstooth stencil, you’d paint a base coat, then apply the stencil once to get a two colour pattern. However, I’m going to stencil twice. As you’ll see, by doing this, the houndstooth pattern is slightly offset and you get a cool outline of the original wood showing through that really enhances the pattern. You’ll see how that looks four pictures down. If you’re old enough to remember the commercial with Mikey, try it, you’ll like it!
Here I’m starting one of the sides to complete the black. Be sure to tape off anything you don’t want to get paint on (like the edges).

In between coats, let the stencil dry and carefully peel away the tape.
Using Glaze to Stencil
Tip #3: For the second colour, instead of painting with solid white, I’m adding some glaze to the paint making it semi-transparent. That allows some of the colour of the wood to peak through from underneath.
The Aqua glaze shown below is an old unopened bottle; I don’t think Benjamin Moore has that exact product anymore, but they still do have a glaze in their lineup of products.

After letting the black dry, I re-apply the stencil again and swirl on the white with the stencil brush. Notice how the stencil pattern below is slightly offset? That effectively leaves an outline of the wood colour all around the houndstooth that I think is stunning! I still have one more row to finish, but doesn’t it just pop now?
Tip #4: Use a paint stick to test the transparency and consistency of the paint before moving to the actual work. You’ll see that in action on the video.
Tip #5: When working with an awkward shape that has a curve, cut a piece of wood on a 45 degree angle. Then wedge it right underneath to prop it up. That will keep it from rocking and rolling as you stencil! As an alternative, you can also use shims instead.

The white paint strikes a perfect balance! In comparison, here is the other side of this piece with only the black houndstooth pattern. Even though the wood on the sides is lighter in tone than the back you saw earlier, the white just brings it all together.

Top Coat
Hubs may not agree with me, but when I topcoat vintage pieces, I just think the sheen HAS to be perfectly flat. After all the stencilling is complete, seal it with a clear finish like this matte Varathane.

Finishing Touch
This sewing table base was never meant to be a planter of course, so we cut a piece of wood to cover the gap you see below on the front. You don’t want to see the inside once you add the plants!
Although I stencilled it to match, that wasn’t the only thing we had to do to complete our tiered plant stand DIY.

Notice above how the edges around the belly are darker? The end grain always sucks up stain more and looks darker than the rest of the wood. Hubs came up with a way to stain and match it so it wouldn’t stick out like a sore thumb. And it only took us six tries :). Now it looks like it could have always been there!

Watch the video below to see how. Once complete we attached it to the front with L-brackets.
Tiered Plant Stand DIY – Video
With the front piece in place, all that’s left to do is add a plastic tray and fill it with poinsettias. The tray I’m using is this storage box from Ikea (Trofast). It’s meant to hold kid’s toys but works perfectly to catch any water runoff after watering the poinsettias. Here I’m showing it in another sewing machine table. We actually didn’t use it for that project, but it’s perfect for this one! The liquid rubber we added to the belly provides just enough friction to keep it in place!

To achieve the tiered affect, I purchased larger poinsettias for the back row (8″ pots). But I also used a little trick to get them to stand a little taller: add two plastic containers right underneath the pots.
Tiered Plant Stand DIY – Before and After
Here’s a reminder of the vintage sewing table before removing the top.

When arranging the poinsettias in the Trofast box, upcycle two empty plastic food containers. Place the poinsettias in the back row onto the containers. That will raise them higher than the rest of the plants, giving you a beautiful tiered planter effect!
Here’s how our tiered plant stand DIY looks now!

Caring for Poinsettias
Want to know on how to pick out the best poinsettias and care for your plants? Have a look at these poinsettia care tips from Laura at Garden Answer. There’s also a great segment at the end on year-round care and Laura even explains how to keep your plants all year round and get them to bloom again the following Fall!
I wish I had watched Laura’s video before buying these plants; I bought them from a big box store and, as Laura warned, they were right by the draughty doors. Because we have very few windows in our house, we also have no choice but to display them by a heat register. It will be interesting to see if these poinsettias last in our home. Fingers crossed!

The one good thing we have going for us is that they are beside / in front of south and east facing windows respectively. Poinsettias originate in Mexico and will appreciate the natural light these two exposures provide.

On another note, isn’t this houndstooth pattern a beautiful foil for the colours of these poinsettias? We couldn’t be happier with our Christmas plant decor!

The smaller ones looked like they were struggling a bit, so I moved the tiered plant stand DIY to the south facing window in our kitchen where they’ll get even better southerly light.

The smaller poinsettias are now on the treadle where they have more space to themselves.

Click here for more unique stencil ideas.
Want more holiday inspiration? Check out these 31 Christmas Craft Ideas for Adults!
Pin for Later
Pinning is always welcome and appreciated!

We’ve got lots of interesting upcycle projects on how to stencil! Or check out these amazing upcycled planters for ALL our planter ideas!
Do it Over Designers

Visit these other talented bloggers for more do-it-over goodness!
- The Apple Street Cottage
- Exquisitely Unremarkable
- Unique Creations by Anita
- Little Vintage Cottage
- Southern Sunflowers
- Modern on Monticello
- Purple Hues & Me
- Doodlebuddies
- Pandora’s Box
- Our Hopeful Home

WOW factor! Thanks for sharing!
Thanks Rhonda – and thanks for dropping in !:)
This is a beautiful makeover! I’m always amazed at the things people want to throw away. Don’t worry, your poinsettias will last – just keep them watered.
Thanks Ann; I hope my green thumb kicks in! I’ve been checking them every day; I think they’re supposed to dry completely before watering again?
I’ve been eyeing out Donna’s hound’s tooth stencil for such a long time and you’ve done such an amazing job showcasing it on this extraordinary planter idea Sara. We have poinsettias growing wild and busy in our garden, but they hate being inside our house. I think it’s a bit too dark for them.
Wow; how lucky are you that they grow native in your country!
Darkness is exactly what I’m worried about too Michelle! Our little house is on the dark side and has so few windows. I did move them to the kitchen. But it’s not ideal to have them by a heat register or draughty window. I really love them and hope they last.
We really are so lucky with our weather here <3
I love those old sewing machines. My grandparents had one and my cousin has it now. I will send this to her as an idea. Love the project. Thanks for sharing and wonderful crafting with you.
Thanks so much Chas! The ironic thing is that my husband had been teaching himself how to restore old sewing machines and they are just exquisite. I’ll likely be restoring tables to display them now – lol! There’s nothing better than those old machines; the quality is so superior to what’s on the market today!
What a creative imagination to turn a vintage sewing machine into a planter! How cool and fabulous does this look!
Thanks so much Gail! We’re getting quite the reputation for our DIY planters – lol!
Beautiful makeover! I have my great-grandmother’s old sewing cabinet and treasure it so much.
Thank you Donna! Is the machine still with it? We have a new found interest in the machines now too; Hubs has been learning to restore them as a hobby since lock down 🙂
That is truly outstanding Sara! You guys need your own DIY show.
Thanks so much for that lovely compliment Kim! DIY sure is a fun distraction, isn’t it?
Your plant stand is gorgeous! And so are the pointsettias! I’ve seen many sewing machine upcycles but I think this one is the best. xo Kathleen
Thanks Kathleen – you might change your mind when you see this one: http://birdzofafeather.ca/diy/hudsons-bay-point-blanket-inspired-upcycle-ikea-hack/
What a brilliant makeover Sara, I have seen many of these but never one as a planter, it looks awesome. I also love the stencil you chose it really does suit this project. And lastly thanks for the tip using liquid rubber. I always varnish and it does work but for permanently.
Thanks Anita!
Oh wow !! That’s a fantastic transformation ! Would’ave never guessed what it was going to look like.
Naush
Thanks Naush! I didn’t really know myself what it would look like until it was done – lol!
What a great upcycle idea for turning it into a planter! I absolutely love the stencil pattern and it makes the wood look carved at first glance. Pinned.
Thanks Allyson!
This is just unbelievably fantastic!! My granny had one of these and I love how you saw the potential to repurpose!
Thanks so much Janet! I just love these old tables; I’m working on another one right now that I can’t wait to share 🙂
Wow! This is one of the most creative upcycles that we have seen in a long time! We love vintage sewing machines!
We love them too; Hubs actually restores the machines and I love to upcycle the tables 🙂
My mother gave mea sewing machine like this years ago, what a great idea! Looks so pretty now.
Thanks Maria! Do you sew with it? Those vintage machines are ‘sew’ awesome!
I just love your attention to detail and how you updated and secured the sewing machine casing. The hounds tooth stencil is a perfect addition for texture and visual interest. The poinsettias highlight your beautiful piece. Very impressive, my friend.
Thanks so much Meegan; it’s the first year I’ve had poinsettias and I’m loving them.
Sara, I have never seen such a beautiful makeover of an antique sewing machine. It is something I would love to have in my house 💙
Thanks so much Deana!
Sara,
What a creative idea and it turned out so well!
Thank you Libbie!
Very cool makeover and lovin that stencil choice!
Thanks Kim! It’s my new favourite stencil… but that will change again – lol!
Wood oil, drip pan belly…is what it is called.
Awesome! Thanks so much for letting me know Mary! I’ve been wondering about that for ages 🙂
Sara, you two did such a beautiful job on this sewing table upcycle. Love the stencil choice too! Great idea turning it into a planter stand.
Thanks so much Marie! I’ll turn anything into a planter – lol!
Wow! The stenciled pattern came together so well. This is perfect for poinsettias or other plants. You’ve got amazing vision to see this project from the original sewing machine. Thanks for sharing! I’m visiting today from the Party in Your PJs linkup. Have a great day Sara!
Awesome Marielle! Thanks for taking the time to drop by and leaving a comment . Have a great day too !:)
Congratulations Sara. Your Tiered plant stand is one of our features for this week.
Naush
That’s wonderful news Naush; thank you so much for the feature!!
This turned out so beautiful! I love old sewing machine tables.
Thanks Janet – we have an abundance of those old sewing tables now (Hubs is learning how to restore old sewing machines). I’m sure there are plenty more makeovers to come lol
Great idea! I love those old sewing machines and finding a way to use them warms my heart.
Merry Christmas,
Kippi
You and me both Kippi! I just hate to see anything going to landfill; there are so many possibilities with these things 🙂
Oh wow! I love this so much! My Late mother had a Singer very much like this one. Now, I wish I still had it so I could do something like this. Love your do-over tiered plant stand!
Thanks so much Jayne! Perhaps you’ll stumble on another one day; this was literally about to be chucked in a dumpster!
This was a great makeover! I love this idea! thanks for sharing!
Thank you Kimberly!
WOW this is such a great idea! I have my grandmothers sewing machine, it’s about 75 years old!
Thanks Kristin! Hope you’re still sewing with it; those old machine are the best compared to the junk made these days. They were built to last!
My mom had a sewing machine like this that she used as a bedside table. It belonged to her grandmother, but was lost in a move. Love how you repurposed it.
Thanks Marie! One day we’ll restore the rest of the table and hopefully my husband can get the machine working too :). But for now we can sill enjoy it like this.