When we found this vintage Singer sewing table at a local thrift shop (missing the treadle and band wheel), I couldn’t resist the challenge to repair the veneer and breathe new life into it! I had two very distinct visions for it – so we’ve upcycled it twice! We’ll have one reveal for you today and another – more unique one – next time.

Vintage Singer Sewing Table
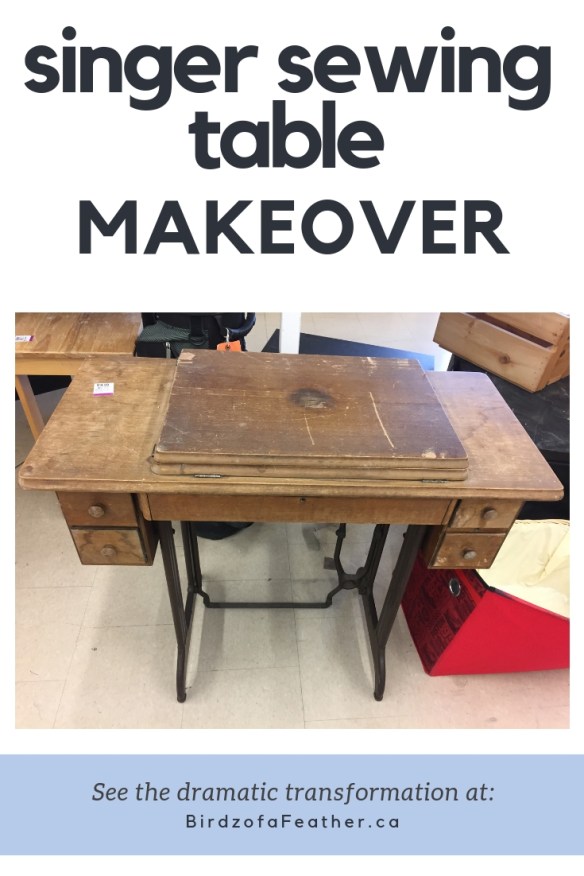
These vintage singer sewing tables are getting harder to find. My guess is that this is a mid century singer sewing table because of the clean simple lines of the base and table top. Because it isn’t fancy, perhaps it was even for industrial use vs. home use. Nonetheless, water damage and age were not kind to the table, but the metal base was in perfect shape: not a spec of rust!

The finish is practically non existent on the outside, but under the lid reveals a darker stain.

With a light press on the bottom edge of the middle drawer, it swivels open to reveal three compartments.

As I was exploring how everything opens, Hubs was preparing to blow off years of dust with an air gun and compressor.

Once everything was relatively clean, we brought the drawers inside.

Singer Sewing Table Base
Then Hubs taped it up and turned the table upside down….

…so he could remove the legs and blow them off too.

We carried the legs and table down to my craft studio in the basement as-is so I could methodically take the rest of the table apart and document it with pictures.

The legs didn’t stay in my studio for long; once I decided on the paint colour, they were back outside to be painted with a metal paint. As you’ll see later, we didn’t tape off the Singer name, but in retrospect I wish we had. In the finished product you can still see it, but it’s very subtle.

Document Singer Sewing Table with Pictures
As I disassembled the singer sewing table down to the sum of its parts, I placed all the hardware into labeled ziplocks so we wouldn’t lose any pieces.

I took a lot of pictures so we could reverse engineer it back together again once it was painted.

We used a variety of screw drivers to get everything apart, but they all have something in common: a ratcheting feature and magnetic end. These features prevent wrist fatigue and hold onto the screws so they can’t accidentally fall and roll away.

The long screwdriver shown above is essential for taking off the drawer surround. It’s perfect for those difficult, hard to reach areas.

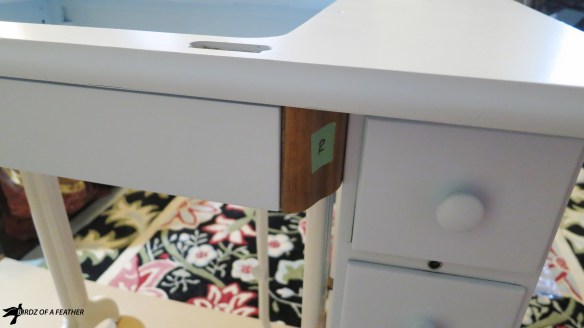
When there’s two similar pieces, mark each with a piece of green tape and mark them left (L) and right (R) respectively. Here are the drawer surrounds separated from the table and marked:

I always find the specialty hardware facinating. The one below is what allows the middle drawer to swing out.

The swing drawer at some point had a key to lock it – long since gone.

Murphy’s Law of Furniture
Here is my own personal Murphy’s Law of furniture disassembly. Whenever I get down to the last piece, there’s always ONE screw that I absolutely can’t budge on my own. It’s like furniture builders of yore turn that one screw extra tight so they can look down and laugh at me contorting myself to will it out of the hole. I always have to call Hubs to use this brute strength to remove that stubborn screw! What would I ever do without him?

Once everything was apart we took one last picture and put the hardware away for safe keeping.

Singer Sewing Table Veneer Repair
At this point, we repaired the loose and missing veneer before priming with paint. As you’ll see in the video (at the end of this post), we re-glued and clamped this corner.

With the intention of painting the table, after a light sanding (remember how thin the veneer is!) we prepared the drawers, then tested a few different quality primers.
Protect Drawers From Paint Overspray
* [If you’re looking for some of the things we used, we’ve got you covered (disclosure): Clicking on the affiliate links below means we may receive a commission. But don’t worry, you don’t pay a cent more and it helps us make more unique DIYs to share with you! Thanks for helping to support our blog!]
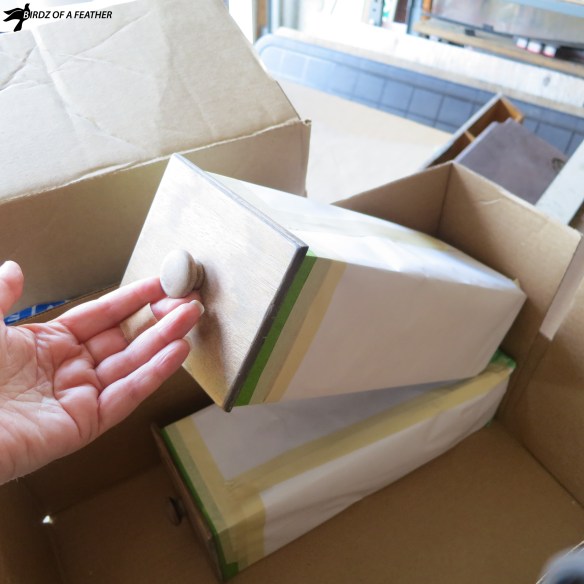
Protecting the drawers from overspray is a two step process: sealing the edges with FrogTape and then wrapping the drawer with Poly-coated paper.
Apply FrogTape to the inside where you don’t want paint to bleed and burnish it down well. FrogTape is edge-treated with a patented adhesive and it’s our preferred tape because it works without fail to provide crips lines without bleed-through. Just remember to put it back into container it comes in to make it last.

Once the FrogTape is applied, you can use cheaper masking tape along the edge as a surface to attach the poly-coated paper. Poly-coated paper is essentially like a freezer paper and is impervious to the moisture in the paint. Together, they protect the interior of the drawer from paint overspray.

With another piece of masking tape on the edge, wrap the poly-coated around the inside of the drawer where you don’t want paint spray to reach.

Wrapped and ready for primer and paint!

Prime and Paint Prep for Singer Sewing Table
We placed two primer samples on the back of one of the pieces:

The primer on the left is Fresh Start from Benjamin Moore (K046). On the right is a product appropriately called INSL-X Stix. Both primers have excellent adhesion under normal circumstances and looked great in the test samples. I don’t honestly recall which one Hubs ended up spraying the pieces with, but we got a lot a weird colour bleed right through the primer (sorry there’s no pictures). Even when you go to the trouble of testing in an inconspicuous spot, you just never know how a primer is going to react on the rest of the piece!
Take our advice: buy a primer that’s specifically made to prevent water, rust and smoke stains, as well as wood tannins, from bleeding through your new paint job. Nothing is more frustrating than having to prime again when all you want to do is get to the finish line!
Hubs changed gears and went out to purchase a different product – still in the INSL-X family called Seal Lock Plus. Seal Lock Plus is an alchohol based product that is phenomenal at blocking stains. It’s an alternative to shellac and dries in 15 minutes. Hubs sprayed everything with the Seal Lock Plus primer again (except the few pieces we kept natural wood, which you’ll see later). To our relief, it did the trick and once dry he sprayed on the top coat.
Clean Hardware
As Hubs was taking care of painting outside on our driveway, I cleaned up the hardware. I didn’t want to affect the patina at all – just clean off years of grime. The bottom hinge is cleaned; it’s just enough of a difference to shine it up a bit.

I used Method All Purpose Cleaner because it doesn’t require rinsing. If you have a tried and true method of cleaning metal, let us know in the comments!

Seal Raw Wood
I don’t know the proper name of the piece you see below so I’ll call it the under belly. As I mentioned, I wanted to keep some of the natural wood so I applied Hemp Oil to protect it.

You can use a brush or wipe it on with a cotton rag as shown. Apply hemp oil generously. Let the wood tell you if it needs more. If it soaks in and still looks dry, apply more. You can’t really over apply it; just make sure to wipe away the excess within 12 hours. I wiped off the excess with a clean, dry cloth.

As you’ll see in the reveal, Hubs sprayed the metal stand with an off white metal paint that he custom mixed. For the rest of the wood he use a paint by PPG called Break-Through. He sprayed a few light coats of a colour called Siesta Key blue; I just love the combination of cream and blue!
Get Organized
Work close to the area where you plan on putting your finished piece. We worked on the floor on top of a piece of cardboard to re-assemble the piece. I transferred all our pictures onto an iPad so we could see exactly how everything should go back together.

This is where you’ll be happy you took lots of pictures and marked the hardware! Without the pictures to guide us, we would have been stumped about which hardware goes where!

As you can see, the hardware doesn’t look shiny and new. It’s clean and maintains the original patina. Just the way we like it!

Reassemble
The escutcheons were a bit difficult to put back because of the paint overspray in the holes. Hubs solution was to press it in as far as possible, then use a clamp to drive it in the rest of the way. Just by tightening the clamp, he was able to get them snuggly back in place. You can protect the metal if you like, but we didn’t bother.

We didn’t paint the end caps on either side of the swing drawer. I’d like to say we did that on purpose, but honestly they went into a Ziploc with the rest of the hardware and we forgot to paint them. It’s one of those ‘happy accidents’ that worked out better than planned!

One side goes on first before the drawer and then the other side gets screwed in place to secure the swing mechanism.

Hemp Oil to the Rescue
After that, the underbelly went back on. Look how drab it looked originally before the hemp oil and paint.

Here’s the underbelly going back on. It slips in place via dowel and should sit underneath a metal catch (which we put on prematurely and had to undo to get it properly back in place later).
Doesn’t the wood look so rich and lustrous now? This was my first time using hemp oil; it really brings out the depth of the wood and grain nicely!

These L-brackets attach the middle section onto the table top.

Then we were able to screw the metal stand back on.
When you attach the drawers, double check to make sure the pieces are facing the right direction. In all our excitement, we screwed it on backwards!

Hubs only realized his mistake as we were starting to screw on the second one. He unscrewed them and turned them around 🙂

The last piece on the underside to attach were these brackets to hold the metal legs in pace. They secure every together.

We stood the table up and fixed the metal tab holding the underbelly. Although hemp oil is the finish on the outside, we painted the inside blue to match the rest.

We unwrapped the paper on the drawers. As you saw earlier, Hubs’ secret trick to preventing paint seepage into the drawers is to use FrogTape to seal around the inside perimeter before applying a poly-coated paper.

Peel the frog tape back on a 45 degree angle to reveal a crisp paint-free edge!

Remove any green tape from pieces that still have the R & L tags:

I’m ready for my closeup, Mr. Demille!
I think the touches of wood we left as-is are interesting! I like having a few small references to remember how the vintage table used to look!

The end caps were the one thing on the table still in perfect condition; we didn’t have to refurbish them at all.

I haven’t sealed the inside of the drawers yet; I’ll either use hemp oil again or I hear Wise Owl furniture salve is great for this application too!

A Second Life!
So what do you think of the old singer sewing table now? I’m sure that many a person passed up this old table at the thrift store. They might do a double take if they could see the transformation! It’s come a long way, baby (baby blue, to be exact)!
After reattaching the lids, I’m displaying a grouping of succulents on top:

You don’t even necessarily have to replace the double lids again. If you prefer, one lid is perfectly fine to cover up the gap where the sewing machine used to be. This configuration would be well suited for a laptop station.

The Video
Watch the transformation in the quick video!
With the extent of veneer work that was necessary to repair this piece, even I wasn’t sure it would look this good again!

If you enjoyed this post, please pin!


As great as it looks now, wait ’til you see what else we’ve done with this vintage singer sewing table! We took it one step further and I think you’ll get a kick out of the wow factor (and functionality).
This waterfall dresser (in progress below) is another furniture project that’s getting the Birdz of a Feather touch:

Get your DIY mojo on and subscribe! Follow us here on Birdz of a Feather! You can also follow us on Pinterest, Facebook, YouTube and Instagram.


What an amazing undertaking! This looks terrific.
Can you tell me what brand/color the “icicle blue” paint is that you used? Thank you!
Hi Nikki – I just checked and realized that I got the name wrong. It’s actually Siesta Key Blue Paint Color – 70BG 67/126 by Glidden. However we only used the colour and had it made in PPG Breakthrough paint for durability.
Lovely. The blue drawers and white legs look fresh.
Thanks Caroline!
Good idea and good job.
I have the exact same cabinet but the sewing machine is still working
It’s so ironic you have the same one! Unfortunately ours was missing the machine and some parts. Any idea how old yours is?
Amazing job! You should be proud
Thanks Maria; so sweet of you to say! I actually am really proud; it was quite a challenge and given what we started with, the outcome really exceeded my expectations 🙂
Love the new colors! Yall did an amazing job on it.
Thanks Linda! We don’t usually use such subtle colours on furniture so it’s a refreshing change!
Thanks so much Linda! It’s such a nice change from cracked veneer 😉.
Your cabinet turned out beautiful. I just bought this same cabinet with the machine working at an estate sale today for $40.00. I am so excited to get it cleaned up and the cabinet redone so I can start quilting on it. You have inspired me, I hope mine turns out half as beautiful as yours. Thank you so much for the great tutorial.
Thanks Angie! You got a steal on the sewing machine. I’m so glad the tutorial was helpful. Happy sewing!
Hola, saludos desde México, estaba buscando un tutorial para reparar el mueble de la máquina de coser, singer de hace 60 años, quiero hacer un escritorio, la mayor parte del mueble funciona. Gracias por la idea.
Genial – encantada de ser de ayuda!
Gracias excelente trabajo, me inspire para restaurar mi máquina de coser, haré un escritorio; necesitaba saber como comenzar, y me inspiro tu trabajo. gracias saludos desde México
Eso es genial, ¡buena suerte con tu proyecto!