

A couple of weeks ago I casually mentioned to my husband that I want to learn how to hand paint furniture designs. Specifically, something artistic – not just slapping on paint colour. He raised an eyebrow and said ‘but you’re not artistic’.
I think EVERYONE has it in them to be artistic. Like anything, it just takes practice. Once you get into the groove of expressing your creativity, anything is possible. Like when I get an idea to upcycle and reimagine a cast-off into something unique that’s never before seen on Pinterest. Or how about this acrylic pour painting (my first time painting on canvas)?
Here’s a closeup of my first try at how to hand paint furniture designs!

I’ve been watching Dixie Belle‘s brand ambassadors’ videos and am inspired to try something artistic too! They make it look so fun. So I set off to explore my artistic side. Stick around to the end and let me know if I pulled it off.
By the way, I’m collaborating with Rachel from Tea and Forget-me-nots on tables this month. You can check her half moon table makeover too!
Creative Craft Hop
It’s also time for another Creative Craft blog hop! Speaking of artistic, if you are visiting from Jenna at The Painted Apron, welcome! At the very bottom of this post, I’ll be directing you to the next stop on this venture. But don’t forget to check out the other stops too because you’ll find plenty more craft ideas. Be sure to drop back in throughout the week to visit them all!

Watch This Video!
If you’re a visual learner, watch this video to see how easy it is to hand paint a furniture design! Or continue to the tutorial below.
Before we get into the tutorial, don’t forget to get your craft mojo on at Birdz of a Feather and subscribe to our newsletter:
You can also follow us on Pinterest, Facebook, YouTube and Instagram.
How to Hand Paint Furniture Tip
I suggest when hand painting furniture the first time to start with something small. Then work your way up to the Sistine Chapel :). So the first culprit to try my hand at painting furniture is an old sewing cabinet. We have a million of them hanging around the garage, basement… just about every room in the house. Thanks to Hubs’ sewing restoration hobby, any one of them is fair game.
Supplies for How to Hand Paint Furniture Designs
Below are affiliate links to products we use and love. If you click on a link and make a purchase, we may receive a small commission at no extra cost to you. Purchasing products using these links allows us to continue bringing you free tutorials and product knowledge. Thank you for your support! ♥️
Purchase supplies here, at a retailer, or the links below 👇🏻👇🏻:
- Terra Clay Paint:
- Saral transfer paper (choose a colour that will show on your background)
- Silk All in one Mineral Paint – Nautical
- Artists Brushes
- Continuous Spray Mister
- Foam Brush
- Mini Angle Brush
Furniture Prep
To start, I remove the door because that’s where my hand painting is going to be. Clean the piece well with a TSP product like White Lightening. Or for an environmentally friendly cleaner, mix one part white vinegar to two parts warm water with a drop of dish soap. With either cleaner, be sure to rinse well with plain water to remove residue.
This sewing cabinet is mahogany with a shellac finish. In fact, I know from experience that the tannins in mahogany easily bleed through light colour paint. You have to prime with something that prevents bleed through (like BOSS).

Bleed through is the bane of my existence. As an example, this painted sewing box looked beautiful after stencilling the inside lids with a light colour paint.

However, it wasn’t until AFTER I top coated it that it bled terribly. Ugh!

I’m not as worried about bleed through on this piece because I’m working with dark colours, which isn’t as noticeable. However, it’s still something to keep in mind – and I have another tool in my arsenal to help block stains.
Hand Paint Furniture – the Base Coat
Although I’m using the new line of Terra Clay Paint, underneath that I’m using Silk All-in-One Mineral Paint as a base coat! Silk has a built in primer and top coat. Notwithstanding bleed through discussed above, the main reason I’m using Silk (for the first time) is because Terra reactivates with water. So if I happen to distress back to previous layers, there’s always a danger that I’ll go right back to wood. I don’t want wood showing through my underwater scene, so Silk is ideal as a base. If I do reactivate previous layers, I’ll just see the colour Nautical showing through instead!

Base Layer
On top of the Silk, I’m adding a blend of colours of Terra Clay Paint for the water background.
If you saw this YouTube short tip on how to paint small pieces, you’ll recognize these life sized ‘paint chips’. Just as I hoped, there are a quick reference to help me pick the right colours. For the water, I’m using Blue Moon (in my right hand). But I’ll create an ombre effect by darkening it with Onyx (in my left hand) and then also lightening it with Moon Beam (lower right corner).

Water Layer
I let the Silk dry 2 hours. First I blend Blue Moon and Onyx and paint the top third of the door. Then I use Blue Moon in the centre. For the last third, blend in some white.
I use automotive applicators to grab my paint out of the container because they don’t absorb paint like brushes.
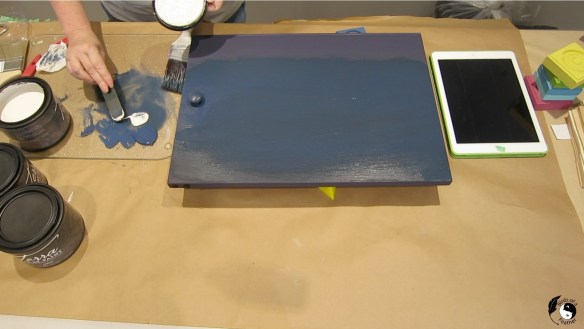
I’m mixing the paint right on a glass cutting board. It acts as a palette (by turning it upside down on the smooth side).

I keep a continuous mister bottle filled with distilled water to help blend and dilute the paint on the paint palette. Add a slight bit of water on your brush to blend the three colours together.

You can see the original Blue Moon below against the three shades mixed to produce a gradient effect from dark to light.

While you set aside the door to dry, the excess paint just wipes right off the glass pallet.

Use Saral to Transfer Drawing
Now I’m ready to transfer my drawing. I found the inspiration for this pond scene on Pinterest. But I redrew it and scaled it to fit the front door of the sewing cabinet. To transfer the drawing, I’m using Saral tracing paper. Saral is wax free and won’t leave a trace on your finished artwork!

Put it underneath your drawing.

Then simply trace with a pencil. Saral comes in different colours; here’s I’m using white which shows up perfectly against the dark blue.

Brushes for Hand Painting
I’m using Dixie Belle’s artist brush set (plus a few that Hubs’ uses for his touch up work). I highly recommend the set; it has an angle, 2 flats and a round brush. If I continue painting, I’ll likely want to add a fan brush, filbert and several different sizes of round brushes.
How to Paint a Koi Fish Pond
Terra Clay Paint Colours

The colours I used to paint this pond scene are (in order):
- Silk All in one Mineral Paint – Nautical
- Blue Moon
- Onyx – background, koi, lilly pads
- Moon Beam – koi
- Marigold – koi and flower centre
- Prairie Dawn – water lillies
- Pistachio (mixed with onyx – and on its own) – lilly pads
- Bougainvillea (mixed with Moon Beam) – petal tips
- Daffodil – flower stamens
- Burnt orange – mix of Bougainvillea and Daffodil
How to Hand Paint Furniture Designs
1. Paint Moonbeam on koi. Start with fins. After letting Terra Clay Paint dry for a bit, come back with some water on the brush and ‘rub away’ areas of white so the blue background shows through.

Use Terra’s ability to wet distress to your advantage! Blending and brushing back with water will make the fins look transparent in places.

By the way, as an aside, don’t discount the use of a Lazy Susan when you’re hand painting a design! I started without one and then put it underneath the door. And can I tell you how handy dandy that was?! As you see below, I can easily rotate my work to paint at the perfect angle for the last fin.

2. Now fill in the body of the koi with Marigold.

At this point, it’s very much like paint by number – just filling in the spaces.
Your hand painted picture will look flat until you start to layer paint to build depth. Don’t worry, that will come later!

Also stipple Marigold in the centre of the waterlilies allowing some of the background to show through for depth.

3. Use Prairie Dawn to paint the water lily petals. Doesn’t it have a pretty luminous glow?! Paint Tip: leave a thin unpainted line between each petal so you can easily see the shapes to apply further layers.

4. Mix Pistachio and a tiny bit of Onyx to darken. Paint waterlilies. Again, leave a fine line to delineate sections of the lily pad. For ease, I upcycle plastic lids to mix the paint. Furthermore the white lid gives me a good indication of the colour mix before I paint.

Again, leave any lines you want to see later unpainted.
5. Using Onyx, paint markings on the koi body, eyes, and shade the edges of the water lillies.

Don’t worry if the Onyx is too dark in places, like the lily pads. Regardless, you can easily layer paint over to soften it later (which I end up doing in the end).

6. Add highlights with Moon Beam, in the form of star shapes, on the water lillies. Also outline around each one.

7. Mix a tiny bit of Bougainvillea with Moonbeam. I water this down quite a lot so it’s almost translucent. Paint the outer petals of the water lillies, leaving the centre free of paint.

8. Then switch to a smaller brush. Because Daffodil is more transparent than other colours, I find that adding Moonbeam will make it more solid so it stands out. Using this mix, paint the centre of each flower with upward strokes to create stamens. Be sure to let some of the Marigold underneath show through. This is how you build depth by layering.

9. Shade the koi. Create a burnt orange by mixing equal parts of Bougainvillea and Marigold. Stipple on.

Then dampen the brush and blend into the first layer of Marigold, making sure to still let it show through in some places.
At this point, it’s a good idea to let it dry overnight and come back to it with fresh eyes in the morning. If you want to touch up, go ahead and finesse any areas you want to improve. For instance, I feel the black highlighting on the water lillies is too dark in places (or not dark enough like the lower left one).

So I mixed Pistachio with a tiny bit of Onyx and a lot of water. Then I went over the areas to blend. Water will reactivate Terra Clay Paint making it ideal to play with the paint until you’re absolutely happy with it.

Now, all that’s left is to lock in your hard work!
Seal Your Work
Because Terra Clay paint reactivates with water, it must be sealed. Top coat with Terra Wax or Terra Seal Matte. However, as of now, both these products are unavailable online. So I use a matte clear coat from the chalk mineral paint line. It’s ok to brush on a water based finish as long as you don’t overwork it (remember Terra reactivates with water). Because of that, I spray the sealer instead, just to be safe.
Paint Table with Silk Mineral Paint
Since Silk is a self-levelling paint, I could have easily hand brushed the cabinet. But again, we decide to spray it. Because we get a welcome break from the sweltering heat, we have to take advantage of it, don’t we?!

The great thing about Silk is that is has a built in primer and top coat. All you have to do is clean your piece and give it a scuff sand!

To get around the leg turnings we use a red Scotch Brite pad. It just dulls the shine enough for paint to stick. And it’s flexible to get into all those details.

Of course, after removing the sanding dust you’ll have to mask areas you don’t want overspray.

Silk happens to be a line of paint that you DON’T use water with. However, the exception is spraying. I add about half an ounce to half the paint to try it out on the top first (so use a full ounce for a 16 oz. jar).

We rarely skip straining the paint but, since this is a new jar, we throw caution to the wind and pour it straight into the sprayer. See our guide on how to paint using a spray gun: you might want to learn the proper steps to take :).

This is the top after the first coat. For the best durability, spray two coats of silk. But wait at least two hours before respraying.

We came back out to spray after dinner and then let it dry in the garage overnight.

In addition to spraying the clear coat on the door, it’s probably a good idea to also seal the Nautical – especially since we watered it down to spray it. Or at least seal the top, which gets more wear, for extra durability.
How to Paint Furniture Designs
Reveal
So this is how it looks now. Hubs really likes the hand painting, however I totally forgot he has an aversion to fish! But he better get used to it because we’re keeping this one!

Terra Clay Paint is a true artisan paint; if you’re curious to try it for yourself, start with these beginner paint projects first:
- What is Terra Clay Paint? (Tiki Wall Decor)
- Wall Planter DIY (Sconce Upcycle)
Our First Book!
Before you go, if you love to gift handmade items (or fun books), check out our very first Christmas pattern collection! And in breaking news, it’s available on Amazon as a Kindle eBook and in hard copy format too for those who want to gift a printed book (in limited markets)!
100% of proceeds go to our Crochet for a Cure fundraiser (more about that story here).

Order Crochet Phone Covers for a crochet lover on your Christmas list!
Fall Into Fabulous
One of the things I love most about blogging is connecting with other makers , and this Fall we’ve created something truly inspiring together.
Grab 16 digital goodies from top creators — planners, recipes, colouring books & more — including our Beginner Crochet e-Book!
Every dollar of our commission goes straight to Alzheimer’s research — a cause close to our hearts. Your purchase through this link means you’re not just treating yourself; you’re making a real difference.
Grab it now — the bundle is only available for a limited time! Let’s make this Fall fabulous and full of hope. 💜

Pin How to Hand Paint Furniture Designs
Pinning is always welcome and appreciated.

Creative Craft Hop
Now that you’ve seen how to hand paint furniture designs, it’s time to check out this Fall Wooden Bead Garland from Tammy at Patina and Paint. When you’re done, please remember to visit these other amazing talents below:
- Gourd-geous Fall Doormat
- Dollar Tree Fall Pom Pom Wreath
- The ‘Not Yet, Fall’ Pumpkin
- Fall Garland with Dollar Tree Items
- DIY Framed Pressed Leaf Art
- Spooky Fun Halloween Decoration
- How to Hand Paint Furniture Designs (that’s us!)
- Fall Wooden Bead Garland
- Clay and Raffia Bowl Oopsies
How to Hand Paint Furniture FAQs
How do you prepare wooden furniture for painting?
- Remove hardware
- Clean furniture with a cloth dampened with TSP or combination of water, vinegar and dish soap. Rinse with fresh water and dry well. For both applications, only dampen the cloth, don’t soak it.
- Scuff sand with fine sandpaper or Scoth Brite pad to remove gloss. Remove all dust with a silicone free tack cloth. Silicone will repel paint!
- Apply stain blocking primer (if necessary)
- Paint with chalk paint, clay paint or all-in-one mineral paint
Do I need to sand furniture before painting?
Yes, you should scuff sand a piece with fine grit sandpaper to remove gloss to allow the paint to adhere to the surface. However, there’s another alternative below.
How do you paint over wood without sanding?
As an alternative, instead of sanding, use a primer that bonds to slick, shiny surfaces, like Slick Stick.
What should I prime furniture with before painting?
- Use two coats of a stain block, like BOSS or shellac based primer, if the wood has tannins that will bleed through paint (like oak, mahogany etc).
- Or, if using a paint/primer product like Silk All-in-one mineral paint, apply two coats.
Can you paint without knowing how to draw?
- Yes! Look for inspiration on Pinterest. If you can’t draw, you can resize and trace your design onto any furniture surface with Saral transfer paper. Just be sure that you’re not infringing on any copyrights and your painting is for personal use only.
- Watch a variety of videos from experienced painters, like
- Think of the objects you are painting as shapes and layers of colour. Start with the colour furthest away and work your way forward to create depth and dimension.
- As with anything, practice makes perfect. Get a good variety of brushes to help you ‘shape’ the various colours as you fill in the areas with paint.
Is it better to spray paint or hand paint wood?
- Both are equally good if you have the right paint. Some paints, like Chalk Mineral Paint and Silk All-in-one Mineral paint self level. So you can get a professional looking finish by hand painting.
- Spray painting is faster but there’s a bit of a learning curve and also more prep and cleanup involved. In addition, it should be done outside in favourable conditions (not too hot, not too windy). The paints mentioned above are low VOC, so you can paint indoors under ideal conditions!
- Hand painting, if desired, allows you to add texture – like when you use Terra Clay Paint. Clay paint adds interest and can also disguise minor dings on the wood you don’t want to fix.
Is it better to roll or brush furniture?
One isn’t necessarily better than the other. A smooth lint free roller is a quick way to apply primer and topcoat for painting furniture. If you choose a good roller, you will also get a smooth surface if that’s what you’re going for. However, a roller does absorb and use up a lot more paint. Alternatively, hand brushing can add a lot of character, especially if you hand paint a furniture design. Hand painting is a lot more versatile as far a paint finishes are concerned (i.e shading). Brushing is also a lot easier to get into tricky areas like detail moulding.
Should I put a topcoat on painted furniture?
Yes, if your paint doesn’t have a built in top coat you should always protect your beautiful work by adding a clear coat for durability. Some topcoats, such as Gator Hide, are waterproof and extra durable so can protect your furniture outdoors too! You can also protect with wax as a topcoat, which is a beautiful way to preserve clay-based paints like Terra Clay Paint!
How do you paint a table without brush marks?
Opt for a well made synthetic brush or smooth lint free roller. If using chalk paint or clay paint, you can add water to your brush and that will help minimize brush strokes too. Lastly, use a paint that has self levelling properties.
WOW Sara, this painting is amazing. I never used transfer paper but will keep that in mind the next time I do a painting project. The table looks so darn cute, love how you shade and highlight. Perfect!
Thank you Terrie! I’ve got the painting bug now and want to try another piece.
You NAILED IT, Sara! I can’t believe your hubby said you are not artistic. Oh yes you are! I love the design you created, too! Your table looks fantastic!
Thanks Gail! He works with ‘real’ artists where he works so his definition of what’s artistic is pretty defined lol.
Great job Sara! I’ve been painting since I could hold a paint brush as my mom was an artist. You did such a good job first time or 100th time. Love this!
Thanks for that lovely compliment Tammy. That means a lot coming from you as you’ve been an inspiration too 🙂
For someone who claims not to be an artist – well done!
Thanks so much Marie :). Gotta try this again!
Wow, Sara–this is gorgeous! I appreciate your step-by-step tutorial and the results are beautiful! Thanks again for hosting! Cecilia @My Thrift Store Addiction
Thanks so much Cecilia!
I think your husband is eating his words now. This turned out beautiful and I can’t wait to see what you paint next!
Not that last time Ann, ha ha! I can’t wait to see what I do next too!
Stunning! I think you proved to yourself and your husband that you are indeed artistic. So glad you shared the project and I hope you try out many more.
Aw, thank you Donna!
Sara, it’s gorgeous! You are indeed artistic!!
Thanks so much Kim! I’m going to tell my husband there’s a consensus lol!
Woa… this is gorgeous hand painting Sara! The flow the koi image offers is so calming! Stunning piece!
Thanks Denise! I had to find a way to keep our pond vibe going through every season lol!
Beautifully done, Sara. I doubt your hubby still thinks you’re not an artist and he’ll grow to love fish too with that beauty at home 😀
BTW – Saral transfer paper was always a favourite of mine, but I haven’t seen it in our art stores for years. Thanks for reminding me. I’ll be ordering some online.
Thanks Michelle! I had an opportunity to buy some Saral on clear out years ago, but didn’t take advantage to add it to my stash. Didn’t realize how handy it would be! Thank goodness it’s available online 🙂
For some reason fish creep him out. We went snorkling once and I could literally hear him scream underwater when a guppy swam by 🤣🤣🤣
Oh my goodness 🤣 Does he eat fish or is that also a no go?
Doesn’t eat it either lol!
Turned out so super cute Sara! I loved it, and what a fun design too! Well done!👏👏👏
Thanks so much Dee!
Awesome makeover Sara. It is so true what you said about practice nobody gets it first time so the more you practice the better your become.
If only I didn’t have to many other hobbies, I could get pretty good at one of them lol!
I’m an artistic wanna be with not much natural ability. Appreciate the detailed instructions. I think I can do this!
You CAN do this Susan! Give it a try 🙂
What talent. I might be artistic in some ways but could never do this. Maybe if it was a paint by number. LOL
Once you transfer the design, it IS basically a paint by number :). You CAN do this Rosemary!
Gorgeous! Great to see you on craft schooling sunday, hope you don’t mind if I feature this!
I don’t mind at all Sara! Thanks so much 🙂