

It is with nervous excitement that I’m playing with Terra Clay paint today! Are you ever hesitant to try something new? I personally tend to procrastinate until I work up the nerve to try new things, but with Dixie Belle’s brand new Terra Clay Paint, there really is no reason not to dive right in!
Unusual for me, I didn’t even have a plan. And I can’t tell you how FUN it is to paint with reckless abandon. I need to do this more often!
Terra Clay Paint Video
Curious to see Terra Clay Paint in action? Watch this video!
What is Terra Clay Paint?
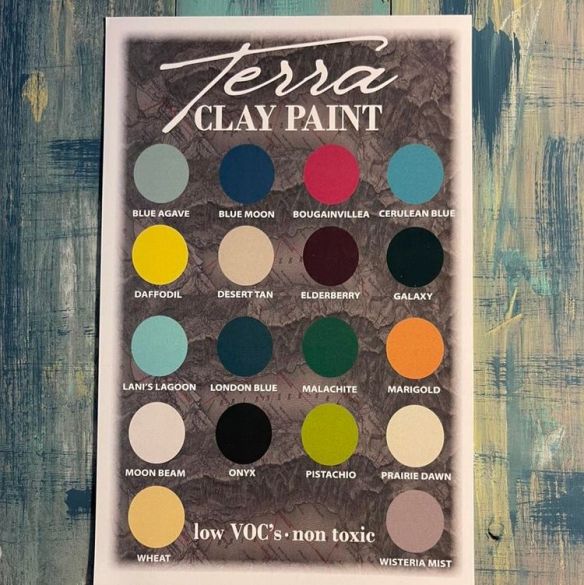
Terra clay paint is Dixie Belle’s newest line of highly pigmented water based paints. It’s now available (both in retail stores and online) and comes in 18 fun and fabulous colours.
- low VOC,
- dries to a matte finish and,
- eco friendly (just the way we like our paints)!
Use it with water to create layers, texture and visual interest. Then let it dry 2 hours between coats. You can easily ‘water distress’ it (no sanding necessary) to reveal layers of colour underneath. It actually reactivates with water until you seal it. So play with it to your heart’s content to create artistic effects and then lock it in after 24 hours using Terra Wax or Terra Matte! You can even seal with a water based clear coat if you spray – or you’re careful not to over brush.
Creative Craft Hop
It’s time for another Creative Craft blog hop! So if you are visiting from Gail at Purple Hues and Me, welcome! At the very bottom of this post, I’ll be directing you to the next stop on this venture. But don’t forget to check out the other stops too because you’ll find plenty more ideas. Be sure to drop back in throughout the week to visit them all!

Before we get into the tutorial, don’t forget to get your craft mojo on at Birdz of a Feather and subscribe to our newsletter:
You can also follow us on Pinterest, Facebook, YouTube and Instagram.
Terra Clay Paint – Wooden Tikki Set
I found these vintage 70’s wooden tiki salad servers at the curb! I’ve had them for a while and was just waiting for inspiration to strike. As soon as I got my Terra Clay paints, it was a no brainer to create a boho look for them!
The cans are convenient and the plastic lids are brilliant; no rusting! Use a rubber mallet to close the lid when you’re done.

Terra Clay Paint Prep
Clean and prep your project as you normally would before starting. An environmentally friendly cleaning option is a mixture of water, vinegar and a drop of dawn dish soap. You can also use white lightening. However, it’s best to mix white lightening in a spray bottle so you only use what you need. Then rinse thoroughly with clean water. Never throw white lightening down the sink. Use a primer, like BOSS or slick stick, if your piece is a bleeder or has a shiny finish, respectively.
I’m using Cerulean blue for the base colour.

Painting with Terra Clay Paint
The Mini Angle brush is a good all-purpose brush for the job! Spray some water on the brush before you dip in with a continuous spray mister; the paint is fairly thick given it’s a clay base.
All Terra Clay Paint colours are darker when wet.

Then the paint will dry to a lighter shade. You can see the difference between wet and dry paint below. But once you seal it with Terra Wax or Terra Seal, the colours will really pop again and be vibrant. Paint the front and sides of the Tiki set, then let it dry before finishing the back.

Dixie Belle recommends to let the base coat dry 24 hours before proceeding with the other colours. However, you can proceed again after 2 hours.
Supplies
[If you’re looking for some of the things we used, we’ve got you covered (disclosure). When you purchase products through our affiliate link, we may make a small commission with no additional charge to you. This allows us to purchase supplies to continue to share unique projects and video tutorials with you. It also helps feed our upcycle/DIY addiction 🙂].
- Cerulean Blue Terra Clay Paint
- DBP Synthetic Brushes
- Continuous Fine Mist Spray Bottle
- Artist Brushes
- Pistachio Terra Clay Paint
- Daffodil Terra Clay Paint
- Marigold Terra Clay Paint
- Malachite Terra Clay Paint
- Bougainvillea Terra Clay Paint
- Lani’s Lagoon Terra Clay Paint‘
- Leather Cord (use another one if you prefer it softer)
- Picture hanging hooks
Layer Terra Clay Paint
For this project, you can layer Terra Clay Paint in a few ways (I’m sure this isn’t a definitive list)!
- You can brush on full coats and let dry for two hours in between. Then you can wet distress back to whatever layer you want to stop at.
- Dry brush.
- Apply watered down paint in streaks.
I chose the two latter methods for speed. As you’ll see below, you can layer colours all at once if you’re careful about not using too much water to blend.
First, I dry brushed the first four colours. Here are the colours in the order I used them:

Pistachio goes on first, sporadically on the handles.

Again, dry brushing, I randomly add Daffodil.

Then Marigold.

Malachite is a deep green. Each time I apply colour, I keep the brush damp. I just take a tiny bit on the brush and dab off onto a plastic lid to act as my paint pallet.
 Don’t concentrate on any one area; brush each colour onto different areas of the faces and handles.

Wash of Colour
After dry brushing, I take advantage of the remaining paint in the lid and mix together water, Malachite and Daffodil for a grassy green. Terra clay paint reactivates with water so you can use every last bit if you like! That goes on in streaks on the bottom of the fork and spoon. Then I grab the Bougainvillea.
 Again, I mix Bouganvillea with water to thin it.

Then I streak it onto the fork and spoon areas, leaving some of the Cerulean blue base colour showing through (and previous green wash).

I go back into the lid of paint to thin a few more colours and streak it on too. The incredible thing is that it may look like a mess until it doesn’t! Keep layering on colours until you’re happy!
One caveat is not to over-brush when using wet paint; it will remove paint right down to the wood. While that might be great if you’re doing that on purpose to distress the paint, you may have to touch up otherwise!
Speed up the Dry Time
If you want the paint to dry faster, you can wave a hair dry over the still wet (darker) spots.

I use a cool setting to dry larger patches like this.
Keep the hair dryer moving.

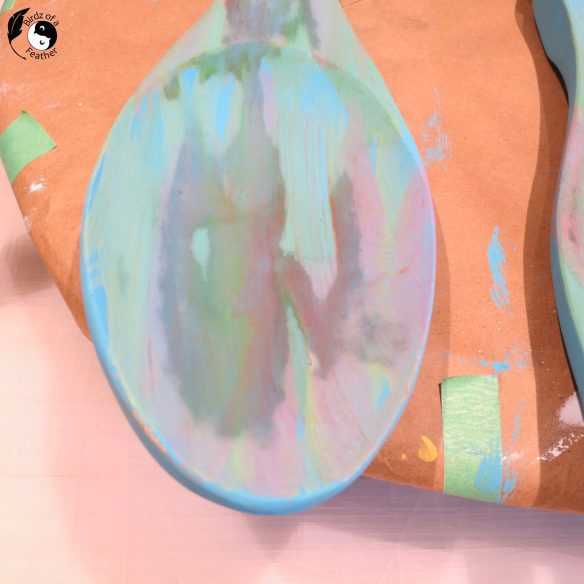
Almost dry. Isn’t the blend of colours pretty?!

Dry Brush
For the last coat, I water down Lani’s Lagoon. But then, after loading the brush, I dab onto a paper towel so the paint isn’t too wet.

Here, I’m starting to highlight the high points on the faces. I do a bit on the sides too of dry brushing on the sides too.

You know, the thing about using Terra is that it’s so much better in combination with other colours! Although I used multiple colours on this project, I’d recommend using at least two. My friend Stephanie at Gathered in the Kitchen may have had that epiphany when she also tried Terra Clay paint for the first time so check out her painted shelving unit :). As you’ll see, Terra is not really a one colour and done type of paint (Silk All-in-one mineral paint and chalk paint are better options for that)!
Seal the Paint
Clay paint must be sealed. Unfortunately I don’t have any Terra Wax, so I’m leaving this project as-is until I get some! I’ll update this post once the waxing is done! In the meantime, if you’re interested in how to apply the Terra wax, see the FAQ section below.
Don’t forget to seal your cans too! Use a rubber mallet to close all the lids.

Last step it to add new leather cord to hang!

Tiki Salad Server Reveal
Hang on a hook and enjoy!
I’m loving the eclectic mix of colours and the boho look you can achieve with Terra Clay Paint! This little project was a great introduction to what Terra Clay Paint can do. I ended up with a pretty water colour effect along with some dry brushing to bring out the details.

Closeup of clay paint blend
Our dining room, where these are hanging, doesn’t get a lot of natural light, but these colours really do look fabulous in the space!
 Take a closer look! I’m really looking forward to seeing how those colours pop once I have Terra wax! Now, I can’t wait to do more projects with clay paint and play some more!

As a matter of fact, wanna see what else you can do with Terra Clay Paint? Check out this wall planter DIY and how to hand paint furniture designs!
Fall Into Fabulous
One of the things I love most about blogging is connecting with other makers , and this Fall we’ve created something truly inspiring together.
Grab 16 digital goodies from top creators — planners, recipes, colouring books & more — including our Beginner Crochet e-Book!
Every dollar of our commission goes straight to Alzheimer’s research — a cause close to our hearts. Your purchase through this link means you’re not just treating yourself; you’re making a real difference.
Grab it now — the bundle is only available for a limited time! Let’s make this Fall fabulous and full of hope. 💜

Pin Terra Clay Paint Makeover
Pinning is always welcome and appreciated!

Creative Craft Hop
Now it’s time to check out this Christmas in July Christmas Tree from Tammy at Patina and Paint. When you’re done, please remember to visit these other amazing talents below:
- Christmas in July Christmas Tree
- Christmas in July Gingerbread Ornament
- $180 Pier 1 Knock-Off Decorative Mirror Set for Under $15!
- Retro Metal Lawn Chair Makeover
- Clay Pot Solar Light Holders
- Easy Peg Board DIY
- Purple and White Checkered Wood Ornaments
- Terra Clay Paint Tiki Makeover (that’s us!)
Terra Clay Paint FAQs
How do I apply Terra Wax?
Terra wax is oil based and produces rock hard protection. After the last coat of paint, wait 24 hours. Then apply wax in small sections with a natural bristle brush, like the La Petit brush, in swirling motion.
- After one hour, buff with buffing pad to a sheen.
- Use Clean as a Whistle to clean the brush after applying wax to entire piece.
- Let dry 24 hours and buff again. Terra wax cures in 30 days.
What’s the difference between Chalk Mineral Paint, Silk and Terra Paint?
Chalk Mineral Paint (CMP) and Terra Clay Paint can be used with water, while Silk is used straight from the jar as-is. Silk has a built in primer and top coat. CMP can be sealed but doesn’t have to be. Instead, you can let it cure for 30 days and get away without using an extra sealer. On the other hand, Terra Clay paint must be sealed with a top coat because water can reconstitute it.
A big benefit of the Terra Clay Paint is that you can wet distress back to any layer you want to stop at to get that perfect chippy look! You have the ultimate control on how it looks and how deep you want to distress based on your layers of clay paint! Use a rag or work it back with a wet brush. You can even use a finger to wet distress.
Another feature of Terra Clay Paint is that you can texture it. Terra doesn’t self level, like the other two lines, so you can really get some creative, artisan finishes with it.
One of Dixie Belle’s Brand Ambassadors, Tracy at Tracy’s Fancy, has a FREE download that charts out all the differences between the three paint lines to help you decide which paint is perfect for YOUR next project. You can download it here.
Helpful Advice
Tips for using Terra Clay Paint:
- Let the first coat of paint dry overnight.
- Create texture by applying thick or thin coats
- For added texture, use a natural bristle brush. But you can apply Terra with a spatula, synthetic brush or even your fingers. Anything goes; there are no rules.
- If you want to add a transfer, you need to seal with Terra Seal and let dry 24 hours.
- You can ‘wet distress’ you piece using water – on a brush, a rag or your fingers. You will get ghosting of various colours where you distress if you painted several layers and can work back to earlier coats. That’s the charm; just stop wherever you want. You can also distress with sandpaper (but of course, that’s dusty and not as controllable).
I LOVE this and definitely want to give it a try. Such an unusual paint system but the possibilities for it’s use are endless. Thanks so much for sharing and I love your fork and spoon. Great color choices.
Thanks so much Tammy! I really did feel like a kid again using this paint. I had no plan and just set out to have fun. The cool thing is that you can keep layering until you get how you like. I would imagine that you can even wipe it right off with water and try again if you really don’t like it.
Sara, I haven’t seen this type of paint before but I love the effect! Your fork and spoon look great! Pinned!
Thanks Cecilia! I hadn’t heard of it either but apparently there’s a few clay paints out there. This one is brand new; I hope to do many more projects with it to see what else it can do.
Wow Sara, the salad servers turned out so cool! This new paint does look like a ton of fun to play with, I love the color mix you used and the cool way you blended the different colors! Awesome! Thanks so much for hosting and sharing!
Jenna
I must’ve been channeling you when I painted this lol. You have such a flair with paint and colour!
aw, thanks Sara, it did feel strange not to use a paint brush for the Christmas ornaments I made haha…
Too funny lol!
You know I love paint and always like to change things with it! I need to try the paint, love all the texture you gave the set with the paint. Looks amazing Sara.
Thanks Terrie! We’re two peas in a pod 🙂
I haven’t seen this paint yet in the stores but will be looking for it. Looks like a great product for makeovers. Love what you did with the salad servers.
Thanks Donna – hopefully it’s out by end of month. It’s so exciting to try something brand new; I think you’ll enjoy it.
Gee Sara, this paint sounds amazing and something I would be interesting in trying! Your salad servers look gorgeous! I like that water affects it in designing a new look if you’re not quite satisfied. Thanks for introducing us to clay paints! I had never heard of it before.
My pleasure Gail; I think you’ll be seeing a lot more of TCP. I know I can’t wait to use it again soon to see what else it can do.
Sara this project is so good! I love a good upcycle, especially when you can do it with a treasure find. I’ve never heard of Terra Clay Paint, so now I’m going to look for some. Can’t wait to see how it looks with the wax coat!
Happy hopping!
Niki ~ Life as a LEO Wife
I’m looking forward to trying the wax to see those colour really pop!
Oh, also pinned. Forgot to mention that!
Ha, thanks so much Niki! I completely forgot to pin projects yesterday (so unlike me), so will go back and do that asap 🙂
Ooooooooooo I want some of this!!!! Those colors are gorgeous and it looks like so much fun to play with.
I suspected this would be right up your alley lol! . I’m working on the video right now so you can see how fun it really is 😉.
I’ve never heard of terra clay paint and now I’m itching to give it a try. What a pretty patina and update to your wooden tiki salad servers! I can’t wait to see the colours after they are waxed.
You and me both Marie; can’t wait to see those colors pop 😊
I love this! I just started playing around with the Terra & it’s so fun!
Thanks Virginia! It is so fun! I’m obsessed with it now.