

You may have noticed stunning examples of acrylic pour painting on Pinterest! I’ve always wanted to try it. But I’ve never really seen it done with chalk paint. So today I have an acrylic pour for beginner project that’s as easy as it is beautiful! And it’s all done with Dixie Belle Chalk Mineral paint.
You’ll probably never guess what I actually upcycled to create this painting! There are so many acrylic pour techniques; you can really get caught up binge watching them on YouTube. One that caught my eye is how to do a chain pull butterfly. Because I happen to have a whole spool of ball chain to upcycle, it’s the one I immediately want to try out first.

Butterfly Acrylic Pour Painting
Creative Craft Hop
It’s time for another Creative Craft blog hop! So if you are visiting from Terrie at Decorate and More with Tip, welcome! At the bottom of this post, I’ll be directing you to the next stop on this venture. But don’t forget to check the full list because you’ll find plenty more crafty ideas. Be sure to drop back in throughout the week to visit them all!

Before we get into the tutorial, don’t forget to get your craft mojo on at Birdz of a Feather and subscribe to our newsletter:
You can also follow us on Pinterest, Facebook, YouTube and Instagram.
Acrylic Pour Painting
I have a gorgeous selection of rainbow colour Dixie Belle Chalk Mineral Paint. You really only need the smallest amount of paint for the size of canvas I’m using. So if you happen to have leftovers of chalk paint from another project, this art piece is a great way to use them up. The 8 oz. size is more than enough for this project. And you’ll still have plenty left over for other fun projects! Or more paint pours!
Paint Pour Video
Before you read the tutorial, watch this video to see this paint pour for beginners project in action!
Paint Pour Materials
This post is sponsored by Dixie Belle Paint. All opinions are our own. Rest assured that we would not share these products with you if we weren’t absolutely thrilled with them!
We may earn a small commission on qualified purchases sold through affiliate links which helps support this blog at no additional cost to you. In purchasing supplies we use and recommend, you help to support our free DIY tutorials. Read our full disclosure here.
Dixie Belle Chalk Mineral Paints:
- Measuring/mixing cups with lids (we’re using Pebeo)
- #10 bead chain (3/16″) (4×18″ lengths). Note: this is heavier than a standard lamp pull chain
- Pallet Knife set
- Film canisters
- Floetrol
- 8″ x 10″ Canvas
- Eye droppers (ours are upcycled)
- Flux bottles
- Adhesive Liner
Acrylic Pour Technique
Finally, after finding a whole spool of ball chain at our local ReStore, I have a use for it! Cut four pieces into 18″ lengths.
When you’re ready to start, fill a container with water to drop the ball chains (and eye droppers) into as the work progresses.

Actually, this is my first time painting with a pallet knife; it’s great for quickly spreading the paint after pouring it on. But even a plastic scraper or credit card will do in a pinch. You really don’t need the fancy tools. As for me, I’ll take a new tool over flowers any day!

Paint Pour Medium
Mix all your paint colours at a ratio of 2 part Floetrol to one part Dixie Belle Mineral Chalk Paint.
If you want a colour you don’t have (such as orange), mix red and yellow chalk paint together before adding the Floetrol.

I mix in a larger container, then transfer to air tight film canisters I’ve been saving. For all colours, except the black and white, I only mix an ounce because I’ll need only a few drops of each.

Mix at least double the quantities of Midnight Sky and Fluff for the outline and middle of the butterfly respectively. Because it’s nice to have more control over the flow, these two colours should go into a squeeze bottle, like this flux bottle. The needle tip is handy for controlling the amount on paint.

Cut Butterfly Mask
Because I love symmetry and I don’t have the steadiest hands, I’m going to cut a butterfly mask out of adhesive liner. Of course, you can draw the butterfly yourself by hand. But if you are artistically challenged, you can find our free butterfly template in our Birdz on the Fly project library. If you’re not a subscriber, fill out the form at the bottom of this post for access :).

First, trace and cut the butterfly template from the adhesive liner. Then centre the butterfly onto the canvas and peel back the adhesive while sticking it down.

Paint the Background
Now, layer Fluff, The Gulf and Pure Ocean using a paint pallet knife to spread it onto the canvas. Then use a water mister and mini angle brush to blend the three colours together.

One thing I might change is to put the lightest colour on the top. But either way works!

Allow the paint to dry. Floetrol will slow down the drying time so I let it dry overnight.

Acrylic Pour Painting the Butterfly
Because I let them sit overnight, I find that the colour mixes will tend to separate. So when you uncap the paints, give each a gentle stir so you don’t incorporate air bubbles.
After peeling away the vinyl on the canvas, squeeze some Fluff paint into the centre of the butterfly.

Use the pallet knife to spread the chalk paint to the edges.

Now, attaching the needle applicator to the bottle, outline the butterfly with Midnight Sky. You only really need to outline the wings; we’ll paint the middle later. At any rate, when you trace around it really doesn’t have to be perfect. 
Apply Rainbow Colours
I apply the rainbow colours using an eye dropper to form drops of paint.

Squeeze any excess paint in the dropper back into the container. Then, when all colours are complete, draw up some water from a container and let them soak until you’re ready to clean up.

In some instances, I’ll add additional dots of a different colour paint on top. For instance. on the red, I also drop on some orange.
Instead, if you like, you can do two rows of dots side-by-side. Then you won’t end up with quite as much white as I do if that’s the look you want.
All the dots are on! Now for the fun part.

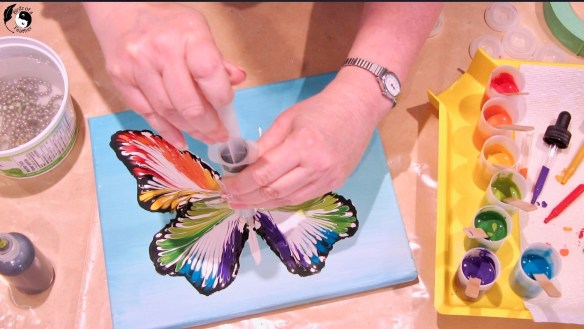
Chain Pull Technique
Work on one quadrant at a time (which is why I cut 4 pull chains). Carefully place the chain into the black paint around the perimeter of the butterfly.

Now, slowly pull the chain toward the middle. Keep pulling until you can lift the last little bit off the canvas in the middle.

Repeat the same process using a fresh chain in the next 3 sections.


By the way, if you do two rows of dots and find that too much excess paint is gathering in the middle, use a glue syringe, like this one, to suck up the excess.
The gaps between the dots will leave pretty ribbons of colour interspersed with Fluff.

Acrylic Pour Art Butterfly
Fill in the centre section of the butterfly/antennae with Midnight Sky to complete and let it dry. If you wish, you can even touch up after the paint is dry. Even though I have a few imperfections, I choose to embrace those and leave it as is.

Scrape off the excess paint from the stir sticks and let them dry. Now you’ll have a record of your paint colours! Just write what they are right onto the stick. 
To finish I’ll seal with Dixie Belle’s Gloss Clear Coat. That will really make the colours pop.
Acrylic Pour Painting Reveal
In all honesty, I wasn’t sure that chalk paint would work so I’m thrilled that it does! I love how this sweet little butterfly looks with our lampshade makeover DIY!

This was my very first paint pour. But it definitely won’t be my last! I want to try more paint pour techniques and share them all with you! What do you think? Is this something you would try? If so, check out the free butterfly template and give it a go!
Don’t forget to check out the Creative Craft Hop links below the pinnacle image before you go!
Free Template for Acrylic Pour Painting
To gain access to the free butterfly template, subscribe by email on the form below if you’re not already a subscriber. Once you confirm your e-mail, you’ll receive a welcome message with the password (be sure to add us to your safe list). We change the password periodically, so check the newsletter often. You’ll find our new freebie library at Birdz on the Fly.
We always endeavour to bring you unique content on Birdz of a Feather. Follow us on Pinterest, Facebook, YouTube and Instagram to stay in the loop! And if craft projects are your thing, browse our Craft Rehab Category.

Fall Into Fabulous
One of the things I love most about blogging is connecting with other makers, and this Fall we’ve created something truly inspiring together.
Grab 16 digital goodies from top creators — planners, recipes, colouring books & more — including our Beginner Crochet e-Book!
Every dollar of our commission goes straight to Alzheimer’s research — a cause close to our hearts. Your purchase through this link means you’re not just treating yourself; you’re making a real difference.
Grab it now — the bundle is only available for a limited time! Let’s make this Fall fabulous and full of hope. 💜

Pin Acrylic Pour Painting
Pinning is always welcome and appreciated! See our Craft Rehab category for more craft ideas!

Creative Craft Hop
Now it’s time to check out these Floral Ice Cream Cones from my friend Jenna at The Painted Apron. When you’re done, please remember to visit these other amazing talents below:
- Floral Cross Upcycle
- Woven Ribbon Wall Basket
- Adorable Garden Signs
- Burlap Cross Wreath
- Easy Easter Basket Tags
- Sweetest Change to a Bird Cage
- Acrylic Pour Painting (that’s us)
- Floral Ice Cream Cones
Acrylic paint pour FAQs
Can you use chalk paint for paint pouring?
Yes, you can! I’m using Dixie Belle Chalk Mineral paint combined with Floetrol (in a ratio of 1 part paint to 2 parts Floetrol) to do a butterfly pull chain technique. Any kind of paint pour technique you can do with regular acrylic paint, you should be able to do with chalk paint too.
How do you pour chalk paint?
Pouring chalk paint is the same as any other acrylic paint pour. First, dilute the paint with a pouring medium, such as glue/water and/or Floetrol. Once your paints are mixed you can use any technique such as dirty pour, puddle pour, pull chain etc. The sky is the limit with chalk paint!
How much Floetrol do I put in Chalk Paint?
For a paint pour, I have successfully used 1 part paint to 2 parts Floetrol. However, you can probably also try 1:1.5 to get a good consistency and thin with some water if necessary. Experiment to see what works best for you!
I love this… I’ve seen a lot of pour paint projects but never anything like this one. Super fun. In fact I have pour paint in my studio and I think that I will be giving this project a try today! So pretty. Thanks for sharing!
That’s awesome Tammy! Is your pour paint pre-mixed? I find that the most time consuming part lol! I can’t wait to try another technique.
Amazing! I have done a chain painting, which was a lot of fun, but your butterfly is beautiful. Love how it turned out. I need to try Dixie Bell paints. Thanks for sharing.
Thanks Terrie! I was so pleasantly surprised that it worked and can’t wait to do more.
Wow Sara, this is way cool! I have done acrylic pour painting, but only abstracts and blending by tipping the canvas…the ball chain technique is totally brilliant and looks so incredible! I am always impressed by your patience and attention to detail, the butterfly is stunning! Thank you so much for hosting our crafty group!
Jenna
Thank you and you’re very welcome Jenna; I always look forward to seeing what you guys come up with each month. I love hosting and participating in our crafty group :).
This is such an interesting paint pour technique I have to try, Sara! Your butterfly looks beautiful! I love paint pouring – although I’ve only done it a few times using a sink strainer. After I had finished the first one, I could visualize so many things in it like eyes, a head, torso and a hand. Sounds crazy, I know! I was so excited about paint pouring, I had the ladies in my craft class do a paint pour session, too! Each one was very unique and amazing to see!
This is my first pour and I’m so excited to explore even more techniques! I have vivid memories of finger painting as a child and paint pouring reminds me of that and brings back all those happy childhood memories lol!
This is SO pretty, Sara! Thanks for sharing your creative technique and also for hosting! Blessings, Cecilia @My Thrift Store Addiction
Thanks so much Cecilia! Always a pleasure to share and host 🙂
Wow! Your painting turned out adorable! I would’ve had that paint all over the place lol. I can’t even paint a straight line, but you made it look easy. I may have to try it one day. Thanks for hosting a fun hop!
Niki ~ Life as a LEO Wife
Thanks Niki! I’m not that great at painting either so the vinyl mask really helps set the boundaries. It probably would not look like a butterfly at all if I had to free hand it lol!
I haven’t tried pour painting either but really want to. This project is stunning. So glad you shared it. Pinned.
Hope you give it try one day Donna! It’s a ton of fun. Thanks for pinning 🙂
That is so pretty, Sara!! I love the colors.
Thanks Kim; we’re headed into another bout of winter weather so cheerful colours are just what I need to tide me over until the weather catches up!
Your butterfly paint pour art is so pretty, Sara! I’ve never heard of the ball chain paint pour technique before nor have I tried an acrylic paint pour. This looks like a lot of fun and I love the results!
You should give it a try if you’re ever looking to explore something new 🙂 You can literally pull these pull chains off a lamp or blinds lol.
Another great project. I’ve seen several using beads and thought it would be fun to try and if I could make it work. You have encouraged me.
Always happy to hear we’ve inspired with a project Rosemary. Hope you try it; you’ll have fun for sure!
Gorgeous butterfly wall art! I love how you used a chain to paint it.
Yes, finally found an interesting use for that chain lol!
Wow I would not have guessed that you used this technique to paint that butterfly! Amazing!
Thanks so much Marie!
Wow Sara, this is amazing! I love the colors too!
Thanks so much Cindy! Those brights will tide me over until the weather catches up with the season!