

We love exploring different materials with our xTool P2 laser, so DIY abstract art with laser cut felt is one we’re excited to try!
Did you know you could cut felt with a laser? I really didn’t even think about using laser cut felt for crafting. But here’s the thing about owning a laser. You think you’ve got projects planned out, then do a full 360° turn when inspiration strikes!
When Hubs asked me to try to cut felt rounds for him, a lightbulb lit up. He wanted new felt pads for under the spools of his refurbished sewing machines.

Laser cut felt
After googling how to cut felt on the laser, I realized there really wasn’t much out there. So after testing and having great success cutting felt, it got me thinking about all the possibilities for crafting!
Here’s some of the colours of felt we purchased from Fabricland, some of which we used for our easy felt applique project.

We actually have 16 colours of felt to work with (there’s a charcoal colour missing below). You can see how the felt spool pad we cut out using our xTool P2 is so precise and perfect. I can’t wait to try cutting felt to craft our DIY abstract art!

Inspiration Behind Our DIY Abstract Art
Now you know the inspiration behind using felt, but why DIY abstract art? I’ve been crushing on a stained glass artist on Instagram. Linda creates amazing colourful glass work and her abstract art was the inspiration for our colourful felt laser project. I especially love Linda’s abstract faces. This is her ‘Gaze’ piece. Isn’t it stunning?

Source: Glass Art by Linda (posted with permission)
You can check out Linda’s instagram and website pages at the links below. Go have a look at her other incredible stained glass work and give her a follow!
Glass Art by Linda:
- Instagram https://www.instagram.com/glassartbylinda/
- Website https://glassartbylinda.com/

Source: Glass Art by Linda (posted with permission)
Upcycling a Door
Another inspiration was a set of oak doors I found at the curb in our neighbourhood. We couldn’t get them in the car fast enough!

Hubs painted one of the doors a pretty lilac colour. We’re planning to inset our DIY abstract art right onto the raised centre panel. So I’m hoping that the double-sided roll of 3M 46 MP beside it will adhere the felt to the door. Of course, we’ll test it first on a sample.
The cabinet door will not only frame the colourful abstract art nicely, but we’ll have something sturdy to hang. We love repurposing cabinet doors, like this Medicine Cabinet DIY we did in our powder room.

There are so many uses for these old cabinet doors, so next time you see one tossed out, consider upcycling it like us!
Do It Over Designers
The doors are a timely find as it’s time for another Do It Over Designers blog Hop hosted by Ann at The Apple Street Cottage.

We’re a group of bloggers who take something old and/or unused and ‘do it over’ into something new. These items can be found in closets, barns, garages, yard sales, thrift stores, you name it! Check out the other blogger’s projects; there’s a list of links near the bottom of this post below the pinnable image. And be sure to drop back in throughout the week to visit them all!
Watch the Video!
Below is a full video tutorial on how to design your artwork and cut the felt on a laser. But more importantly, we’re showing you how to figure out your ‘kerf’ and how to apply it before you save your artwork as an SVG! Read on for the written how-to.
Materials
Posts on Birdz of a Feather may contain affiliate links. As an Amazon/LTK/Impact Associate, we earn from qualifying purchases which we proudly donate to Alzheimer’s research annually. See our full disclosure.
- Colourful 2mm felt
- Olfa rotary cutter
- Upcycled cabinet door
- Self Healing cutting mat
- Electronic calipers
- 90 Steel Carpenter Square Ruler (Home Depot)
- X-Acto knife
- Aleene’s Turbo Tacky Glue
- 3M 467 MP (this is 6″ but we found a 12″ roll in our region)
- xTool P2 Co2 55w Laser (use coupon code SDA80 for $80 off on orders over $999)
- Honeycomb Panel
Draw Abstract Face
First, I drew my face design in Procreate and exported it as a png.
Funnily enough it ended up looking like a self portrait of me when I was in my late teens. My subconscious must’ve been thinking back to ‘Desperate Housewives’. I’ve always admired the pop-art Andy Warhol style portrait of Eva Longoria’s Gabby character and always wanted one of my own!

Import the png into Inkscape to vectorize it. Inkscape is free and is my preferred way to trace the image.
One annoying thing about any graphic software is that it turns all fills into two paths so you end up with a double line, like you see below. That’s great if you want to produce a stained glass effect with an outline, but for this colourful abstract art, I want the pieces to butt up to each other seamlessly without a black line to separate them.

Instead of redrawing my artwork with the pen tool in Illustrator to achieve just one path, I decide to play with the centreline tracing in Inkscape to see if I could ‘cheat’ having to redraw this again. Aferall, it worked great when we showed you how to laser score! 
Drawbacks of Centreline Tracing
Granted, centreline tracing does save redrawing, but also has its drawbacks. For instance, with an abstract image like this, you’ll likely end up with some gaps. So you’ll need to select the nodes and close those gaps by connecting them to the nearest path.
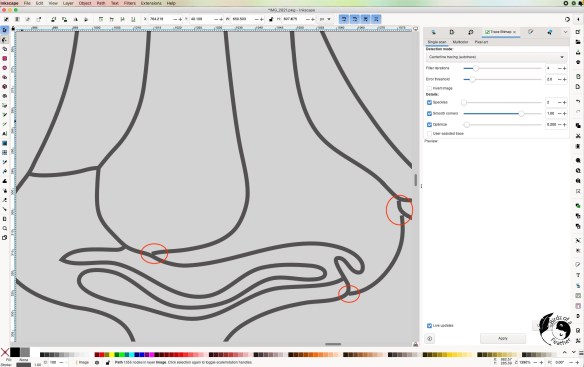
Many of your lines will be wonky too. Or you may have ‘extra’ bits and pieces to clean up and/or delete.

For wonky lines like this, just delete all the nodes in between the top and bottom ones.

That will give you a perfectly straight line between the two remaining nodes.

In retrospect, you might just want to learn how to redraw with the pen or pencil tool instead of cleaning up the file. However, I do think it saves time in the end so I encourage you to give Inkscape Centerline tracing a try.
What is Kerf?
I’ll go into more detail on how to do this on the video, and in the actual project below, but I just want to explain the principle first about why you need to add kerf.
When you cut anything on the laser, it is going to leave a gap between your pieces equal to the width of the laser beam. Just like when you cut wood with a saw, and are missing the width of the blade, it’s the same concept with lasers. With DIY abstract art, you have to add that missing gap back in if you want a tight fit – like a jigsaw puzzle.
To make up for that gap, you have to test each material you use so you know how much to add back onto your pieces. So let’s figure out the laser kerf.
How to Calculate the Laser Kerf
First, cut a 1″ square out of felt.

Then measure it with electronic calipers. Although I get .998, your number might be completely different. Factors affecting your kerf number can include the thickness of material and also your power and speed settings, so don’t go by what I get and call it a day. You have to do your own testing!

Now, using my example, subtract .998 from the original 1″ you started with (= .002). Divide .002 by two, because you have two sides of the cut line to add onto. That gives you a kerf of .001, which is what we’ll add onto all our pieces before we laser cut the felt.
Do a Test Cut
Before you get too busy formatting your DIY abstract art, do a quick test cut test on your felt to make sure your cut settings will work (and your kerf is correct). I draw this simple shape in illustrator.

As you can see, when you draw in Illustrator, you get a single line path. There’s no need to vectorize it. 
I colour the pieces and break them apart. Before finalizing the SVG file to test cut on the laser, I add kerf. You’ll find the step-by-step on how to add kerf to your file on the video and below under ‘Add Offset Path’.

After cutting on the laser, piece your felt back together.

This test looks pretty good to me, so let’s get to the actual abstract art face!

Formatting the DIY Abstract Art
I tried multiple different methods to colourize and break apart the pieces and finally discovered one that worked! Along the way, my files repeatedly got corrupted and had to be recreated so this was quite a painstaking process. But now I have it down to a science! And there’s a great sense of accomplishment in sticking with it until it works!
Have a reference for the colours you want to use for each piece (I coloured mine in Procreate).

In Illustrator, place the SVG on the artboard. The panel of the door is 11 x 10.25 so I ensure the artwork is that size too by using the transform panel.

Note: as you go from one stage to another, make a copy of your artwork so you have an original to refer back to, just in case.

I was going to use the shape builder tool to colour all the individual pieces. But as you can see that didn’t work. As hard as I tried to close all the open paths, I couldn’t isolate the pieces to make the shape builder tool work.

So it was back to the drawing board on how to colour the pieces before separating. The solution is to use Live Paint.
Live Paint
Select everything, then create a compound path (Ctrl +8). Click on the Live Paint Bucket icon (K on the keyboard). As you hover over the artwork, you’ll see a message to click to make a live paint group.

Once you click, you’ll be able to colour all the individual pieces of the DIY abstract art to represent the colours of felt. Refer back to your reference, then pick a colour from the pallete and click to fill.

When all the colours have fill, select everything > object > expand. Then object > ungroup.

Separate the lines, leaving you with all the colour pieces.

Now it’s time to organize all those pieces to laser cut on their respective colours of felt.
So here’s a time saving trick. Click on one of the colours. Then click Select > Same >Fill. It will automatically highlight all the pieces of that colour so you can drag them onto another artboard. Snug the pieces in fairly close to each other to save material. Waste not, want not!

When all the pieces are together with like colours, highlight everything and add a black stroke. This is important before adding an offset path to increase the size to account for the kerf.

Add Offset Path
Again, highlight all the pieces, then go to path > offset path and add the number that represents your kerf. For me, I add .001. Again, that number could be different for you.

Before you click away, change the stroke of the offset to a contrasting colour, like yellow or red as you see here. Now you’ll have a black and red stroke.

Highlight the black stroke of each piece (the inner line) and delete it. Or you can select them all at once using select > same > stroke. That leaves you with just the slightly bigger offset path for every piece. You’ve successfully added the kerf!

Add colour names to each grouping. When I did my test, I noticed that the colours don’t show up in the XCS software, so naming them will allow you to cut each colour accordingly.

Abstract art pieces
Now, copy the entire file into another document. Save the file as an SVG.

Cutting Felt for DIY Abstract Art
Use a rotary tool to cut the felt down to a size that will fit into your laser bed. Be sure to cut on a self healing cutting mat so you don’t damage your table.

I’m going to use 12 out of the 16 colours we have.

Will the pieces fit together seamlessly and work in practice? Let’s find out when we cut our felt on the xTool P2 laser.
How to Cut Felt on the Laser
You really need to do your own experimentation to find the cut settings that are best for you. I tried dozen’s of settings and quite honestly, they all worked really well on flat pieces of felt. But some pieces were a challenge because of the curl.
For this project, I primarily use 5/10/1 for the power, speed and pass respectively to cut the pieces of felt for this project. I prefer to cut low and slow with materials like this to mitigate fumes. If your xTool laser is outside or you’re running a business, you’ll likely want faster settings. After all, time is money!
One piece of advice. If your felt was on a roll, cut the pieces the day before and weigh them down to flatten them.

If they’re not perfectly flat, it can affect your cuts. I kinda wish xTool had been more generous with the magnetic clamps included with the Honeycomb panel.

Assemble DIY Abstract Art
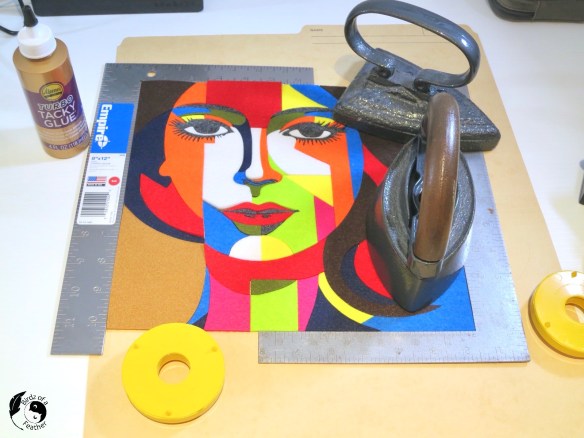
I was going to use 3M 467 MP, a double faced adhesive, to mount the felt pieces onto the middle of the cabinet door! But it didn’t work on my sample, so I’m not going to risk it on my actual project.

Now it’s time to weed out the felt.

Because this felt is synthetic, it tends to melt in some spots and create ‘tabs’.

Laser cut felt
You may have to run a sharp X-Acto knife around the edges to release the pieces.

I’m using a trick I learned from glass artist Linda to keep it all square and assemble: 90 degree right angle rulers.
Some of the felt is still curled. So to attach it all together, I opt to glue it edge to edge first and weigh it down to control the curl. The glue I’m using is Aleene’s Turbo Tacky Glue.
Then I’ll glue it onto a thin veneer backing and put it onto the upcycled door in one piece with 3M 467 MP. Since the veneer is hard and sturdy, using the 3M to glue it wood to wood is easier and faster than waiting for the glue to dry.
Of course, you could just glue it directly down to the door piece-by-piece if you’re precise about the placement. But if you’re just a little off, you could throw it out of alignment.
DIY abstract art face
Check out this felt craft for another colourful and unique project!
Fall Into Fabulous
One of the things I love most about blogging is connecting with other makers. And this Fall we’ve created something truly inspiring together: 16 digital goodies from top creators — planners, recipes, colouring books & more — including our Beginner Crochet e-Book!
Grab it now — the bundle is only available for a limited time at this price: use the coupon code FALLFUN to get it for $9.99!
As always, every dollar of our commission goes straight to Alzheimer’s research, so treat yourself knowing that you’re making a real difference! Let’s make this Fall fabulous and full of hope. 💜

DIY Abstract Art Reveal
I’m so pleased with the outcome!
The possibilities for colourful abstract art are endless! What do you think?

Wall abstract art
Pin DIY Abstract Art
Pinning is always welcome and appreciated!

xTool P2 Projects
Check out these laser craft projects to see what we’ve been up to with our xTool P2 Co2 laser! So far, we’ve explored cutting paper (DIY Solar Eclipse Glasses), wood (dinosaur wall art) and now felt. We’ve also tried techniques on wood like engraving (laser engrave wood rounds) and how to laser score.
If you’re brand new to lasers, you won’t want to miss our xTool P2 Co2 Laser Beginners Guide and the set up and troubleshoot video that goes with it.
Our next xTool laser project is one I’ve been looking forward to! We’ll be cutting cast acrylic to create a stained glass piece you can hang in a window.
Do It Over Designers
Our talented blogger friends have some amazing and inspiring DIYs for you! Don’t forget to visit these posts for more upcycled do-it-over transformations!
- The Apple Street Cottage
- Exquisitely Unremarkable
- Little Vintage Cottage
- Purple Hues & Me
- Southern Sunflowers
- Sum of Their Stories
Laser Cut Felt FAQS
Can you cut felt with a laser?
Yes! It’s easy to cut felt with a laser and we have a step by step tutorial on how to do it quickly on the xTool P2 Co2 laser cutter! Be sure to watch the video for all the tips and tricks; from file design to kerf to cutting!
What is the best felt for laser cutting?
We’re cutting synthetic felt on our xTool P2 laser, but it’s also possible to cut wool. Both synthetic and natural fibres will work; you just have to experiment with your power and speed settings.
What is the best felt for laser cutting?
We think a heavy felt that’s at least 2mm thick is the best felt for laser cutting. We also love using synthetic felt, vs. wool, because it’s cheap and readily available.
What laser cutter settings for felt?
It all depends on the thickness of the felt. For the synthetic felt we cut on our xTool P2 laser, we used a power and speed of 5 and 10 respectively. However, you should always do your own test cuts first to determine your own ideal settings.
DIY Abstract Art FAQs
Does abstract art have rules?
Rules are meant to be broken which is why we like to design abstract art with laser cut felt! Felt offers a unique and original medium to design a one-of-kind piece.
Should you Frame Abstract Art?
Any art can benefit by adding a frame, but because we love to upcycle, we choose an unconventional way to frame our DIY abstract art. Paint an old oak cabinet door and set your abstract art inside the raised panel!
Why is abstract art so special?
Beauty is in the eye of the beholder so everyone will have their own interpretation of any given art piece. Abstract art allows you the freedom to create (if you’re an artist) and interpret it in a way that is meaningful to you!
Abstract Art Face
What is an abstract art face?
An abstract art face is a portrait that is not based in reality. It is typically made up of multiple different bright colours (sometimes blobs of colour) and loose or geometric line work.
How to Make an Abstract Face?
- Start in Procreate and draw the outline of the face.
- Add a nose, mouth and chin.
- Break up the portrait and background with additional lines that can be colour-filled later, extending the lines out to the edge of the canvas to make full use of the space.
- Use the eraser tool or use two fingers to tap if you want to undo and re-draw an element.
- If you are designing an abstract face to be crafted in felt, don’t use any fill; for instance, the pupils of the eyes. All elements should be drawn as an outline.
- Now duplicate the layer, leaving the original intact in case you need to refer back to it.
- Colour fill each section as you wish from the colour palette by dragging and dropping the colour. Export the finished abstract face as a png to be vectorized.
Absolutely beautiful, Sara. I’ve been involved in wool/felt applique for over a year now and this takes it to a whole new level. Those cabinet doors seem to show up everywhere and I love that you left the handle on it! Wonderful project!
We had to leave the handle on to show its humble beginnings lol! I love coming up with new uses for these doors because you’re right; they are everywhere!
Fabulous! Is there anything this tool can’t do?? I love the colors and door handle. Great touch!
Wowza, this is stunning! What an ambitious project, you did an amazing job. I was thinking that your original geometric tester piece looked pretty cool but you’ve taken this right to the next level.
Aw, thanks so much Julie! I couldn’t wait to run with the idea; it was so much fun to experiment.
Wow, that’s impressive… not only the artwork but all the figuring and trial that you did. I don’t have that kind of patience or attention span. I wish I did though because it really turned out beautifully! Great job!
Thanks so much Tania! I guess I’m just like a dog with a bone! When I get an idea, I can’t let it go until I’ve figured it out!
This is incredible and quite interesting, Sara! You certainly know how to unleash your creativity – which is way above most of us! And it’s amazing to watch you create and assemble your “younger self portrait image!” You are too cool!
Thanks Gail! I’m so flattered that you think I’m cool; I’m going to show your comment to my sisters lol!
Wow, this looks brilliant. I have felt but didn’t have a good idea for a project. Time to think! Great job, Sara.
I can’t wait to see what you come up with Rachel. So far, working with felt has been my favorite xTool project so I think you will enjoy it too!
It’s beautiful and soooo dramatic. Love it and the way your explained “kerf”. It makes total sense.
So glad to hear it makes sense! I was so intimidated to try a project with kerf, but it turns out to be pretty easy! Hope I can encourage others to go for it too!
Wow, Sara this is so unique and brilliant. I have not played around with designing to this extent but you have inspired me. Just a little info about the magnetics, I add small round fridge magnetic when doing curved fabric. I cut eva foam which was a pain and they worked great.
Good to know! I thought about fridge magnets but was worried about the laser head hitting them because of the thickness. Maybe I’ll look for some thinner ones for that purpose!
That is absolutely gorgeous! I’ve never considered using felt in this way.
Thanks so much! It just took a suggestion from my husband to try cutting felt pads for his thread spools to get the wheels turning. Guess it was one of those happy accidents!
Wow Sara, this turned out lovely. I recently was inspired by an abstract art piece too. That is some detail, and I am not sure I have the patience for it, but it turned out great! How awesome of a find were the oak doors!
Thanks Cara! I was so happy to spot those doors; they are a great size for crafts! I’m like a dog with a bone once I get an idea, I can’t stop until I figure it out lol.
Wow, your abstract felt art is gorgeous! I’m a fan of bright colors. The purple frame really gives your art an even bigger wow factor. Awesome project. Pinned.
Purple was the one colour that I couldn’t find in felt. I called every fabric store in our immediate area, and came up empty. So painting the frame purple was the best compromise; just one of those ‘happy little accidents’! Thanks for pinning Allyson!
Wowza! That’s absolutely amazing. I love the colors. That is a super cool piece of art!
Thank you Tuula! It turned out just as I envisioned it so I think it’s pretty cool too lol!
Great inspiration and a great result. Thanks for sharing with Create-it link party
Thanks so much Jane!