

Our wooden wall art DIY is a great way to upcycle pallet wood and a discarded old wall clock into a functional pallet clock. But there’s another function to this pallet upcycle: take this DIY pallet upcycle idea one step further and turn it into a pallet planter!
International Bloggers Club
It’s time for this month’s International Bloggers Club (IBC) and our challenge this month is Walls and All.
The IBC is a group of bloggers from all over the world who challenge each other every month to make something using a common theme. Our previous challenge was “Furever Craft” and we made this fun string art dog.
You’ll find our friends’ wall art project at the bottom of the post. So don’t forget to check them out before you go. And if you don’t have time to browse today, pop back in later in the week to pick up where you left off.
Wooden Wall Art DIY
When we walk our neighbourhood on garbage day, sometimes I can’t help but get inspired by the bounty of items ripe for the picking – like this pallet…..

… and large scale clock found a block apart. You could do this project with just pallet wood and skip the clock frame altogether. But we just can’t let anything go to landfill so snatch them both up. 
We love to create clocks with a twist, like this Foghorn Leghorn Clock built right into an Ikea Besta cabinet! So a multi tasking clock that’s also an air plant holder is right up our alley!
Pallet Clock DIY Video
Watch this brief video to see how easy it is to make a pallet clock!
Wooden Wall Art DIY Materials
* [If you’re looking for some of the things we used, we’ve got you covered (disclosure): Clicking on the affiliate links below means we may receive a commission. But don’t worry, you don’t pay a cent more and it helps us make more unique crafts to share with you! Thanks for helping to support our blog!]
- Pallets
- Plastic wall clock
- Clock mechanism
- White, black and red paint (we’re using PPG BreakThrough)
- JB Weld Plastic Bonder (if anything on the frame needs repair)
- Rustoleum Painter’s Touch – French Blue
- Rustoleum Comfort Grip (for aerosol spray cans)
- Double-sided carpet tape
- Ook French Cleat or Z-clips (to hang the wooden wall art DIY)
- Nano tape or Scotch Extreme Interlocking Fasteners
- Varathane water based finish – satin
How to Make a Pallet Clock
1. Break down pallet
Carefully remove the boards from the pallet and give the wood a good sand.

2. Dissemble Clock
Dissassemble the clock and remove clock mechanism. You will need to replace the clock mechanism to accommodate the extra thickness of the wood. So measure the depth of the wood to determine size needed. Store screws in a Ziplock bag for reassembling again later.
Measure the inside diameter of the clock face to determine the circle you will cut from the pallet. Mine is 22 5/8″. Ensure you have enough width from the pallet wood to create the circle.

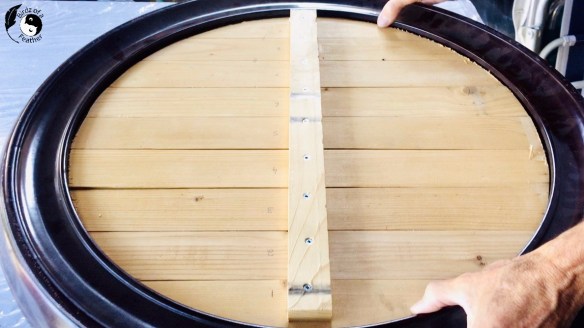
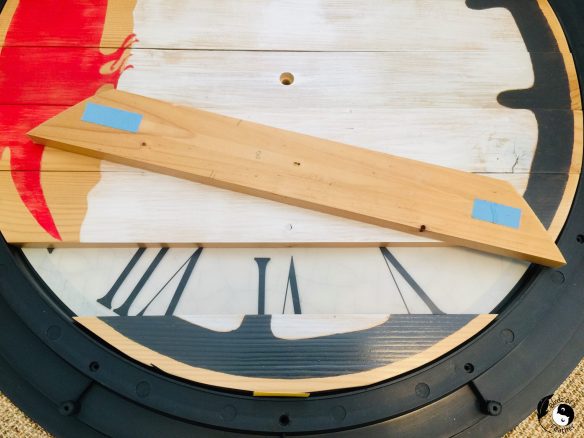
3. Arrange Pallet Wood for Wooden Wall Art DIY
Lay out the pallet wood on a table, good side down.
Line up a batten in the centre and countersink enough holes for each board. Screw the batten onto the back of the pallet wood as shown.

Note that when you flip it over to the right side, you’ll need to add two extra supports on either side to keep it steady (they don’t need to be screwed in). You can create a circle template on paper, if you have a piece big enough, or draw your circle directly on the wood.

4. Draw Circle Template
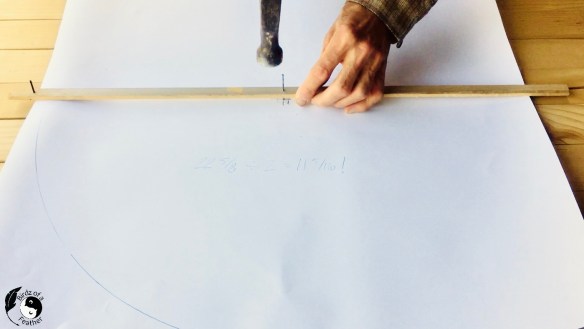
How to Draw an Arc
Any method will do to draw the circle, but here’s what we do. Using a thin piece of wood, drill through the centre and place a nail through the hole. Measure half the distance of the circle and drill a tight hole to accommodate a piece of pencil lead. Centre the wood on a piece of paper large enough to draw the circle.
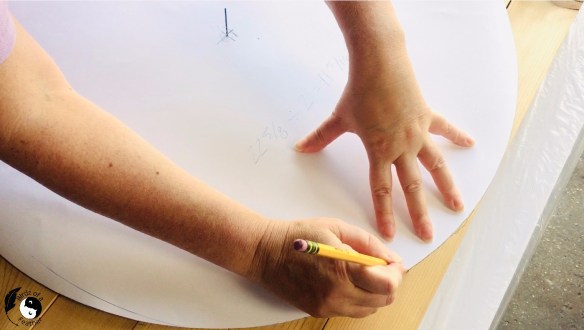
Cut out the circle and transfer it onto the face of the pallet wood.
5. Cut Pallet Wood with Jigsaw
Secure pallet wood onto the workbench with clamps and cut out the circle with a jigsaw.
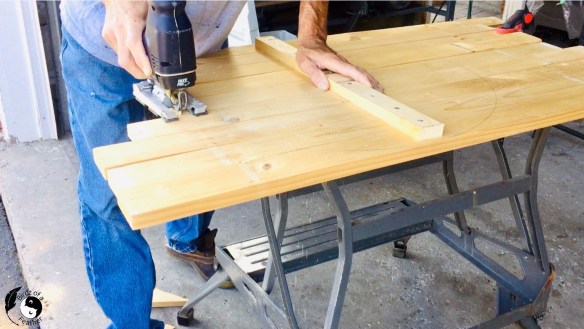
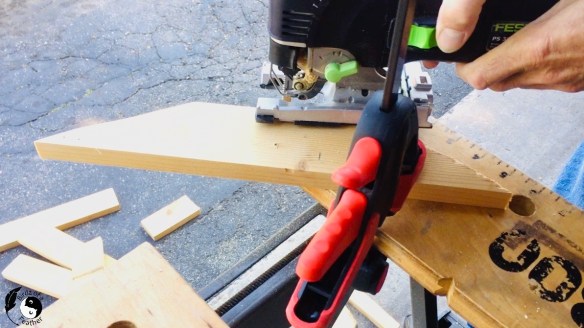
You’ll likely have to turn it around in the workbench and re-clamp to cut the other side.

If necessary, temporarily remove the top and bottom pieces from the batten to finish cutting the edges with the jigsaw. If you do, clamp again to the workbench.
Reassemble to sand edges smooth with sandpaper and block.

Check the fit in the frame before moving onto painting and adjust if necessary. Temporarily remove the centre piece of wood and drill out to accommodate the width of the clock mechanism.
Replace the wood and leave the batten on the back until after paint is applied. Also number all the pieces on the back. This will keep all the pieces together.
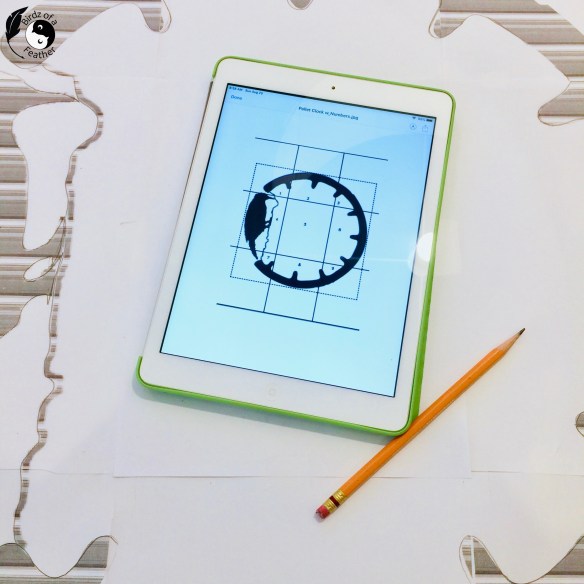
5. Cut Stencil for Pallet Wood Clock Face
Scale pattern to the size you need and get it printed by a company that does engineer- sized prints. Or print images on your home printer on multiple pages and tape together.

When I printed this at home on an ink-saving mode, I got psychedelic lines running through the graphic! So I refer back to the pattern on my iPad to tape the sections together.
Stick together two pieces of shelf liner to get the size you need. The shelf liner will become the stencil for the wooden wall art diy. Then peel the backing and stick it to the pallet wood. Save the backing; you’ll need it when dry brushing each section.

Use carbon paper to trace the image onto the shelf liner.

Use an X-acto knife to cut through all markings on the vinyl onto the wooden wall art diy.

Peel up the middle section, but remember to stick it to the saved backing to replace it later.

Here’s how it looks.

6. Dry Brush Paint
Dry brush the middle section with white paint.

To dry brush, offload most of the paint onto paper towels.

Layer the white as light or dark as you like.
 Once dry, replace the middle section, then peel up the bird. Dry brush with red paint.
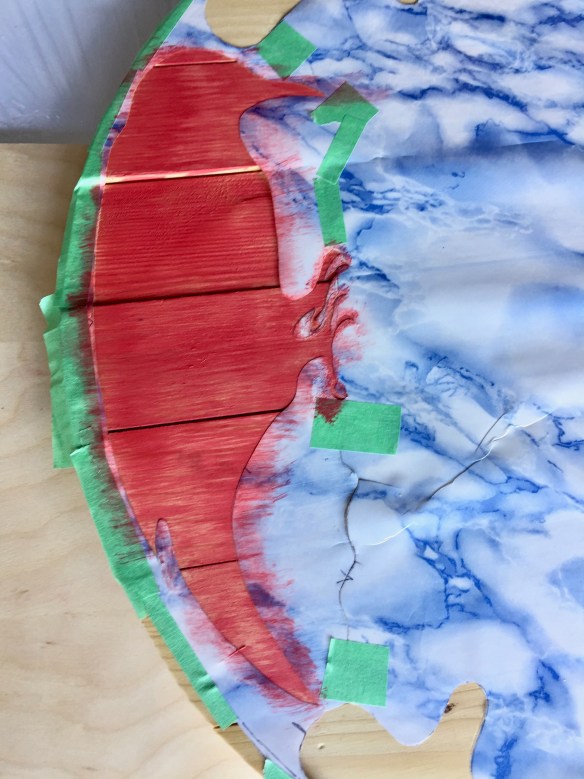
Let dry. Now it’s time to dry brush the black.

Lift the last section and carefully dry brush the black paint.
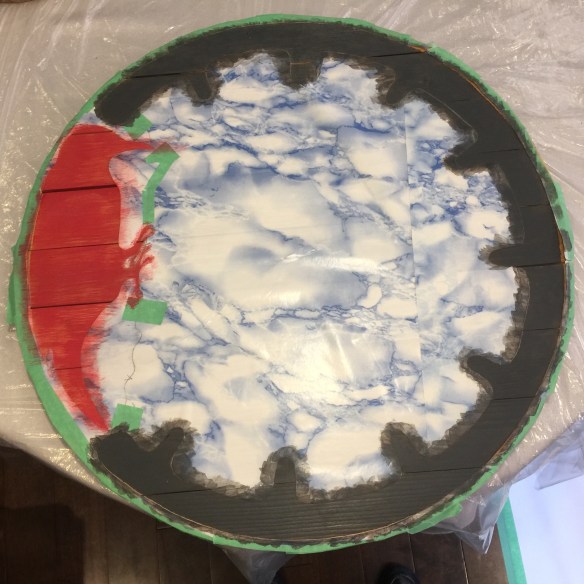
Finally, peel away all the vinyl and discard.

Remove the screws and batten. We run a piece of masking tape down the middle of each plank. This is so there’s still some bare wood in the centre of the wood so we can add double side tape later.

Now apply 2 coats of clear coat water-based varnish around all surfaces of the pallet wood; let dry. My preference for top coat is Varathane water based finish in a satin finish.

7. Assemble Pallet Wood Clock
Use double faced tape on back of each piece to stick wood to backing. You can apply along the hole piece or just in sections (as long as your tape is super strong).

Reassemble the pallet wood onto the clock backing in order.
With the tape holding the pallet wood in place, mark where the planks intersect with the side of the backing and use chalk to mark lines corresponding with the centre of each piece. Drill through the plastic in several places into the wood.
Use a washer and screw into the wood to hold the pieces from the back and secure the pallet wood to the backing.

8. Paint Frame
Thoroughly clean the plastic frame with warm, soapy water, rinse and dry. Lightly sand with fine grit sandpaper and wipe clean.

If you chose to use spray paint in a can, the comfort grip you see below is a good idea to prevent hand fatigue. Or refer to our post on how to paint using a spray gun. Whatever method you choose to paint, be sure to use a compatible paint made for plastic, like this Rustoleum spray paint.

When spraying a round piece, like this frame, it’s helpful to build wood risers to spray on. The risers are elevated to allow the piece to dry (which you’ll see further ahead).
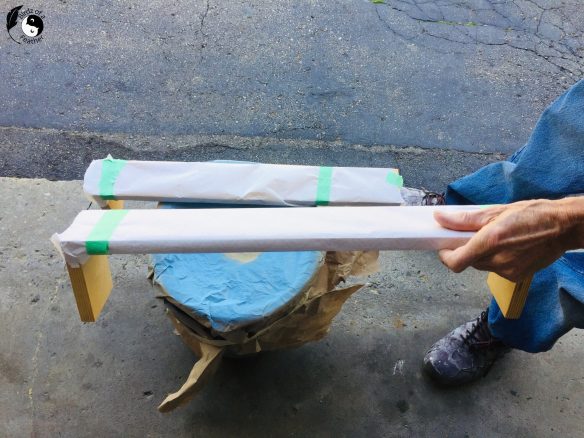
Prop them onto a bucket to elevate the frame as you spray.
 Hopefully you get the paint perfectly smooth like this.

However, we didn’t shake the can well enough and in some sections the can spat out this textured look I was not thrilled with. But don’t worry, we didn’t leave it like this!

It’s easy enough to sand it back and reapply another coat of paint.

Originally we were going to re-spray it and leave it smooth, as you see below. However, I had an epiphany to distress it to allow some of the base colour of the plastic to show through.

As you can see, it’s a really bold and interesting effect! It actually complements the red bird as you’ll see later!

We achieve this finish by spraying an incompatible clear coat on top of our Rustoleum spray paint, while it’s still wet. The Tremclad you see on the left below will effectively crackle the paint in some spots and allows the red tone of the plastic to bleed through in others. In contrast, since the Krylon (on the right) is made for plastic, it likely won’t work.

9. Attach Clock Mechanism
Install the clock mechanism according to directions on package. This is my least favourite part of this wooden wall art DIY – trying to attach all those fiddly little bits!
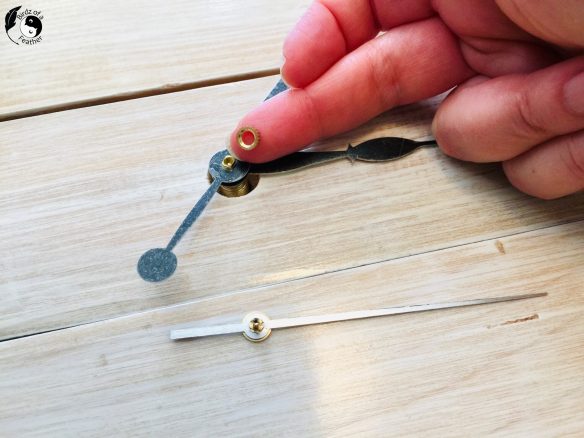
You’ll find more info on how to assemble the clock mechanism in this computer hard drive clock post (steps 7 and 11).
Fixing Any Issues
When you upcycle anything you find at the curb, keep an open mind. It’s out on garbage day for a reason. And that reason is likely an imperfection.
In this instance, we do have an issue with some of the plastic spacers breaking off, so we break out the JB Weld Plastic Bonder. Ironically, it’s black to match the plastic on our clock!

It bonds and sets up in 15 minutes so is a quick and sturdy fix.

There! Good as new.

How to Hang Heavy Objects on Drywall
Hang a Big Clock
Since this clock is made from pallet wood, it’s fairly heavy. So what do you use to hang a heavy clock to there’s no chance of it coming down? An aluminum french cleat, or Z-clips, is a great solution when you have to hang heavy objects.

Install the French Cleat
When you turn the clock upside down to mount the hardware, be sure to put two runners underneath so that you don’t squish the clock hands! We’re using these foam pieces on either side and then lower the clock onto them.

The french cleat has two parts. One half of attaches to the back of the pallet clock and the other half (lower one) to the wall.

Because the back of the clock looks like crop circles, we jigsaw out some wood to fill the void where we’ll screw in the french cleat.

Before screwing in the cleat, we countersink two holes to attach it to the clock.

Once the french cleat hardware is attached, then use the screws saved when disassembling the piece to re attach the frame to the backing.
Hang the Pallet Clock
What I love about this particular Ook hanging system is that it comes with level to help you get the cleat level on the wall! It just slips into the channel.

Wooden Wall Art DIY Planter
There’s one last embellishment. Turn your wooden wall art DIY into an air plant holder by adding air plants around the clock face!

Turn Your Wooden Wall Art DIY into a Planter
If you want to turn your pallet clock into a planter too, position bottle caps around the cogs as shown (that’s the reason the cogs are offset on the stencil if you noticed that).
Then glue the air plants into bottle caps with hot glue! The hot glue won’t harm the air plant if you glue them at the base.

Attach the bottle caps to the pallet clock with pieces of removable doubled-sided nano tape or 3M strips.
The nano tape is reusable so will stand up to removing the bottle caps when you have to water your air plants.
Before and After
Here’s a reminder of the pallet wood and clock we started with:

And now?
Of course you can leave the pallet clock as is. But I think the green air plants look gorgeous against the other colours of our painted pallet clock!

Pallet Planter Maintenance
Remove the air plants with once a week and soak in water (this picture was taken before the bottle caps, but they will be attached).
Gently shake the water off the air plants and allow to air dry before replacing them on the clock.

I did make one improvement to the air plant holders, which I’ll write about in a future post (update: see unique air plant holder).

Instead of glueing the air plants, they sit right into wire air plant holders so they can easily lift out for watering.

Want more planter ideas? Check out these amazing upcycled planters!
Fall Into Fabulous
One of the things I love most about blogging is connecting with other makers, and this Fall we’ve created something truly inspiring together.
Grab 16 digital goodies from top creators — planners, recipes, colouring books & more — including our Beginner Crochet e-Book!
Every dollar of our commission goes straight to Alzheimer’s research — a cause close to our hearts. Your purchase through this link means you’re not just treating yourself; you’re making a real difference.
Grab it now — the bundle is only available for a limited time! Let’s make this Fall fabulous and full of hope. 💜

Pin Wooden Wall Art DIY

Wall Art Ideas
International Bloggers Club
Don’t forget to visit these awesome ‘Walls and All‘ projects from our creative friends below. You’re in for some unique and spectacular wall art ideas!
- Unique Creations By Anita
- Birdz of a Feather (that’s us!)
- A Crafty Mix
- What Meegan Makes
- Interior Frugalista

This is a really unique makeover. I love that you added the air plants and the spring stands were a really cool touch. I really wish we had a garbage day here where we live you seem to get so much great stuff.
Yes, trash day is more like shopping for us upcyclers – lol! I think we’re so lucky here; the inspiration is endless and it keeps things out of landfill!
I love this Sara! I especially love the bird. :0}
You know that’s my favourite part too 🙂
This must be the most creative vertical garden I’ve ever seen, Sara. Adding air plants takes it to a whole new level. My step-mom has a HUGE collection of air plants and I can’t wait to show her what you’ve done.
Thanks so much Michelle! I love air plants so can’t help but dream up new and different ways to display them!
I really love how you made the wooden clock an air plant holder. Such a creative idea! I especially love how you rescued and reloved curbside finds from ending up in the landfill. If only these people could see what a treasure their junk became. Thanks for the great paint crackling tip and homemade stencil idea!
There used to be a Canadian show where two brothers went around taking garbage. Then they’d go back to the shop to make it over and return it to the curb where they found it. They’d knock on the door and hide to see the reaction. If I had all the time in the world, I’d do that too just for fun – lol!
Sara this is an amazing project. I love how you come up with these ideas. Adding the plants is amazing.
Pinned
Thanks Cindy! Planters are becoming a specialty around here; I just love having plants around!
I love how you were able to make something out of nothing and it’s gorgeous. I love the rustic style and especially the air plants. Thanks for always jump starting my creative juices!
Thank you Meegan; so glad to hear that!
This is so clever, and I love that you made it from recycled finds. xo Laura
Thanks Laura! We’re all about eco crafting; just about all our projects have at least one element that’s upcyled/recycled etc!
My goodness this is creative Sara! It’s a clock, art and planter all-in-one!
Thank you Donna! I’ve never been known for keeping it simple 🙂