

Just like a real dog, this string art dog tugs at the heart strings! Today we’re showing you the ultimate guide to string art for beginners using an upcycled scrap of wood. I’ll show you how to make a custom string art piece using a picture of your own dog. But this particular piece isn’t only artwork, it’s functional too: this string art dog is also a leash/bag holder.

International Bloggers Club
It’s time for this month’s International Bloggers Club (IBC). With world dog day coming up on August 26th, it’s time to celebrate our furry friends with this month’s challenge ‘Furever Challenge’.
The IBC is a group of bloggers from all over the world who challenge each other every month to make something using a common theme. Our previous challenge was “Fantabulous Planters” and we used a basketball to make this fun basketball planter.
You’ll find our friends’ forever crafts at the bottom of the post. So don’t forget to check them out before you go. And if you don’t have time to browse today, pop back in later in the week to pick up where you left off.
Inspiration Behind the String Art
I live vicariously through other people’s dogs, because Hubs is allergic, so I design ‘furever’ crafts like this dog gift basket to give away. Both my sisters adopted dogs from Mexico a few months apart – first Britney, then Polly. Their angelic sleeping faces belie their respective mischievous streaks.

Britney belongs to my middle sister. She is not as high strung as Polly and is a fun loving dog – as this joy ride attests.

But she also has a mischievous side. More specifically, Britney has a thing for chewing paper. A few years ago Hubs and I were helping my brother-in-law build an outdoor structure and Britney stole the door plan measurements. See what happens when I try to get it back from her:
You’d never guess how naughty Polly can be just by looking at her. But she was the best company for my Mom, while she was still alive, and remains an indispensable companion to my youngest sister now.

See that blurry tail? You can get a sense of how fast Polly’s tail is wagging here; she’s ALWAYS happy to see us when we visit!

Before we get to the tutorial, don’t forget to get your craft mojo on at Birdz of a Feather and subscribe! You can also follow us on Pinterest, Facebook, YouTube and Instagram.
What is Needed for String Art?
[If you’re looking for some of the things we used, we’ve got you covered (disclosure): Clicking on the affiliate links below means we may receive a commission. But don’t worry, you don’t pay a cent more and it helps us make more unique crafts to share with you! Thanks for helping to support our blog!]

This beginner string art project is economical because you can get most supplies from the dollar store! You’ll need these string art supplies:
- A picture of your dog
- Dollar store mini yarn
- A wooden board or scrap wood
- 1/2″ and/or 3/4″ finishing nails
- Hammer – I use CS Osborne Magnetic Tack Hammer
- Paint
- Reverse action tweezers
- Beadsmith 1.5 mm Metal Hold Punch (optional)
- Dollar store letters
- Masking tape
- Paint stick
- Coat hook
- Double side tape
- Drink can, flattened
- Dollar store jump rings
- Wax putty stick (for correcting nail holes)
- Wooden clothes pin
- Electrical wire (optional)
What Kind of Nails do You Need for String Art
I use half inch brad nails for the majority of the dog, but switch to 3/4″ nails for elements that I want to stand out.

The silver contrasts with the colour of the dog (black)., However if your own dog is primarily light in colour black nails would look great too if you can find them! 
What is the Best String for String Art?
For a beginner project like this, I prefer a thin 100% cotton or floss. The smoother, the better; anything with texture will just catch on the nail heads.
Be on the lookout for these mini yarns at the dollar store. You can find them in pastels and brights – which is what we’re using for this project.

Watch String Art Dog Video
I made this instructional video with all my tips and tricks, but if you prefer to read on, continue with the string art dog tutorial below.
Step 1: String Art Template
For the backer board, I upcycle MDF previously used for centrepieces.

Once repainted white, I’m getting good mileage out of these house shapes, because I also made this key organizer with one.

Any wood will do, but if you want to recreate this shape, use the dimensions shown below.

For the template, start with a picture of your dog. Here’s a picture of Britney. Be sure to take a picture with good contrast. This picture is a little dark and I could have added the part between her legs where her butt meets the grout, but miss that part. Since it’s best to simplify anyway, leaving that out is not a big deal.

The easiest way to make the string art template is to trace the outline onto a sheet of tracing paper. Then you can scan it into your computer, scale the size as you wish and print it on regular white paper. Notice below that I also add a heart.

If you have photoshop, you can also create this template in photoshop. If anyone wants a tutorial on how to make string art patterns, leave us a comment and if there’s enough interest I’ll do a tutorial on turning a photo into line art.
Step 2: Outline the Template
I originally intend for the string art to sit in the dog house shape vertically. But I forgot to take note of the measurements and messed up on the size of my template. Ultimately, I just decide to go with the flow (horizontal it is!) and it all works out in the end :).
Tape the template onto your board. At 1 cm intervals, use an awl and tap around the outline with a hammer. If you accidentally put a hole to close to the previous one, I have a fix for that I’ll show you further ahead in the ‘Troubleshooting’ section.

That will leave you with holes to guide the nails. I’ve seen tutorials where the nails are driven in with the paper on. But that will just leave you with a mess when you try to peel the paper away.

Step 3: Nail the String Art Dog
Start nailing using the holes. Because of its narrow head, I really like an upholstery tack hammer for this task.

Position a nail in a hole. Hold the nail with this reverse action tweezer.

These tweezers open when you squeeze and close when you release. I find them ideal to hold the nail as I hammer away.

They allow you to hold the nail tight and at a distance so you don’t accidentally hammer your finger. If you’re like me, you learn that the hard way!

Another benefit of these tweezers is that the nail height for these 1/2″ nails is perfectly set every time. Rest the tweezers perfectly flat against the board, then hammer in the nail until the head reaches the top of the tweezers as shown below. 
As you can see from this side shot, the height is consistent!

Vary the Height of Nails
As I mentioned earlier, if you for some reason want an element to stand out, you can use longer nails.

Because I want it to be more prominent (and did plan to add the wire heart), I switch over to 3/4″ nails for the heart.

String Art Nailing Tips
How to Nail
I’ve never come across a tutorial that goes into detail on how to nail, so I’m giving you all my tips and tricks. Be sure to watch the video to see parts of what I’m explaining here.
- Step 1 – Nail along the right side of dog, stopping in the middle
- Step 2 – Nail interior elements (in this case, the collar and heart)
- Step 3 – Proceed with left side of dog. When you come to a curve, nail the holes that are furthest away first. Then work outward. This will allow you to maneuver better with the tweezers to hold the nail. The example below shows the ear, starting at the head and working outward.

Troubleshooting
hiding unwanted nail Holes
I thought a few holes closely spaced would better define the shape. However, I find that they’re not really necessary and only crowd the nails making it harder to string. If you end up in the same situation, don’t fret. I have a great way to hide those additional nail holes: a wax putty stick!

Since our wax stick is well used (we use it to hide nail holes in our baseboards), it no longer has a pointy tip. That makes it difficult to use for this particular purpose. To combat that, shave some wax off with an X-acto knive and use the point to push the putty into the hole. Buff over it with a piece of cotton to remove any excess.

If a hole is in the interior of your string art dog, use a long nail to reach it and push the putty in with the tip.

Before and After Fixing Nail Holes
As you can see by the following before and after pictures (where my finger is pointing), stick putty does a great job of hiding holes – like they were never there.


Fixing Crooked Nails
No matter how hard you try, working with nails can be fussy. That’s because they don’t always stand straight up and down after hammering. But troubleshooting that problem is easy if you have a wooden clothes pin. The tail end will give you just the leverage you need to push a wonky nail upright. Then use the tweezers to hold it and tap it again with the hammer.

With a rounded tip, you’ll find the head of the clothes pin comes in hand too (as seen on the video).
Step 4: String the String Art
Because Britney is primarily black, I choose black for the main colour, red for the heart and pink for her collar.

With all the nails in place you’re ready to string.

Start at the middle top of the head and knot the string onto a nail. Zig zag around the nails staying above the collar (do not string black through the collar area). There really is no right or wrong; just ensure that each nail has been strung around at least once. When satisfied with the density of string, come down the side of the collar and continue stringing the lower half. Again, just like you avoided the collar area, avoid stringing black through the heart.

Once all the black areas have string, knot it on a nail and tie it off at least twice. Apply glue to all the knots and cut the black string.
Fill in the heart with red and the collar with pink: knot to start, zigzag the string and knot to finish. When doing the collar, pop the dog tab onto one of the lower nails before you start to string it. The string will then hold it in place.
Always apply glue to the knots so your string art dog can’t accidentally unravel down the road.

Now you’re ready for some embellishments if you like!
Step 5: Embellish Your String Art Dog
Embellishments are optional, but help personsalize your string art dog. I actually do all these extra touches just before I finish nailing so paint has time to dry. However, you can leave these for the end instead.
Dog Bone Tag
Flatten a drink can (you can find details on how to do that in this can craft tutorial).
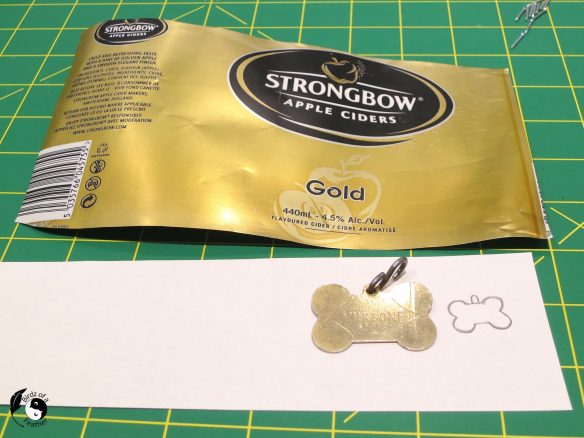
Then use it to make a cute little dog bone tag for your string art dog! Stick the paper template to the can with double sided tape and cut around with scissors.

Sand any sharp edges with a super fine sandpaper if you like.

Use a permanent marker to write on your dog’s name.

Punch a hole at the top and add two jump rings. I have a special 1.5 mm jewellers punch for this, but you could use a sharp awl and hammer to create it instead.
I’ll explain how to add the dog tag to the collar later.

Wire Heart
Bend a piece of electrical wire around the outline of the heart.

Cut heart with wire snips to trim end and set it aside for later. I was originally going to add this heart right around the nails after stringing it. That’s primarily why I used deeper nails. However, it didn’t really add anything and in the end. So I used it elsewhere on the board.

Add Your Dog’s Name
These laser cut dollar store letters are perfect for adding your dog’s name to your string art dog. You can leave them plain or paint them.
Here’s our best tip for painting tiny objects. Grab a paint stick and some masking tape. Tear off a piece of tape long enough to mount the letters.

Tear off two smaller pieces of tape for the ends. With the long piece, sticky side up, secure it at the ends with the two short pieces.

Stick your letters onto the paint stick!

Now you have an easy peasy way to paint them and they won’t shift!

Because Britney’s name is seven letters, I choose to paint each letter in rainbow colours. Arrange each colour if you want to get the order correct: red, orange, yellow, green, blue, indigo and violet.
I use a sponge brush for this because it’s easy to wash and squeeze the water out, ready for the next colour.

When it all comes together in the next step, I think her rainbow colour name is fabulous! Set it aside too dry. I didn’t top coat, but you can apply a clear varnish if you like. 
Step 6: Assemble
Tape a straight edge to your board, like this paint chip, to provide a straight line for the letters.

Apply glue to the back of each letter and place against the straight edge. Here, I’m using a nail to apply the glue.

Glue down the heart (I used crazy glue) and screw on a double hook. This hook is one I had in my stash and I love it because the two hooks are vertical instead of side-by-side. A double hook comes in handy: I provide the poop bags and my sister will have to supply the leash when she gets it :).
String Art Project
What I like most about this art project is that it’s just as easy as dog paw string art you see all over Pinterest, but so personalized! Do you think you’d make one of these for your dog? If you’d like more string art ideas, let us know in the comments.
For anyone who wants a string art template to play with, we have a pdf for you in our exclusive freebie library at Birdz on the Fly. To gain access to the free pattern for our string art dog, if you’re not already an e-mail subscriber, you need to become one by filling out the form below. After you confirm your e-mail, you’ll receive a welcome message with the password (sorry but Bloglovin’ / WordPress subscribers won’t have access to the password unless subscribed through this form). We change the password periodically, so check the newsletter often.

Fall Into Fabulous
One of the things I love most about blogging is connecting with other makers, and this Fall we’ve created something truly inspiring together.
Grab 16 digital goodies from top creators — planners, recipes, colouring books & more — including our Beginner Crochet e-Book!
Every dollar of our commission goes straight to Alzheimer’s research — a cause close to our hearts. Your purchase through this link means you’re not just treating yourself; you’re making a real difference.
Grab it now — the bundle is only available for a limited time! Let’s make this Fall fabulous and full of hope. 💜

Pin String Art Dog

International Bloggers Club Projects
Don’t forget to visit these awesome ‘Furever Craft‘ projects from our creative friends below. You’re in for some unique and spectacular dog-related creations!
- Interior Frugalista
- A Crafty Mix
- Unique Creations by Anita
- Birdz of a Feather (that’s us!)

The best I’ve ever been able to do with string art was a triangle-shaped Christmas tree 😀 Super impressed with how you managed to capture Britney’s character and yes please to the offer of a line art tutorial. I’m always game to learn more
This is my first string art project and I’d love to explore this art form more, so happy to hear you’re up for that Michelle!
Awesome project, you made it look so simple. You have definitely inspired me to have a go. Britney and poly are cute as hell. 😍
Thanks; it really is as simple as it looks – this is my first go at string art :). Britney and Polly are adorable, but just like your two they do have that devilish streak – lol!
Adorable! Such a great idea for a poop bag. Who knew there would be a cute way to display those.😂
They’re SO necessary, they might as well be cute – lol!
Oh my goodness, those mischievous eyes! Britney and Polly are so cute. Wow Sara, I’m so impressed that this was your first string art craft! It is ADORABLE and so well done. What a great idea for a dog leash holder or FURbaby wall art. You offered some fantastic crafting tips here too. After seeing this adorable idea, I want to get my string art groove on. Thanks for the fantastic tutorial!
So glad you like it! I’m really hooked on string art now and want to do more with it – the ideas are swirling 🙂
Very cute idea and the dogs are adorable. xo Laura
Thanks Laura; wish I could have my own fur baby but it’s just like kids and grandparents – they get to enjoy them without all the work 🙂
Another cute dog idea, Crafty mix had one too. Your dog is precious. What a sweetie
Thanks Maria! Loved A Craft Mix’s post!
Sara this an adorable project. I loved watching your video. That was a very fast reflex. Brittney and Polly are wonderful and I’ve hearing you laugh.
Thanks Deana! They always keep us laughing 🙂
This is so cool!! I’d love to know how to turn the photo into line art. I’d like to make one of these of my dog that passed away earlier this year. Pinned!
On a side note, I won a first place ribbon for my string art in elementary school. Nobody had ever seen string art before. Haha!
Awesome Michelle – I’ll do a little tutorial in a future post :). I’m curious: what did you design in string art the won you the first place ribbon?
I think it was a star in all white thread. I remember using a piece of old wood and some of my daddy’s nails. 🙂 I look forward to the tutorial!
You are so clever, Sara. I love the photos (and video) of the pooches. I’m glad your mom had a good companion toward the end.
Thanks Alys! I really do think that Polly helped keep my mom’s mind active. It was only during the last month or so that she couldn’t communicate. You should try your hand at this project for Tessa 🙂
Really a neat craft idea! Happily pinned to my Crafts board and to my Animal Friends board for you. 🙂
Happy crafting!!
Barb 🙂
Thanks so much Barb. It’s always a happy day when I can craft :).
Oh wow! This is so darling. You really thought of everything. The string art i so pretty. You are patient with nailing all the nails into the board. So much more patient than I would be. Thanks always for posting inspiring ideas.
I’m always in my happy place when I’m crafting so the longer it takes, the more zen I feel – lol! I always love hearing that our posts are inspiring :).
LOVE this keepsake! Such a brilliant way to string art a unique shape!
Don’t forget to share over at the Creative Crafts Linky Party every Wednesday through Sunday
https://creativelybeth.com/creative-crafts-linky-party-51/
Followed and Pinned! 🙂
Creatively, Beth
Thanks so much Beth! Will definitely swing by the link party :).