

Think you can’t make a cement planter because you can’t wrap your head around making cement planter molds? Look no further than the recycle bin for this easy eye-catching upcycle idea!
We’re back with another variation on how to make a cement planter using upcyled light bulb packaging. If you love air plants, you’ll adore this unique standing air plant holder. I guess once you start doing cement crafts, the ideas just keep on coming. Keep reading for easy cement craft ideas!

Today we’re taking part in the Creative Craft Hop. While our regular hosts are on hiatus, we’re hosting for the summer months! If you’re dropping in from Jane and Sonya at Sustain My Craft Habit, welcome! Check out the other projects at the bottom of this post. And be sure to drop back in throughout the week to visit them all!
Before we get into the tutorial, don’t forget to get your craft mojo on at Birdz of a Feather and subscribe! You can also follow us on Pinterest, Facebook, YouTube and Instagram.
What you Need for Cement Planter Molds
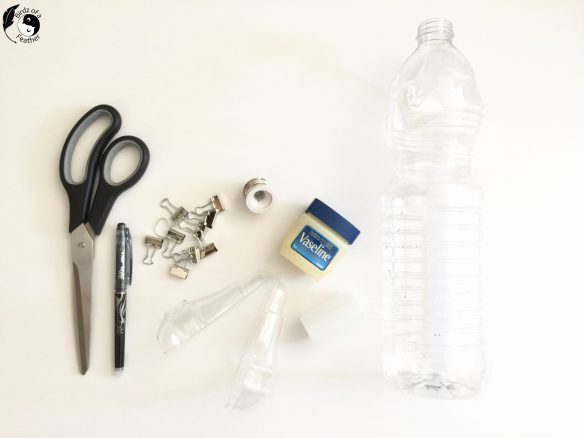
These are the easiest DIY cement planter molds you’ll ever create with! Gather the following supplies:
[If you’re looking for some of the things we used, we’ve got you covered (disclosure): Clicking on the affiliate links below means we may receive a commission. But don’t worry, you don’t pay a cent more and it helps us make more unique crafts to share with you! Thanks for helping to support our blog!]
- Medium base porcelain lampholder with pull chain
- 8 oz. Rapid Set Cement All
- 2 oz. Water
- Light bulb packaging
- Vaseline
- Binder clips
- Marker
- Standard base adapter
- Plastic water bottle
- Scissors
- Utility knife
- Air plant
- Clear cap (from hair product can or any similar round object like a film canister)
Cement Planter Molds
The recycle bin is full of cement planter mold ideas! We upcycled the outer plastic shells from LED light bulb packaging.

So if you’re upgrading your light bulbs, save all the packaging – and accessories! In addition to the plastic shell, we also combined it with a standard base adapter from this chandelier bulb packaging. These adapters are the trick to getting this cement planter to stand on its own. But don’t worry, these adapters are also available separately. 
Here’s a closer look at the base adapters that allow the cement ‘bulb’ to be screwed into a porcelain lamp holder socket – just like a real light bulb!

Air Plant Stand
To allow the cement planter to stand, use a thrifted porcelain lampholder like the one shown below. You may even have some of these if your basement is unfinished. So don’t forget to save them for cement crafts when you renovate and upgrade your light fixtures!

Cement Planter DIY
If you’re a visual learner, watch our video for all our tips and tricks.
How Do You Make Cement Crafts?
Step 1 – Prepare Mold
Use any straight side round object, like a film canister or hair spray cap, to create a hole in the top.

Notch out the lip where your round object touches the top of the bulb packaging so you can get it to sit flush. Then trace around it with a marker.
 Cut a hole in the top as shown with scissors or a utility knife.

The film canister should be able to slide into the hole to displace the wet cement. That’s what will create the hole in the top for the air plant to sit in.

Step 2 – Grease the cement planter mold
You’ll need a cement release agent so the cement mix doesn’t stick to the mold. An oil-based release agent like petroleum jelly, aka vaseline, is perfect for the job.
Use a piece of cotton to spread a coat of vaseline onto the inside of the mold. If it’s too thick, you’ll see texture when you pour the cement into the mold so a little goes a long way.

As well as the mold, the metal base adapter also gets a light coat of vaseline before it goes into the bottom of the mold. And don’t forget to grease the film canister too.

Then place the base adapter into the cement mold so it sits at the bottom of the light bulb shape.

Step 3 – Seal the Mold
To seal the cement planter mold and prevent leaks, secure all sides of the light bulb packaging with binder clips.
In fact, put them tightly side-by-side so the cement will stay inside the mold.

Step 4 – Create Support for Cement Mold
Cut the water bottle in half, as shown. While the bottom half is used to support the mold, ready to receive the cement, the upper half is used as a funnel. It will help direct the cement into the mold.

Step 5 – Mix and Pour Cement
For the cement mixture, the ratio is one part water to four parts cement. Our air plant holder uses 8 ounces of power and 2 ounces of water.

Mix the Rapid Set Cement All with water according to package directions, stirring for only a minute until the water is well absorbed.

Pour the cement into the makeshift plastic bottle funnel.

Before inserting the film canister, tap the side to release air bubbles (I did it after on the video).

Now insert the film canister and tape it down. Then let the cement dry for 1 – 2 hours.

With the leftover cement, let it dry in the plastic container. Nothing goes to waste: we’ll use it later as a sanding block.

Step 6 – Release Cement Mold
Take off the binder clips.

Remove the plastic light bulb shell.

The base adapter will likely have a light coat of cement on it.

Break off as much cement as you can.

A metal punch helps remove the rest. Tap it, as shown in the video, to crack the remaining dry cement on the base adapter.

Step 6 – Sand
Now use the cement puck you made from the leftover cement to sand the ridges on the sides of the cement planter.

Once sanded, screw your DIY light bulb planter into the porcelain base and pop an air plant right into the top.
Didn’t we tell you cement craft molds are easy? And using recycled light bulb packaging is easy on the pocket book too! Now that you know what to use as a mold, a grouping of these air planters would look great lined up on a window sill.

FAQs – Working with Cement Planter Molds
Here’s a few FAQs and recap about crafting with cement.
Mixing Cement for Crafts
What Kind of Cement is Used for Crafts?
The best cement for crafts is one that’s strong and fast setting. For crafting, you also want a cement mix that will give you a smooth finish like Rapid Set Cement All. Cement All is a multi-pupose product used for levelling and concrete repair. But its quick set time and low shrinkage make it idea for cement crafts like our diy cement planter.

Mold for Cement Planter
You don’t really need fancy cement molds for crafts! Sure, you can spend money on silicone molds. But our cement planter mold is upcycled from the plastic waste packaging that comes with LED light bulbs. Easy AND cheap is always a win-win!
What’s the Difference Between Cement and Concrete
Some tend to use the term cement and concrete interchangeably, However, cement and concrete are not one in the same. In fact, cement is an ingredient that’s used in concrete mixes.
What Can I do With Spare Concrete?
Let leftover cement dry in the bottom of the container you mixed your cement craft in. Once dry, you can pop it out and use it as a sanding block to smooth the seams of your cement planter.
Want more cement crafts? Check out these cement planter ideas. Or how about more planter ideas? Check out these amazing upcycled planters!
Fall Into Fabulous
One of the things I love most about blogging is connecting with other makers, and this Fall we’ve created something truly inspiring together.
Grab 16 digital goodies from top creators — planners, recipes, colouring books & more — including our Beginner Crochet e-Book!
Every dollar of our commission goes straight to Alzheimer’s research — a cause close to our hearts. Your purchase through this link means you’re not just treating yourself; you’re making a real difference.
Grab it now — the bundle is only available for a limited time! Let’s make this Fall fabulous and full of hope. 💜

Pin DIY Cement Planter Molds

Creative Craft Hop

We hope you enjoyed our post on how to make a cement planter mold. Now go check out Terrie’s DIY Christmas Picture Frame. Then pop back in to visit these other talented bloggers for more creative craft projects:
This is so clever! And adorable!
Thanks Michelle! There’s so much potential in ‘garbage’!
Really interesting project, Sara. Love reusing the light bulb packaging. So smart to keep it out of the landfills. The little plant looks great with the cement holder. Thanks for hosting.
Thanks so much Carol; we’re on a mission to keep as much out of landfill as we can. Every little bit helps 🙂
WOW…just…WOW!! franki
Thanks so much Franki! So glad you like it 🙂
Amazing Sara! Your tutorials are so thorough with your step by step photos and supply lists. I love how you Upcycled your lightbulb packaging and incorporated a socket holder as a stand. Thanks once again for your organizing efforts!
My pleasure Mary! For a while I was thinking about writing a planter book but then realized I’d be writing an encyclopedia. I can’t help but include all the details; no one could afford to publish me – lol!
Wow Sara, this is crazy cool! How cute to use a porcelain lampholder…it looks so pretty! I would probably have a disaster if I played with cement, but your tutorial is so detailed and thorough, thank you! And thanks for hosting our hop this summer!
Jenna
My pleasure Jenna – by the end of the summer I should get the knack for it, then I can hand it back to Andrea – lol! This project is a great beginner project if you fancy giving cement a try – you really can’t go wrong when you start out small. Plus there’s the fun factor – it’s just like playing with sand in the sandbox. I feel like a kid again when we craft with cement!
This is so cool. I will have to try this. Thanks for sharing!!
It’s a fun one; might have to make a few of these for Christmas 🙂
Looks great, Sara! I love that you used recycled materials for your planter. Thanks again for hosting! Blessings, Cecilia @My Thrift Store Addiction
Thanks Cecilia! I enjoy coming up with new ideas to recycle things you’d typically toss in the garbage. Makes us so happy to keep it out of landfill!
Oh my, Sara, you always come up with clever ways to create the best crafts! How amazing is this! And what a terrific idea to use the lightbulb packaging! You go!
Thank you Gail!
Super crafty and very inspiring, as usual!
Thanks so much Kim! I wish I had more time for crafting; we’re overwhelmed with decluttering right now.
This is so clever, Sara. Thank you for sharing at Party In Your PJ’s!
Thanks so much Ann!
I would have never thought of using the plastic around light bulbs – so creative!
Thanks so much Carol – I enjoy coming up with ideas that keep plastic out of landfill! I just completed some pieces for a Coral reef exhibit at our local Science Centre that draws attention to the plight of our oceans due to plastic pollution and global warming :). You can read more about that here: https://birdzofafeather.ca/diy/crochet-coral-reef/