

When Hubs started restoring vintage sewing machines, the need of storage for organizing all his tools was an obvious must-have and so we built this pegboard display stand DIY.
Normally, we’d be sharing a craft today but we’ve been busy as bees preparing for my sister’s move at the end of this month. So instead, we’ll upcycle some scraps and show you how to build a useful storage solution you may just want to adapt for your your craft space!
It’s time for another Creative Craft blog hop! If you are visiting from Allyson at Southern Sunflowers, welcome! Isn’t her robot craft idea so sweet? At the very bottom of this post, we’ll be directing you to the next stop on this venture. But don’t forget to check out the other stops too because you’ll find plenty more ideas. Be sure to drop back in throughout the week to visit them all!

Before we get into the tutorial, don’t forget to get your craft mojo on at Birdz of a Feather and subscribe to our newsletter:
You can also follow us on Pinterest, Facebook, YouTube and Instagram.
Pegboard Display Stand DIY
This is a great storage idea for makers and crafters alike. We’ve done so many pegboard ideas for my craft studio, it’s about time we focus on the man cave too. However, when Hubs builds something for himself, it’s usually all about the form and function. After all, there’s no creating without tools!
The beauty of this standing pegboard build is that it houses a tool kit at the base. That way, you can keep everything together that you use to craft. So when the weather is gorgeous and you want to craft outside, you can bring it outdoors – or even travel with all your essentials.

Watch this video tutorial with a few tips and tricks we learned along the way.
At first, Hubs started with this scrap pipe to get an idea of the size and space requirements. So I thought the pegboard stand display DIY would take on an industrial vibe. We love working with pipe; our most recent project is this DIY Pipe Lamp.

Of course, I like things to look pretty too. So imagine my surprise when I learned this project does happen to have a pretty element because Hubs insisted on using copper for the standing pegboard support! What isn’t pretty is the oxidation on the leftover copper scraps from our plumbing projects in the basement. But we’ll take care of that later.

After drawing out the measurements, Hubs supplemented the copper pipe with a few longer lengths too. Since your own space requirements will vary, your measurements and supplies may be different.
Materials for Pegboard Display Stand
One of the essentials you’ll need is a pipe cutter.

Hubs’ tip of the day is to cut a piece of grippy non slip liner to help hold the pipe as you are cutting it. It will go SO much faster when you have a good hold on the copper!

It’s fun to work it all out before committing to cutting the copper with the pipe cutter. Further ahead you’ll see we also added a scrap of wood as a base for the tool kit to rest on.

You’ll also need pegboard cut to size (your big box store can do this for you), 8 copper elbows, 8 T’s, 4 pipe holders, 2 caps and 8-32 machine screws and nuts (to hold the shelf and pegboard). You can solder the pieces together if you have that skill (which we do), but we chose to use Gorilla glue.
How to Make a Pegboard Display Stand
Measure twice and cut once :).

Here’s a closer look at Hubs’ measurements.

Clean the Copper
Use vinegar and salt or a commercial copper cream on the scraps of copper that are tarnished so everything looks consistent.

Once everything is clean, we seal the copper with a few spray coats of Tremclad clear since we wish to prevent future tarnish. The pegboard is also painted light blue to match my double pocket doors, since this pegboard sits close to my studio entry.
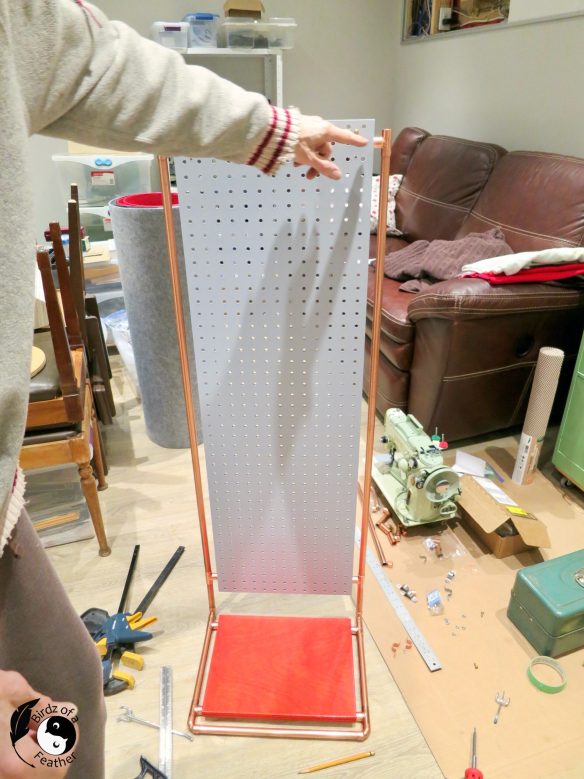
Dry Fit the Pegboard Display Stand DIY
Now do a dry fit of all the pieces.

This is where you can still adjust things if necessary.

Because it’s easy to glue things out of level and plumb, Hubs clamps two 90 degree pieces of wood to a table to square everything up as he glues.

Hubs also painted the scrap wood shelf at the bottom bright red. As you can see from the glimpse of his favourite screwdriver on the bottom right, red is a great accent colour for tool storage! Attach the red shelf with the pipe holders and screws on the underside.

Then the all important pegboard gets attached with more pipe holders. Position it one column over from the edge.

fastening the standing pegboard
The screw heads are hardly noticeable from the front.
From the back, you see the nuts and pipe holder that hold the pegboard on.

Accessorize the Pegboard
Install a pegboard screwdriver organizer if you work with a lot of screw fasteners. Another handy item is a magnetic tool holder. Hubs has more tweezers than I have in my makeup kit lol (he’s actually added on since this picture)!

And there you have it; a pegboard display stand DIY than you can customize to suit your own needs!

Free standing pegboard display
Don’t forget to finish off with the caps on top. The copper stand is perfect for hanging a flashlight; we always know where to find it!

Pegboard is always our go-to solution when it comes to organizing. We’ve done many unique pegboard projects to organize everything from jewelry to crafts – like this unique pegboard craft organizer.
If you want to get even more creative and pretty up the pegboard – check out the paint treatment of the pegboard in this pallet shelves diy!
Fall Into Fabulous
One of the things I love most about blogging is connecting with other makers. And this Fall we’ve created something truly inspiring together: 16 digital goodies from top creators — planners, recipes, colouring books & more — including our Beginner Crochet e-Book!
Grab it now — the bundle is only available for a limited time at this price: use the coupon code FALLFUN to get it for $9.99!
As always, every dollar of our commission goes straight to Alzheimer’s research, so treat yourself knowing that you’re making a real difference! Let’s make this Fall fabulous and full of hope. 💜

Pin Pegboard Display Stand DIY
Pinning is always welcome and appreciated.

Creative Craft Hop
Now it’s time to check out Beautiful Mother’s Day Mason Jar Sign with Free Designs & Paper Flowers from Niki at Life as a LEO Wife. When you’re done, please remember to visit these other amazing talents below:
- Cord Wrapped Tin Can Flatware Caddy
- How to Make Pretty Planters with Vinyl
- Repurposed Ceiling Medallion Whimsical Mushroom Wreath
- You Can Paint….WHAT?
- Kentucky Derby Straws
- Denim Cuff Bracelets
- Robot Craft Idea for Kindergarten Kids to Make for Friends
- Pegboard Display Stand DIY (that’s us)
- Beautiful Mother’s Day Mason Jar Sign with Free Designs & Paper Flowers
Sara, pegboard is so handy and the copper accents really elevate this project! So creative! Blessings, Cecilia @My Thrift Store Addiction
Thank you Cecilia! It’s just great for Hubs to be organized and have everything at his fingertips!
Wow Sara, that is so professional! It looks great and it must be so nice to be able to immediately be able to grab the right tool without having to dig around in a tool box. The copper does add a pretty factor! Thanks so much for hosting our monthly hop!
You’re welcome Jenna! Hubs came up with a great design; it’s so nice to that he thought about both form and function and the copper does look pretty!
I definitely need this for my craft room tools. Thanks for the idea. I love it!
Thanks Terrie; it’s Hubs’ brainchild; I’ll be sure to pass that on to him 🙂
Great project, Sara! Can I borrow your hubs? All kidding aside, I love this idea and desperately need to organize my craft supplies! Besides having them in my craftroom, I’ve taken over part of our garage and was recently given an ultimatum to “clean” up an area that is blocking the circuit breaker. So I should get busy organizing!
Ha ha, I get that question a LOT lol! We have several pegboard ideas on the blog so there’s definitely going to be one to fit your craft space no matter where you’ve expanded to. We even have a few that tuck away and slide out (you’ll find all our pegboard ideas here: https://birdzofafeather.ca/tag/pegboard-ideas/).
Your Hubs is quite the handyman. Looks like you have a very useful spot to store his tools. This project is above my pay grade, but I’m impressed with his skills. Thanks for hosting, Sara.
You’re welcome Carol! Yes, Hubs is definitely a keeper lol.
I love this project, Sara – everything is right at your fingertips. No hunting for the right tool!
That’s the beauty of it; a place for everything and everything in its place!
Now that is a handy idea!! I love the use of the pipe, too. We just used it for a curtain rod. Great minds…
Copper is such a pretty metal. Great idea to use it as a rod for curtains; I may have to steal that at my BILs new place! BTW, I don’t know if you ever watch Magnolia Network, but I saw Joanna Gaines re-do a house with copper eavestroughs and it was drop dead gorgeous.
Great DIY idea for getting organized! I like that it can be moved if needed and it looks real good with the copper piping.
Thanks Allyson; I was super happy that Hubs chose copper to build it; it’s a pretty metal.