

I wouldn’t have guessed that a fire pit would top my list of favourite upcycles! It’s amazing what you can find kicked to the curb every week. As I walked down the street on this particular day, I spotted it in the distance.
 However, as I got near, I saw that it was far from perfect.

The mesh top was destroyed and had separated from the strapping. Moreover, the rust on the surrounding metal was deeply pocked and beyond saving.
 Most people would have kept on going. But not me. As I lifted off the top to explore, I noticed that the base was quite ornate and not nearly as rusted as the top.
When you think about it, it makes sense that the bowl would be destroyed far sooner than the base because it’s more exposed to the elements. I was inspired!

Not to mention, it breaks my heart to see the abundance of waste that goes to landfill when there’s much that can be done to breathe a second life in it! So I grabbed the base and lugged it home, leaving the unsalvageable part behind for garbage pickup.

Spray Paint Prep
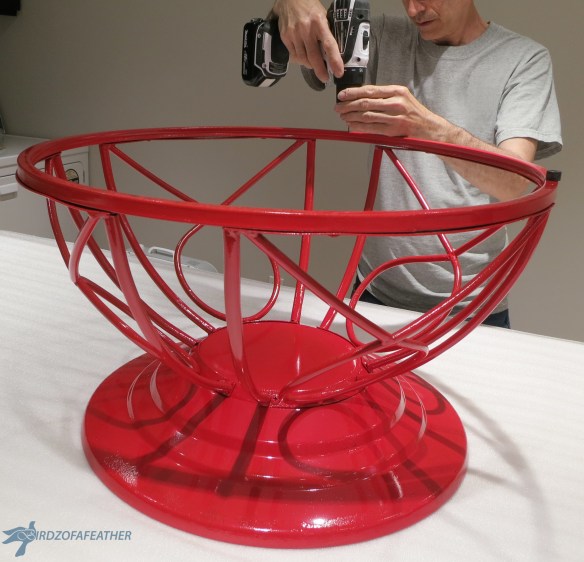
We started by sanding away all the loose rust, then spraying it with a few thin coats of rust paint to prevent further rusting in a bold, bright red.
Once dry, we followed with a few coats of Rustoleum Universal clear to give it more rust-protection durability and a hammered finish!

Then we gathered some rubber bumpers and screws.

The design of these bumpers will allow the screw heads to be countersunk so they don’t stick out beyond the bumper (more on where they were applied later).
The Finishing Touch
Just a few weeks before finding the fire pit, I picked up a special item at our favourite outdoor antique market in Aberfoyle. I knew right away that the two pieces would pair perfectly.

This beauty is a vintage stainless steel milk can called ‘The Surge’ Milker!

Ironically, when Hubs first saw the base, he had the same idea so I knew I was on the right track to transform this piece! Like peas in a pod (or should I say Birdz of a Feather!), we were both inspired to turn the fire pit upside down, realizing it would provide the perfect base to showcase the milker!

With the milkcan’s lid missing, I knew it would make a great planter. But it didn’t really come together until we found the fire pit.
After nailing down the plan, we found a plastic pot with drainage to fit the opening of the milk can. Subsequently, we planted wave petunias in it:

Completing the Fire Pit
Hubs completed the base by drilling holes evenly spaced around the top edge. Then he screwed the bumpers in place.

After attaching the bumpers, he took the base outside to pair up with the milk can.
With freshly planted wave petunias, we put the milk can on top of our now upside down fire pit base.
We moved it to a few different spots in our small backyard oasis and settled on leaving it between a pair of chairs in front of the pond. Coupled with the lines of the milker, the red colour really makes the ornate design on the fire pit pop!

Once in Bloom
Here’s how it looks after growing for a while.

Although the container is small, the petunias just keep blooming all summer long! It’s gorgeous once the flowers are fully grown, don’t you agree?

I wonder what the previous owners would think of their fire pit if they could see it now? They might think twice about throwing it away.
Get your DIY mojo on at Birdz of a Feather and subscribe if you don’t want to miss another unique idea! Also, you can also follow us on Pinterest, Facebook, YouTube and Instagram.
In light of the transformation, I think this project was a resounding success. If you think so too, please pin and share.

Last summer, I made it my mission to create and craft using nothing but items I found on garbage day within a few block perimeter of my house. Unfortunately my mission was prematurely cut short after my craft studio sprang a leak and I no longer had a place to work and store my finds. However, I did score a few great things before becoming water logged and having to put my projects on hold! I can’t wait to pick up where I left off next summer with my curb side finds!
Check out these 10 outside the box planter ideas. Or want ALL our planter ideas? Check out these amazing upcycled planters!
Fall Into Fabulous
One of the things I love most about blogging is connecting with other makers , and this Fall we’ve created something truly inspiring together.
Grab 16 digital goodies from top creators — planners, recipes, coloring books & more — including our Beginner Crochet e-Book!
Every dollar of our commission goes straight to Alzheimer’s research — a cause close to our hearts. Your purchase through this link means you’re not just treating yourself; you’re making a real difference.
Grab it now — the bundle is only available for a limited time! Let’s make this Fall fabulous and full of hope. 💜


In case you missed it, check out our Tarnish Free Jewellery Cabinet Upcycle:


SavSave
I love the way your mind works. That base is beautiful, especially with the vibrant red paint. And your milk pot with summer blooms really makes the entire thing a statement piece. Well done, Sara! I love these posts.
Several years ago a client gave me a child’s table and chairs with butterfly mosaic all in white. It too had a lot of rust. I turned the table upside down, masked off the mosaic, and painted the whole thing with a forged steal spray paint. I really had fun.
I’m always looking forward to your next project!
Thanks Alys! After our flooring series, our next makeover is going to be a waterfall dresser. Hubs found it literally in pieces scattered around our neighbourhood last summer. The owners were using the drawers to hold down their garage sale signs – and intended to dump it all afterwards. It was like a treasure hunt finding all the pieces to make it whole again, and one of the drawers was already missing to our dismay, but we found a new home for it in my craft studio 🙂
You really have a talent for seeing through the dirt and the rust to find the gold at the end of the rainbow!!! Kudos!!
Thank you Chandra – that’s a lovely compliment. Even hubs raises an eyebrow occasionally at some of the things I bring home – lol
Great job on repurposing what others saw as trash! You gave new life and new purpose to a found object and in my book, that’s a win-win! Your other projects are wonderful too! What a talented gal you are!
Thanks so much Karen; I hope you subscribed! I’ve got a lot more projects ahead that up the ante on repurposing 🙂
Great job.I see things the way you do.Love to repurpose. This would make nice table with plexiglass top.
Thanks Karen; that’s a great idea too. I do have an upcoming post that shows something similar, so hope you’re subscribed 🙂
It amazes me how something so ugly can turn out so pretty, beautiful job.
Thanks so much!
Beautiful re-use of what would otherwise be scrapped.
Thanks Mike!
OMG, honey you nail this project. You and your hubby have a great creative mind. Wow, this ugly duckling turn into a prince, for sure. Thank you!
Thanks Ivory; it’s been a while since you’ve been by – I’ve missed you 🙂
I see these pits at the curb all the time, but I keep driving. I need to stop! Love the color.
That’s great Kim; if I can keep one more thing from going to landfill, I’ve done my job 🙂
We have a similar firepit we’re no longer using and hubby was hauling it towards the garbage bin when I stopped him and said it could be made into something useful. I got the eye roll. Wait until I show him this!
Too funny Marie; I got the eye roll too when I dragged it home but Hubs loves it now! He just doesn’t have the same imagination so it can take a lot of convincing 🙂
That turned out great, you’re so creative!!
Thank you for that lovely compliment!
Oh wow,most definitely a resounding success Sara. Love the way your mind works. That red is gorgeous and the way you paired it with stainless steel milk thingy just works
Don’t you just love it when things fall into place so seamlessly? I knew the milker would make a great planter, but the base just really brings it together. Thanks for dropping in to check it out 🙂
Very cool idea turning it into a table. Love the planter too.
Thanks Kim!
Wow, you did a fantastic job, looks as good as new.
Thanks Anita!
Such a beautiful piece to use all year long!
Thank you for the wonderful idea.
Thanks Megan! We tend to put it into storage during the winter just to save the wear and tear, but if we were in a warmer climate this would definitely stay out year round!
simply beautiful, love your outlook on things and what it could be.
Thanks so much Rhonda! I just hate to see anything useful go into landfill, that’s for sure!