

Water leak repair is something we all hope will never be on the to-do list. While water leaks and burst pipes can be a huge problem, we’re showing you how to tackle the repair in two parts. Today we’re showing you how to install a frost proof faucet. In part 2, we’re showing you how to prevent mold growth after water damage.
Basement Water Leak Repair
Some of you may remember the reveal of my craft studio in our newly finished basement. I was also supposed to reveal the mancave right on its heels, but there was a good reason why that didn’t happen for a long time. One morning I went into my craft studio and noticed a swooshing sound coming from the area carpet underfoot. Not a good sign. I then found this on top of my dresser:

The cup that is supposed to be empty is now it was full of water! I could see that all of our perfectly fitted and caulked baseboards had warped and popped off the walls.

Patches of paint were cracked and peeling on hub’s once-flawless drywall.
Eeeeek – we had a water leak!! But what caused it?

Detective Work
I noticed that the path of the water was near the window. However the drywall damage was right up against the edge of a cabinet which suggested that the water might not have come in from the window itself.
It was right underneath the end cabinet where the water had gathered in the cup on top of my dresser. I opened the cabinet door and discovered that all my books were soaking wet. After removng them, when I looked up, I saw the access hole for the shut-off valve to our outdoor faucet. It wasn’t a far stretch to suspect a leak in the pipe could be the culprit.

Once I determined that the water leak wasn’t currently active, there was nothing more that I could do to until Hubs got home from work; I didn’t want to disturb the ‘scene of the crime’ until he was there to help determine where the water had come from. Finding the source was going to require some investigative work to rule out a myriad of possibilities.
When Hubs got home, we took down the cabinet to investigate further and get better access to the water shutoff.

Although there wasn’t an active leak, there was dampness. We had to act quickly to prevent mold damage, so we turned our attention to clearing out the room. In part 2 of this series, we’ll explain mold preventation after a water leak.

The Culprit: Pipe Burst
So what actually caused our leak? Our frost proof faucet burst. Below you can clearly see the split in the pipe. Before we could proceed to put my craft studio back together, Hubs had to remove the frost proof faucet and replace it with another one.
Now, if you simply have a burst pipe and your water leak repair doesn’t involve instalingl a frost proof faucet, then head here for info on how to fix a burst pipe. Otherwise, read on for some tips.

Preventing a Water Leak Repair
We were scratching our heads wondering what could have caused our frost proof faucet to fail when it’s guaranteed frost proof. Are you wondering too? Well, a frost proof faucet is only foolproof AS LONG AS YOU DON’T FORGET TO REMOVE THE HOSE.
You can get away with not turning off the water, but you have to disconnect the hose before winter comes! We’re not 100% certain, but there’s a good chance that hubs forgot to detach our water hose last fall. When winter settled in, the water probably back up from the hose, froze in the pipe and caused the split. Then in the spring, when he went to turn on the tap to fill our backyard pond diy, we got more than we bargained for. In retrospect, I now realize why it seemed to take longer than normal to fill the pond last spring: some water was going into the pond and some right into our basement!
What’s that – more questions? You might also be wondering “why didn’t you just call the insurance company to come take care of the repairs?” For one, we have a deductible. Since Hubs initially did all the work to begin with, he was able to do the repairs himself for much less than the deductible would have been. But it wasn’t just a matter of the money; hubs was so proud of the work he did in the basement that he didn’t want any old contractor slapping it back together. It had to be just as perfect as it was before and the only way to do that is to do it yourself. Secondly, we didn’t want our insurance to go up either when we had the capability to make our own repairs; we’ve never made a claim, but who knows?
Force of Nature
All Hubs wanted to do was finally sit and relax in his mancave but then the leak happened – poor guy! He barely had a chance to enjoy the fruit of his labour and now he had more labour again than he ever bargained for.
The picture below demonstrates the forces of nature: you can see how frozen water burst open the stem of the sillcock (as compared against the new replacement).

By installing a frost free outdoor faucet, you will decrease the chances of having a pipe burst in your home (just don’t forget to remove the hose in the fall!).
Here’s our new replacement. Hopefully, once it’s installed that’ll be the last water leak repair we ever have to make!

By the way, the plastic wedge that we removed below is provided to compensate for lap siding installations. It slips between the frost-proof flange and the siding to form an attractive finish and solid base for mounting. Since ours was a brick application, we didn’t use it.

A properly installed frost-free sillcock will have a slight downward pitch (as show below). So when the water turns off, it will all drain out of the stem. If you fail to do this, the water will sit inside the stem of the sillcock even when it’s turned of and you’ll end up with the same burst pipe as you saw above. This is something we double checked when we replaced our old one (and why we enlarged the bottom of the hole as you’ll see later)!

Source: http://www.startribune.com/a-few-little-tricks-to-make-sure-your-outside-faucets-don-t-freeze/137470183/
Turn Off the Water
The first order of business is to find the shutoff valve and turn off the water. In our house the shutoff is in the ceiling, but if you have a newer home, the valve is typically located right next to the main water valve.
If for some reason you don’t have a shutoff, you’ll need to turn off the water main until the new installation is done. If you have a plumber doing this work for you, you might want to ask him to install a shutoff for future convenience.

Once the water is turned off inside the house, open the outside faucet to allow any water to drain. You need to drain whatever water might still be in the pipe so you can de-solder the pipe connections to remove the old one.

De-Solder
To de-solder the connections, you’ll need some gloves, a wrench and a propane torch. To prep the area, put a piece of tin foil against the joists so you don’t catch the wood on fire – you don’t want to burn your house down in the process of preventing further water damage, do you? As you can see by the scorch mark above, the contractor that built our house didn’t bother with this step!
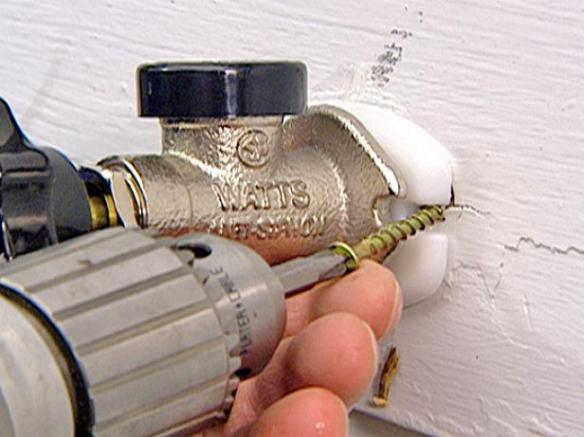
Put on your gloves, hold the pipe with a wrench and apply heat to the joints to ease them apart. Remove the old sillcock from the outside.

To ensure a better downward pitch, hubs increased the length of the hole.
 It gave him more leeway to adjust the pitch. He did a dry fit with a level to ensure that the sillcock would indeed have a downward pitch.

Note that if you were working with siding instead of brick, you would use the supplied plastic wedge behind the flange before inserting the sillcock into the hole. You would then secure it to the siding with wood screws before soldering the connections on the inside to keep it perfectly level.
Source: http://www.diynetwork.com/how-to/skills-and-know-how/plumbing/how-to-install-a-frost-free-sillcock
Back on the inside, Hubs cleaned the copper pipe with some fine sandpaper to make a solid new connection to the silcock. You need to ensure the pipe is clean of any debris or the solder will not seat properly.
Re-Solder
Before soldering, make sure the new sillcock valve is in the open position to let hot gases escape and avoid burning the rubber seat washer (you could burst the pipe again). Hubs then added some flux and soldered it all together to make the new connection. Watch this video from a plumbing pro on how to solder correctly to see the right way to do this.

While Hubs was soldering, I was holding the pipe on the outside with heavy duty heat proof gloves to keep it level. It would have been best to secure it to the brick with tapping screws but we didn’t want to take a chance they wouldn’t hold – or make our hole even bigger. (If you don’t find a way to keep it level, it will likely twist while it is being soldered. It’s important to keep it level (but still on a downward slope) or it may not drain properly – and the last thing you want is to potentially cause the leak cycle all over again!).

Test the Connection
To test whether the soldering job was successful or not, on the inside you can add some liquid soap around the joint, then turn the water back on. If there are any bubbles, you have a leak and must start again.
To finish off, we used a quick set concrete.

We first moistened inside the hole around the brick with water to prepare for the concrete application.

We mixed up the concrete in an old container with some water.

To fill the gaping hole and keep it neat, we scooped the concrete into a ziplock back, then cut a hole in the bag and squeezed it into the hole:

Don’t be tempted to merely use caulk on the outside instead of cement; the hole is too big and will be an invitation to critters, like mice, to find their way into your cosy home if it’s not sealed properly with cement. You can however, use some caulk on the inside to seal the pipe to the rim plate before you re-insulate (as you can see in the before picture – 7th from the top).
By the way, if you have an older home, have never turned off the water before winter and have never experienced a pipe burst, that’s probably because all your heat is escaping through the rim plate and keeping your pipes warm (instead of you!). You’re probably bleeding money on your heating expenses! Proper insulation combined with a frost free faucet can save a lot on heating bills! I learned that the hard way too – with my very first house.
The concrete repair of the hole turned out beautifully and we could water our garden once again! Once the concrete dried, we installed screws to keep from shifting.

More to Come
Back on the inside of the house, we re-insulated the rim space before we closed up the ceiling again. Next time in this 3-part series, I’ll be explaining how we did mold remediation after the leak and how to get a ‘level 5 finish’ on your drywall repairs so you can achieve a flawless finish too.
We can’t laugh about this episode quite yet, but mistakes do happen and things are only fail-proof to a point, so it’s a hard lesson learned. Anyway, our pain is your gain, because if you live in a colder climate and don’t already have a frost proof faucet, you should install one!
Remember, if you have a standard sillcock, you MUST turn off your water AND disconnect your garden hose in the fall. With a frost-proof sillcock you don’t have to turn off the water, but you DO have to disconnect the hose.
Here are a few projects we finished in our basement prior to the leak:
- How to install a patterned backsplash and laminate countertop installation that looks like real stone:
- Mancave Transformation
- Lastly, here’s my craft studio reveal. You’ll also find a project on how to create a desk from upcycled kitchen cabinets.
Water Leak Repair: Pin for Later
Why make the same mistake that we did when you can learn from our mistakes? Pin and share this post to save for later; you’ll be glad you did!

If you’re interested in following the water leak repair series but haven’t already subscribed, follow us here on Birdz of a Feather for upcoming DIY home & garden projects, crafts and recipes! You can also follow us on Pinterest, Facebook, YouTube and Instagram.
SaveSave
SaveSave
SaveSave
I would give anything for a basement! I live in Miami and had to give up both basements and fireplaces in exchange for the warm weather. But I would love a basement for sure!
I’ll trade you for the warm weather – lol. With the wind chill, we’ve had temperatures here around negative 30 celsius! But still, I would probably miss it too 🙂
Yikes, it’s never a good time for any kind of leak. We had a new roof put on, and when it started raining a lot, we had a leak. So, I feel your pain, but happy yours repaired.
Wow – I hope you were able to make use of the warranty!
You write so well, Sara. I can almost picture myself making the repair, simply from your instructions. We’re so lucky here on the cold front. It rarely freezes, and when it does, it’s brief. Further, the air is cold, but never cold enough to freeze pipes. I’m so glad you were able to locate and fix the broken pipe AND that you’ve learned from your mistakes and put things right while educating others. I hope the rest of your winter is uneventful and that your craft room and man cave gets lots of enjoyable use.
Thanks Alys! Yes, winter can be harsh; I’m always thankful when we can get through an ‘uneventful’ season. I’m keeping my fingers crossed! I’m happy to say that hubs is finally enjoying his mancave.
Three cheers for time in the man cave!
That’s great news!
That stinks, but at least your hubs was able to fix it. Maybe the company which made the faucet which burst will compensate you for damages.
Better luck with your new frost proof faucet.
Thanks Mike; we’re keeping our fingers crossed. At least now, we’ll know to keep an eye on it when we fill the pond in the spring 🙂