

I love to read but also like to cozy up when I do, so our upcycled magazine rack is going to do double duty. Let’s start off the New Year with a fun and practical storage solution!
Since this vintage wooden magazine holder is split right down the middle, I’ll store reading material on one side. And on the other? A colourful and cozy blanket. Specifically, an iconic multi stripe point blanket throw!

Painting around those dowels is going to be challenging, but we’ve got a trick for that!

This post is sponsored by Dixie Belle Paint
To see all our tips and tricks for getting perfect stripes, watch this video.
Magazine Holder Challenge
Today we’re taking part in a magazine holder challenge with a talented group of Dixie Belle bloggers! So if you’re looking to up the ante with your magazine rack decor, be sure to check out the links to their projects at the end.
Supplies for Upcycled Magazine Rack
* [If you’re looking for some of the things we used, we’ve got you covered (disclosure): Clicking on the affiliate links below means we may receive a commission. But don’t worry, you don’t pay a cent more and it helps us make more unique crafts to share with you! Thanks for helping to support our blog!]
Dixie Belle Paint:
- Midnight Sky Chalk Mineral Paint
- Fluff Chalk Mineral Paint
- Haint Blue Chalk Mineral Paint
- Peacock Chalk Mineral Paint
- Bunker Hill Blue Mineral Chalk Paint
- Colonel Mustard Chalk Mineral Paint
- Barn Red Chalk Mineral Paint
- Evergreen Chalk Mineral Paint
- Fine spray water Mister
- BOSS (white)
- Dixie Mud (brown)
- Clear Coat Satin
- Finishing Pad
- Artist Brushes
- Mini angle brush
Other Supplies:
For once, we’re working with wood that likely won’t bleed. It’s scratched in some places and I can see there’s white wood under the stain. In addition, when I cleaned it, colour didn’t transfer to the cloth. However, we’re using light colours so Hubs sprays on a coat of BOSS in white. If it does happen to bleed, we’re covered. And the white primer will save me having to do two coats of Fluff chalk paint. A win-win!

Fill
First, clean the piece well. Then for any deep gouges, use a wood filler like Dixie Mud. I add painters tape around the scratch so there’s less to sand. It also helps me ‘level’ the filler. Before priming, we also give it a light scuff sand with 220 grit sandpaper.

Tape Dowels
upcycled magazine rack Tip of the Day
Because it’s almost impossible to paint neatly around a spindle or dowel, here’s a great trick! First, put a painters stick underneath to protect the work surface. Then use a round punch to cut holes into a piece of painters tape.

Cut a slit on one end of the tape.

And wrap it around the dowel.
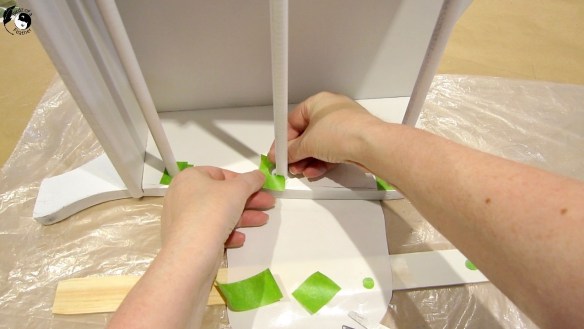
If you have a gap, fill in with another piece of tape. Done!

I find this to be a real timesaver. Instead of cutting dozens of pieces to wrap around, I only need one (or two at most).
If you don’t have a punch, get yourself one of these circle templates. For larger spindles, just double up the tape onto a piece of freezer paper.

Just trace the appropriate size and cut the hole with curved scissors.

Chalk Paint Spindles
I’m starting with the spindles. Because of the narrow gap between the bottom and bottom spindles, it’s best to use a flat artist brush like the one you see below. On the day I started this project Dixie Belle launched a new set of 4 artist brushes that I can’t wait to try!
Notice the blue paper? Use freezer paper or a paint protection paper to resist any accidental spills. I find when I use it, I don’t spill a single drop. But when I forget? It’s splotch city!

I’m using Midnight Sky on the spindles.

Mist the paint brush with water, dip into the paint and spread it along.

To get all sides of the spindle, you’ll have to perform a little painter gymnastics! Turn the wooden magazine holder every which way to get all angles. Let the paint dry and if you see white peeking through, apply another coat if you wish.

After peeling the tape away, the sides are nice and clean!

Chalk Paint Inside
Ironically, the colour I’m painting on the inside is Haint Blue; similar to the protective paper!
Because the lower spindle is so close to the bottom of the upcycled magazine rack, getting in there with a brush will be tricky! So I MacGiver my own paint tool for tight spaces out of scrap felt and an angled scraper tool.

I dampen it just like I would a paintbrush. Flat surface and lack of bristles allows me to push and pull the paint exactly where I need it.
By the way, don’t forget to wrap the spindles before you paint. I was so excited to try my new tool that I forgot and did get a paint drip. See what I said earlier about not protecting your work? It’s murphy’s law!

While the Haint Blue dries on one side, I move to the outside and paint a coat of Fluff with my mini angle brush. I only need one coat because of the primer.

Edges of Upcycled Magazine Rack
For a pop of colour, I brush on a coat of Peacock and sand it back to distress it. I also sand back the edges to the original stain for contrast.

Stripe Template
Trace a template of the sides and draw your stripes (ours are 1″ wide). We use dot labels as visual reference for the colours we’ll paint each one.

I notch the ends of each line so I can add a tick mark in chalk on the top and bottom. Chalk easily erases!

Tape Off Stripes
Use a high quality tape, like this one. It really does make a difference in the success of your painted stripes.
Cut the painters tape down the middle. I find laying it out on a cutting mat and scoring with a utility knife if the fastest way to do this. I was too lazy to pull out my larger cutting mat to accommodate the length of the tape, but you get the idea.

For a perfectly straight tape job, I clamp a ruler between the chalk marks. Keep in mind that the ruler should be positioned on the inside of the lines you’ll be painting.
When you peel up the tape from the cutting mat be aware that the straight edge (not the cut one) goes against the ruler. Watch the video to see the process!

Don’t forget to mask off along the edges too.

How to Paint Stripes
Before starting, line up your chalk paint colours in the order you’ll be painting them. That way, there’s no chance of mixing up what goes where! Starting on the left, I’m using Dixie Belle’s Mineral Chalk Paint in Bunker Hill Blue, Colonel Mustard, Barn Red and Evergreen.

Because I don’t want accidental seepage of paint under the tape, I’m using a French Tip Brush to paint. That’s so I can offload the bulk of paint down the middle of each stripe and then brush in from the edges of the tape towards the middle. Watch the video to see how well that works!
First, mist the brush with water with a fine spray water mister. Paint each colour on both sides. Then wash out the brush and move onto the next colour. The brush should be damp so washing between colours is perfect; no need to let the brush dry as long as you shake out the water well.

Don’t worry if the paint is streaky; subsequent coats will take care of that (this is after two coats). I paint with very little paint so I needed three coats. If you’re more heavy handed, you may get away with only two.

Upcycled Magazine Rack Reveal
The black dowels are reminiscent of the point stripes on a 3-point blanket.

However, it’s not too exciting until you view the upcycled magazine rack from the side! Wow, those stripes! Speaking of stripes, the spines of my Canadian House & Home magazines are so colourful, it’s like they were meant for a magazine holder like this!

That’s where this project really shines; with those perfectly painted stripes!
Now I’ve got my magazines and cozy point stripe blanket together in one pretty magazine storage rack. I always have aspirations to get more organized every New Year and this project hits the mark!

I’m just crazy about these iconic point blanket stripes! They always fit right into our decor.

As a matter of fact, we’ve also done Christmas Sleigh Decor and this Hudson’s Bay Point Blanket Inspired Upcycle with these bright and cheerful colours! I’m pretty sure this won’t be our last point stripe inspired project!
By the way, this project would not have been done in time to participate in the magazine holder challenge without our local Dixie Belle retailer. Our paint shipment got frustratingly delayed for days just 20 minutes from our house! Jennifer, from Enriched by JR, hooked us up with chalk paint. She even gave us paint from her own personal stash for colours she didn’t have in stock! How neighbourly is that? If you’re here in the Toronto area too, be sure to check her out!

Explore more chalk painted pieces and paint right along with as we show you how to paint with chalk paint. create a painted sewing box, and pink chalk paint furniture!
Dixie Belle Magazine Holder Challenge
Want to upcycle a magazine rack too? Pick up some paint from your local retailer or order here online. Then get inspired by these projects:
- Tea and Forget-Me-Knots
- White Lilac Farmhouse
- Birdz of a Feather (that’s us!)
- Gathered In The Kitchen
- The Vixen’s Den
- The House on Silverado
- Exquisitely Unremarkable
- Creative Moments
- The Fifth Sparrow No More

Fall Into Fabulous
One of the things I love most about blogging is connecting with other makers, and this Fall we’ve created something truly inspiring together.
Grab 16 digital goodies from top creators — planners, recipes, colouring books & more — including our Beginner Crochet e-Book!
Every dollar of our commission goes straight to Alzheimer’s research — a cause close to our hearts. Your purchase through this link means you’re not just treating yourself; you’re making a real difference.
Grab it now — the bundle is only available for a limited time! Let’s make this Fall fabulous and full of hope. 💜

Pin Upcycled Magazine Rack
Pinning is always welcome and appreciated!
And don’t forget to get your craft mojo on at Birdz of a Feather and subscribe! You can also follow us on Pinterest, Facebook, YouTube and Instagram.

I love your vision! The colors on this magazine rack look amazing!
Thanks so much Susan; I’m so happy with how it turned out!
What a neat idea! I love the colors!
Thanks so much Michelle!
Taping off the spindles with a hole punch – genius! Love the colours you chose too.
Thanks Rachel; I’m always looking for quicker ways to do things and usually have something on hand to do the trick. Sometimes it pays to be a pack rat lol!
How fun, I love the new looks of all the collaborators, thanks for getting this organized!!
You’re welcome Lee Ann! Everyone did something different and amazing; I really enjoyed seeing everyone’s spin on this!
This fellow canuck is loving those iconic point blanket stripes! Awesome makeover and amazing tutorial, as always.
Aw, I was hoping you’d see this Marie lol! I love getting a vote of approval from a fellow Canuck. You know how I love my point blanket stripes!
Sara, you know how much I love color, so this makeover makes me smile from ear to ear. It looks perfect with your blue furniture and that throw…and that spindle trick? Genius!
Thanks my friend! We are definitely two peas in a pod when it comes to colour!
Sadly that throw is no longer available; I’m so glad I had the foresight to buy two of them lol!
Okay, so first off I love the ‘filler leveling’ trick and the hole punch idea for the dowels. Both are genius and then there’s that oh, so dramatic makeover. Wow, Sara, it looks beautiful.
Thanks Michelle! You know what they say about necessity being the mother of invention? Who knew this simple little rack would sprout two painting hacks lol!
I ‘borrowed’ this piece from my brother-in-law. Not sure if he wants it back or not but If I keep it long enough, maybe he’ll forget about it lol.
You have made it look so festive, the colors make me happy.
Thanks Maria; love it when our projects do that!
Sara, what a great idea how you taped off your spindle. I am really enjoying seeing everyone’s projects. They are all great. Love the stripes and colors on your project.
Thanks Tammy; I really enjoyed everyone’s projects too. It was fun, wasn’t it?!
I love how colorful this is. So many great color choices from Dixie Belle! Thanks for sharing!
Yes, incredibly the colour of paints I chose for the stripes match my point blanket throw PERFECTLY! I couldn’t believe it when I had them side by side!
What a beautiful transformation! I learned so much from your tips with painter’s tape and the genius felt painting pad. Thank you so much!
Aw, that’s what I love to hear; thanks Becky!
Great makeover!
Thanks Virginia!
Great tips on the painters tape – which I love using. Fun colors.
Thanks Rosemary!
Thank you for sharing this on Traffic Jam Weekend. It has been chosen as a fave feature for this week’s link party that goes live on Thursday at 5:00 pm CST.
Awesome; thanks for the feature and for letting me know :).
Amazing up-styled magazine holder. I love your colors choices!!!
Happy Spring,
Kippi
Thank you Kippi! Spring can’t come soon enough here in this winter tundra lol!