

Today we’re making over a thrift store wooden caddy by turning it into a remote control holder and answering the age-old question: how do I keep my remote organized? Do you always lose your remote controls too? This one will keep your remotes in one handy spot!
I like to come up with interesting alternatives, like this remote control caddy for Hubs’ DIY Man Cave. But this remote control organizer is for our other TV. Since it’s missing the lid, it’s just begging to be upcycled into a remote control holder! And I’m off to a great start with this wood caddy and a few supplies:

Plan for Remote Control Holder
Aside from giving the remote control holder a beachy feel using white gel stain, we’re also making a leather grip wrap on the handle! Leather grips are all the rage on golf clubs, tennis rackets and motorcycles, so why not a remote control holder? For that matter, this technique can be used on anything with a handle!
Before we get into the tutorial, don’t forget to get your craft mojo on at Birdz of a Feather and subscribe to our newsletter:
You can also follow us on Pinterest, Facebook, YouTube and Instagram.
How do you Wrap a Leather Handle?
Watch this video to see how I apply gel stain and turn a cheap thrift store caddy into a luxe remote control holder with leather handle!
International Bloggers Club – Leather Challenge
It’s time for another International Bloggers Club (IBC) challenge and this month our theme is Pleatherable Leather. The IBC is a group from all over the world who challenge each other every month to make something using a common theme. Our previous challenge was ‘Cardboard Creations‘ and we created a unique lampshade makeover DIY out of a tissue box!
You’ll find our friends’ upcycled leather ideas at the bottom of the post. So don’t forget to check them out before you go. And if you don’t have time to browse today, pop back in later in the week to pick up where you left off.
Remote Control Holder Supplies
- Wooden caddy with handle – ours is thrifted
- Scrap leather
- Scrap wallpaper to line drawer (ours is from a wallpaper sample book)
- 45 mm Olfa Rotary Cutter
- Rotary leather hole punch
- Velcro tie strap (to hold leather to handle)
- Harness needles for sewing leather (this one is highly rated) – we’re using blunt sewing needles we just happen to have
- Waxed leather thread (got ours at Michaels)
- Fons and Porter Chalk Pencil
- Self healing mat
- Grid Ruler
- Wood metal edge ruler
- Fiskars Titanium Easy Action Scissors
- Brown craft paper for testing the patterns for the drawer liner and handle
- Pliers
- Awl (to help remove the hole punches and mark the leather)
- Tack lifter (for removing prongs on drawer handle)
- Tracing wheel to mark stitches (I couldn’t find mind or I would have used it instead of marking by hand). I also used a smooth one to score the wallpaper
- (or anything like a bone folder to help score the wallpaper)
- Bone folder (optional – can use to fold and burnish wallpaper)
- Voodoo Gel Stain, White Magic
Upcycled Leather
Although Earth Day is fast approaching, every day is Earth Day at Birdz of a Feather! A few weeks ago Hubs picked up these leather scraps from a leather maker for only $10. Better in my craft studio than in land fill! But when it rains, it pours: I also found a discarded leather sofa on garbage day so harvest the leather from that too! This may be my first leather DIY, but I now have loads of leather to upcycle so there will definitely be more projects to come.

Here’s the wooden thrift store caddy before. It has the kind of deep groves reminiscent of our faux barn board technique.
It also looks very much like Shou Sugi Ban, so the sky is the limit for the ways you could finish this wood. Shou Sugi Ban is a Japanese wood burning technique to treat cedar siding to make to make it weather proof. Although this cedar has the distinct look, I’m keeping the finish simple. But if you want other ideas on how to decorate this style of wood, you have to visit my friend Anita for her mind blowing Shou Sugi Ban creations!

Wood Caddy Drawer
You’ll notice the water stains. So the first thing I do is pull out the drawer and wet the whole thing down and set it aside to dry. And it works! The stain is no longer as apparent when I stain it!

Then I remove the felt drawer lining and make a replacement out of vinyl wallpaper. The wallpaper is also upcycled – from a wallpaper sample book.

Instead of cutting out 5 pieces, like originally, I make a one piece template. First, I cut a paper template.

Once I’m sure the paper pattern will fit, I do the same out of the wallpaper. Score all fold lines with a ruler and tracing wheel.

And then bend it along the lines, burnishing it.

For anything that sticks above the edge, you can trim the wallpaper back with a utility knife held flat against the edge. Be careful and cut away from yourself.

There happens to be enough adhesive to hold the wallpaper insert in place. But for the edges, I add a piece of double side tape.
How to Apply Gel Stain to Remote Control Holder
In order to gel stain the wood without obstruction, I decide to pull the handle off. 
Unfortunately, it isn’t screwed on; it’s held on by metal prongs. So I have to use pliers.

Once they are bent back, I can remove the handle.

I love the smell of cedar, but the colour is quite drab. So I’m using Voodoo Gel Stain to perk it up. If you’re ever curious to see how a product will look first, try it out in an inconspicuous spot. If you look closely at the video, you’ll see I tested first on the bottom of this caddy.
To apply it, I’m trying out these new foam brushes and I have to say I’m impressed with the performance. Not only do they not leave streaks, but the foam stands up to the of the wood. I know that cheap dollar store foam brushes would just shred on this rough wood, but these are tough and durable!
I dampen the brush with a little water first before applying the gel stain. Since this gel stain is water based, you can also add more water to thin it out so more of the wood shows through.

Notice that I leave some of the natural colour cedar. Tape can help mask the areas you don’t want to gel stain.

I question that choice, but as soon as we add the leather, it will tie it all together!

As the gel stain dries, we can cut the leather for the caddy handle!
Cut the Leather

Preferably, use a sewing tape measure to determine the circumference of the handle. I couldn’t find mine so make a paper pattern instead.

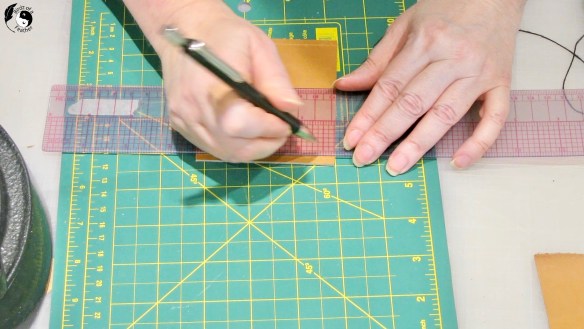
Because I find it doesn’t mar the leather, I use a Fons and Porter ceramic chalk pencil to mark as I measure. Use a rotary cutter and self healing mat to cut the leather to size. A self healing mat is just as much for safety as well as it is to keep the blade from dulling.

Initially, when I went to wrap the leather around the handle of the caddy, it was too small; there was a whopping 1/2 inch gap.

But then after removing the plastic lacing, I find that the leather stretches while sewing. Just keep in mind that the leather should stretch to fit tight – that’s what you want. So, after trying this for the first time, I think it’s best to add at least 1/4″ to whatever circumference you get. You can even cut it a little bigger to test it out before punching holes and adjust. After all, you can always take away, but you can’t add.
Watch the video to see my tips on cutting!
Score a line 3/16″ in from the edges. I just use the metal tip of a retractable pencil (with lead retracted) to mark it.

Punching Holes in Leather
If you have a leather wheel or prong punch, you can use those to mark or cut the holes, respectively.
 Since I don’t have any of those tools, I use the retractable pencil tip once again to mark my holes, starting with 1/8″ from the edge and then 3/16″ in between. A grid ruler helps with this task!
Then I punch the holes with this rotary punch tool set to the small hole size. This punch is old, and belongs to Hubs, but it’s still going strong. It’s one of the only tools I didn’t have a duplicate of when we got married!
 Instead of punching each side, on a test piece of leather, I try doubling over to punch through the holes on one side, but it’s tricky to keep the edges even.

However you end up punching your holes, do make sure that they are even and parallel to each other! You’ll notice anything off kilter once the leather is stitched onto the remote control holder.

How to Leather Wrap a Handle
There are so many types of leather stitching to choose from. But for this project we’re going to cross stitch the leather together onto the handle.
What is the Best Thread for Leather?
For hand stitching, you can buy natural and synthetic threads such as linen, polyester and nylon threads specifically made for leather. Whatever you choose to use, be sure to purchase one that is pre-waxed – or you can even wax your own thread! This article discusses the pros and cons of each type of thread.
Weight is another consideration. I started sewing this project with the waxed linen thread shown below but it immediately snapped with the first stitch. Given the weight of my leather, a heavier thread is best. I guess it would be fine for lighter leather applications, but not this one.

The best waxed leather thread for this particular job is this polyester one from ArtMinds. It’s thicker, therefore can withstand all the pulling necessary to tighten each stitch.

What are the Different Types of Leather Stitching?
When sewing by hand, there are a few popular stitches such as the saddle stitch, cross stitch and baseball stitch. The saddle stitch is actually stronger than machine sewing and can stitch two pieces of leather together. Typically you would use a leather pony to hold the leather as you stitch. However this video shows a novel technique for sewing the saddle stitch without a pony!
For leather wrapping a handle, as we are doing here, the cross stitch and baseball stitch are both decorative and strong. We’re showing you how to do the cross stitch for this project.
How to Sew Leather by Hand
About the Needles
Sewing the cross stitch on leather is a two needle job. If you get into more leather work, you’ll want to purchase ‘harness needles. They come in various gauges, depending on the thickness of the tread you’re using, and have blunted tips especially for use with pre-punched holes. I just happen to have sewing needles that are blunt and they work perfectly well for this small product.

To start, measure out a length of thread and cut. I measure about 6 times the length of my leather and then double that. then thread both sides of the thread.
To lock the thread in place and keep it from slipping out of the holes, wrap the end around twice. on the second pass, insert the needle through the thread, splitting it in two. Pull the end down past the eye of the needle, then pull to tighten it up against the eye. This probably won’t make sense unless you watch how it’s done on the video :).
Leather Wrap the Handle
To keep the leather in place as I stitch, I use a velcro strap and tighten it around the middle.

It’s the extra set of hands I need and works like a charm! 
Starting in the first hole, come underneath the first set of holes with each needle. straight out the ends of the thread, then loop one side to create a bar tack.
Then with the right needle, insert it into the hole down one on the opposite side (from the outside in), then out through the hole parallel to it on the other side.

Pull the thread through the hole, then drop that needle.

Now with the left needle, repeat this again but insert the needle into the hole that the right-hand needle just came out of (pulling the thread forward and out of the way as shown). Pull the thread through and drop both needles.

Take the threads on each side, and pull.

Now wrap your fingers around the thread to get leverage and really pull tight! You must do this with each and every stitch; you can’t criss cross a few and then pull because it won’t budge. The wax will help keep it from slipping and loosening.
This will all make sense when you watch the video.

Fasten Off Thread
I’ve seen other makers singe the ends and even add glue to the last hole, but I don’t want to take the chance of damaging the leather. So to complete the ends, I bar tacked twice, instead of the once I did at the beginning. Just insert each end into the opposite hole and come back through the original hole.

Then knot each end and snip close with scissors. Push each knot down into the hole to wedge it in.
Remote Control Holder Before and After
Here’s a reminder of the before:
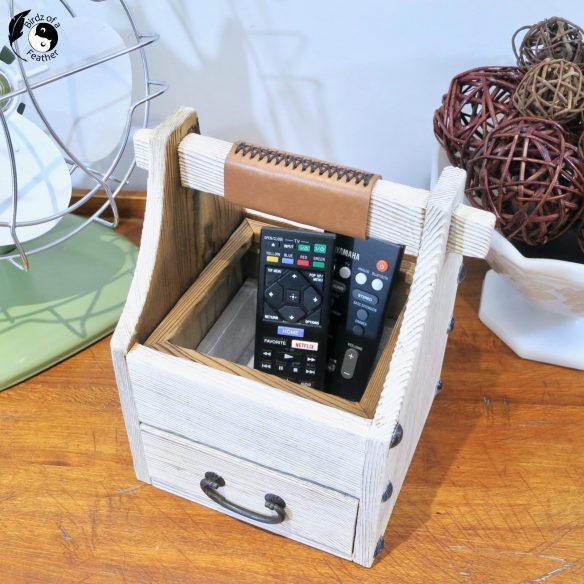
And now?

The end result is fabulous! The leather really makes a cheap thrift store caddy look luxe! I love the smell of cedar and it’s still fragrant because I left some of the wood natural. With the leather complete, I’m actually loving how it looks.

But before we can call this done, let’s grab those remotes!
Remote Control Holder Reveal
I’m not actually sure how I’ll style this on our side table upstairs so I’m trying out three different looks/accessories in my studio. If you have a preference, chime in and help me decide by leaving a comment!
#1:

#2:
#3:

Fall Into Fabulous
One of the things I love most about blogging is connecting with other makers, and this Fall we’ve created something truly inspiring together.
Grab 16 digital goodies from top creators — planners, recipes, colouring books & more — including our Beginner Crochet e-Book!
Every dollar of our commission goes straight to Alzheimer’s research — a cause close to our hearts. Your purchase through this link means you’re not just treating yourself; you’re making a real difference.
Grab it now — the bundle is only available for a limited time! Let’s make this Fall fabulous and full of hope. 💜

Pin Remote Control Holder
If there’s anything you want to add some flare to with scrap leather or gel stain, pin one of these for later!


IBC Pleatherable Leather Challenge
Want more leather ideas? Don’t forget to visit these awesome ‘Pleatherable Leather‘ projects from our friends below. You’re in for some incredibly unique and creative diy leather ideas!

- Kippi at Home – Succulent Planters
- Unique Creations by Anita – Geometric Lion Wall Hanging
- Interior Frugalista – Embossed Leather Drink Coasters
- A Crafty Mix – Boho Leather Tillandsia Planter
- Birdz of a Feather – Remote Control Caddy – that’s us!
I’ve never hand stitched leather before. I kinda assumed it would be like stitching fabric by hand, so I appreciate the tips. I would have done it all wrong and probably given up halfway through. BTW I love the idea of adding leather handles to stuff. We have a whole bunch of leather scraps that are just to small to use in larger projects that would be ideal.
Leather handles can really elevate anything. Now that I’ve had one success, I’m sure I’ll want to cover everything with scrap leather lol!
We are always are looking for our remote controls too. I love your upcycled caddy with the leather covered handle. Your idea of using a velcro strap to hold the leather while you sewed it together was genius.
Thanks Kippi! It’s so good to finally have them organized!
I so enjoyed your leather sewing tutorial Sara. I’m a huge fan of the British show, The Repair Shop and mesmerized by watching Suzie, the master saddle-maker sew her leather restorations. Such a lovely addition to your very handy remote control caddy!
OMG Marie – I thought that I was the show’s biggest fan lol! We just got a free preview of the channel that carries it and recorded every we could so we can binge watch it! I wish I could be a fly on the wall there. I only took a break for this project 🤣.
This is perfect for remote! I’m always looking for my remote. You should sell it. People definitely would buy it. :))
Thanks Maria! I always find selling the most difficult part.
Really great makeover on the caddy, the leather handle was a great addition. I have never stitched leather before so your tutorial will be handy. We could do with one because our remotes are always falling down the couch.
It would be scary to add up all the time spent looking for remotes lol!
This is such a cool idea, Sara! I’ve never worked much with leather but would love to try after seeing some of these great creations! Pinned!
That’s great Crissy! So glad you were inspired to try something 🙂
The leather handle is a great touch, especially for a man cave!
Thanks Marie but this one’s definitely for the woman cave lol.
Ohh ☺️ I must have misread
I actually think Hubs would like to trade lol.
Great transformation Sara, and what a fun challenge!
Jenna
Thanks so much Jenna!
I love the new look, so updated and beautiful!! You did an amazing job!
Thanks so much Kristin!
Love that leather look, Sara!
Thanks so much Kim!
Visiting from the Grace at Home party – what a great idea, and your instructions are fantastic!! i’d love it if you shared at our Share the Wealth party!
http://mybigfatmenopausallife.blogspot.com
Thanks for stopping by and extending the invite; shared 🙂
What a super cool piece this turned out to be! Adore the leather handle look so much. I’ll remember this tip!
Can’t wait to see what else I can ‘weatherize’!