This is the second time in a month I get to refinish a coffee table! Years ago on a trip to the States, Hubs and I picked up a cute little coffee table that was originally a vintage sewing table. We’ve done several vintage sewing machine table makeovers now and they always get me thinking creatively. Surprisingly, we’ve never come across such a short base before!

Hubs did not take a liking to the table top and always joked about tossing it out and starting over. As if! Not on my upcycle watch :). Save for the cherry stain, I really like it! So I start thinking about cool ways to paint a coffee table that will sway him back over to my side.

Before we get to it, don’t miss out on another unique idea from Birdz of a Feather. If you haven’t already, get you craft mojo on with us and subscribe! You can also follow us on Pinterest, Facebook, YouTube and Instagram.
Materials
[If you’re looking for some of the things we used, we’ve got you covered (disclosure): Clicking on the affiliate links below, means we may receive a commission. But don’t worry, you don’t pay a cent more and it helps us make more unique DIYs to share with you! Thanks for helping to support our blog!]
I couldn’t have done this makeover justice without stencils from Old Sign Stencils and these fine products.
- Antiques stencil
- Argyle stencil
- Fusion Milk Paint’s Clear Wax (for top)
- Tremclad Clear (for base)
- Rustoleum Comfort Grip spray trigger
- Stencil brush kit
How to Refinish a Coffee Table
Our starting point is to sand the finish down to bare wood. Hubs starts with a coarser grit and finishes with a finer 220.

For areas like the trim part around the fly wheel, Hubs has to hand sand.

If you want to see how your table top will look with a clear coat, use Hub’s lacquer thinner trick (watch the video). After seeing the red tones come up again I made a decision to wax it in the end :).
Watch the Video and Subscribe
Watch the video for the full tutorial. In the written version, I touch on most of the highlights, but you’ll find more helpful tips and tricks in live action!
Refinish a Coffee Table – Clean the Base
The metal base is pretty grungy.

For that we use warm soapy water for everything we can reach.

Then we use a combination of small and jumbo cotton swabs to get into the finer detail like this ornate foot petal. We also sand down any rusty spots.

Clear Coat the Base
We don’t often use a spray can, but when we do a spray grip such as these is a must. The one on the right fits our can.

Hubs sprays on a few light coats of Tremclad Clear to prevent further rust and protect.

When spraying is complete, Hubs set the leg wheels onto some popsicle sticks so it doesn’t stick to the cardboard!

Tremclad makes all those pretty details on the metal really shine!
Refinish a Coffee Table – Stencil Time!
Now it’s time to add some personality with two stencils from Old Sign Stencils.
First up is the Antiques stencil. You might remember it from the milk can decor piece in the Fall. The surface of that milk can was so uneven at the bottom that I couldn’t add the date of the piece, which I really wanted to do. Now I’ll get my chance with this coffee table. A little research shows that this vintage sewing table is circa 1910. So that’s the date I’m going to use. The numbers that come with the set make it a breeze to customize whatever date you want.

The second stencil I’m using is this Argyle pattern. This stencil is going around the table skirt.

Stencil Prep
It would be impossible to stencil the skirt without removing it.

Luckily the skirt is held on with pocket screws, which are easily removable.

When taping the stencil onto the table top, I also mask off the last two numbers.

Refinish a Coffee Table with Paint
For this step I use a large natural bristle stencil brush. The paint I’m using is PPG Break-Through in a colour called Carbon Copy. It’s a soft black.
Once everything else is complete, I was just about to finish stencilling the date.

Then I realize, I don’t even need the companion number stencil for this part! That’s because I was able to transpose 1901 to 1910 using the main stencil! I’m sure those accessory numbers will come in handy for other projects down the road though.

Argyle Stencil
The argyle pattern is done in three steps.
Step One
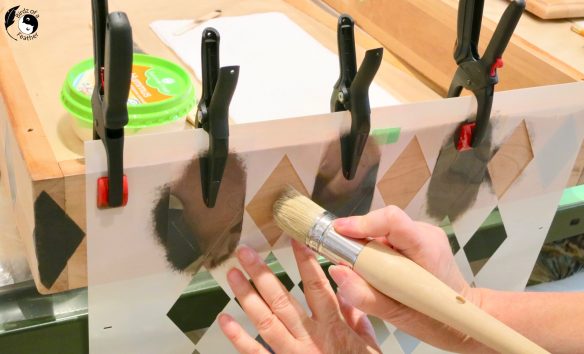
After finding the centre of the skirt and lining it up to the centre of the diamond part of the argyle stencil, I’m using clamps to hold it on. But before I put paint to stencil, I add an acetate overlay to every other diamond. That’s because I’m going to alternate colours – black and white. 
I apply one coat of black paint to every other diamond.

This is how it looks before I slide the stencil to the left and then the right to complete the black diamonds.

After finishing all the black diamonds, I still have some back paint left, so use it up on this old wine box to create our poinsettia Christmas decor piece.

Step Two
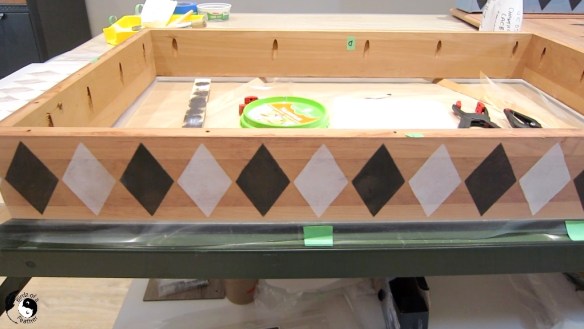
Then I cover up the black diamonds and paint every other remaining diamond white. The colour I’m using is Chantilly White.

Here’s how that looks.

Step Three
Adding the Pinstripes
Last, but not least, is the diagonal pinstripes. For this part, I use a brighter white (Icicle White) so you’ll be able to see the contrast between the two whites. 
At this point, I change to a 1/2″ stencil brush.

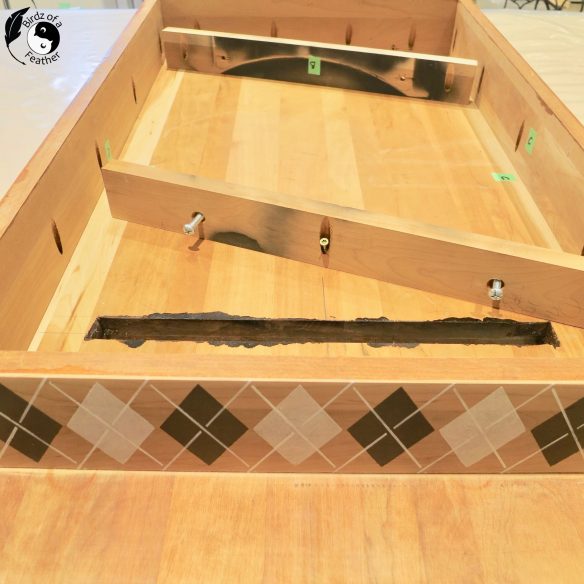
And the argyle is complete! It’s like the stencil was made for the skirt of this coffee table!

After letting the paint dry 24 hours, I can reassemble the skirt with the table top.

These two cross members are the last pieces to attach. There are holes in them to hold the metal base on with bolts.

Wax the Wood
I don’t want to bring out the orangey/red tones in the wood that Hubs disliked so much with the original top. So, instead of a clear coat, I use Fusion Mineral Paint’s clear Furniture Wax on the wood to protect it. That’s because it won’t yellow over time and gives the wood a soft sheen.

Hubs and I both agree that we love the new look of our refinished coffee table now! Here’s another look at the before:

And now, our coffee table makeover!

That little strip of wood to the left of the wheel is just enough space for a caddy filled with poinsettias. But I know you’ll want to check out the full view of our wooden planter box DIY!

What Can I do with An Old Sewing Table?
You can turn an old sewing table into a coffee table if it has a shorter iron base, like we show above. Regular height iron bases make a great computer station or desk. Sewing machine tables that have oil drip trays underneath makes a unique tiered plant stand. Wooden sewing tables are perfect to upcyle into a one of a kind drink station. We’ve got examples of all of these sewing table ideas on our blog!
Click here for more unique stencil ideas.
Pin Refinish a Coffee Table
Pinning is always welcome and appreciated!


This is beautiful!! I love the argyle on the side. What a great touch!
Thanks so Michelle! I love the argyle too; it really dresses it up 🙂
Really great upcycle, it looks stunning. I love the stencils and colours that you chose. Well done.
Thanks Anita! It’s easy to take chances on things that Hubs hates because I figure it can only improve – lol!
You had me at grungy metal base… Such a beautiful transformation. The detail in this project is pure perfection. Couldn’t wait to pin this post. Enjoy your amazing upcycled table.
Thanks so much Brooke! I could never resist a grungy base; they’re so pretty again with just a little TLC.
As I am a sewist I am absolutely in love with this project!
Wondeful job of giving this piece a new look ! Well done.
Thank you! We’re so happy with the transformation.
What a gorgeous transformation!
Thanks Maria!
What a great way to up-cycle the table. It urned out great with so many special details. Great project.
Thanks; it was definitely fun to work on!
I’m fascinated by how short the base of your gorgeous table is. That’s so unusual and I’m glad you won hubby over with your stencil and sanding skills. The little coffee table is a keeper
Yes, it’s definitely a keeper and not going anywhere. It was a rare find!
I always love visiting your blog for inspiration and fresh ideas. The argyle stencil adds so much personality. I have a thrifted table that really needs a makeover, so this is just what I need right now. Thanks for the tutorial.
Aw, thank Meegan – I look forward to seeing what you’re up to also!! Can’t wait to see what you do with your table.
I love this – I have an old sewing machine and the wood is in bad shape so this is a good idea.
Thanks Rosemary!
This looks amazing, Sara! I love the argyle stencil. What a unique and attractive table you’ve created for your home 🙂
Thanks Rebecca – it sure beats the previous orange look – lol!
I love this makeover with stencils. You are so talented!
Hugs,
Kippi
Thanks so much Kippi!