

Can a badly water stained MCM side table be restored to its former glory? It can with these furniture refinishing tips.
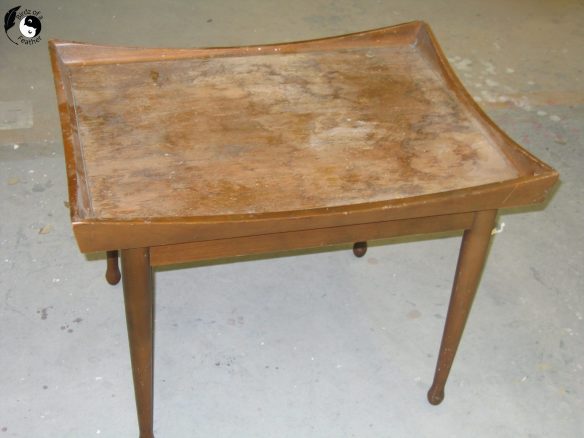
MCM side table before
Do It Over Designers
Today we’re taking part in the Do It Over Designers blog Hop hosted by Ann at The Apple Street Cottage.

We’re a group of bloggers who take something old and/or unused and ‘do it over’ into something new. These items can be found in closets, barns, garages, yard sales, thrift stores, you name it! Check out the other projects at the very bottom of this post. And be sure to drop back in throughout the week to visit them all!
MCM End Table
I found this table in a thrift store when I was young and single (you can read about how I just celebrated the big 6-0 here with these carrot cake muffins – yum!). This thing is solid and heavy. But I literally carried it home on the subway and then the bus. I’m pretty sure I dissembled it before I did but I still don’t know how I managed without a car back then.
It wasn’t until I met Hubs, a furniture restoring expert, that we decided to tackle the side table. When Hubs worked for a well renowned furniture builder, he was sent to retouch the custom furniture, designed by the late Michael Graves, at Disney’s headquarters in Burbank, California. So if anyone knows his stuff, it’s him!
How to Refinish Furniture
If your piece has hardware, remove it and clean it separately (see how to clean brass hardware in MCM furniture).
The first step to refinish any piece of furniture is to clean both the hardware and the wood. I can’t emphasize enough how important this is. You really can’t skip this step or your new finish simply won’t adhere.
Because you’ll just be grinding the dirt right into the wood pores, don’t ever start by sanding. Clean first and you’ll get a professional looking result!
Prep Work
- Start with a thorough cleaning: Use a mild detergent and warm water to clean the furniture piece, paying special attention to any areas that may be particularly dirty or greasy. We like Simple Green. If the piece is smelly, see how to get smell out of old furniture.
- Sand (or strip) the surface: If repainting, use a fine grit sandpaper to scuff the surface of the furniture and knock back the shine.
If re-staining, start the sanding with a coarse grit and gradually work your way to a finer grit. Wipe the furniture clean with a damp cloth as you go to remove all sanding dust.
Stripping
However, if the piece has a lot of varnish or lacquer, I think it’s worthwhile to strip the wood first before sanding. I didn’t do that for these end table makeovers. I really wish I had, because it just gummed up the sandpaper, and then I accidentally sanded through the veneer :(.
Back in the day, we used caustic, harsh strippers like you see below on another piece. These days, there are many eco-friendly formulations available. Fine steel wool dipped in the paint stripper helps remove almost all traces of finish. Wear gloves, googles and work in a well ventilated area regardless of what stripper you use.
Strip in the direction of the wood grain. When applying stripper, don’t overwork it or over brush or it will evaporate faster. Water based strippers are not as strong so you’ll likely need more coats (brushing on and stripping multiple times).
Stripper doesn’t typically melt clear plastic so you can cover each coat of stripper to give it time to work and slow down evaporation.

After stripping, follow directions on the product label for rinsing residue off using plenty of rags. Let the piece dry preferably overnight before sanding. Then sand with the grain with a fine grit sandpaper. This will help to remove any remaining finish and smooth out any rough spots.
Repair and prime
- Repair any damage: If there are any cracks, holes, or other damage to the furniture, repair it using wood filler. Allow the filler to dry completely before proceeding. Sometimes, there’s so much damage that you have more filler than wood! In that case, see how to make wood filler look like wood.
- If you are painting, apply a primer. For woods that tend to bleed, apply a shellac based primer to the surface of the furniture using a brush, roller or spray gun. This will help to seal the wood and prepare it for the new finish. We swear by clear dewaxed shellac. It prevents bleed through and seals in any lingering smell. Then paint. If staining the wood, see the next 2 sections on how to stain.
Finish
- Apply a clear finish: Choose a clear finish that is appropriate for the type of furniture you are working on. Some top coat options include oil-based varnish, water-based polyurethane, or wax. Apply the finish in thin, even coats, using a brush, roller or sprayer. Be sure to allow each coat to dry completely before applying the next and sand between coats. Again, you can use a damp cloth to remove sanding dust. Or, you can also use a Tac cloth for this, but be sure you purchase one that is silicone free or you’ll likely have problems with the stain resisting penetrating into the wood.
If using wax, once the final coat of finish is dry, use a soft cloth to buff and polish the surface to a sheen.
- Sand between coats: Sand the surface lightly between each coat of finish to ensure an even and smooth finish.
- Protect the finish after fully cured (see product label for cure times): To keep your newly refinished piece of furniture looking its best, protect it from scratches and spills by using coasters and tablecloths.
In our case, we went one step further in protecting the surface, which you’ll see in the reveal!
More detailed use of products than found on the label can be found on reputable manufacturer’s web sites; look for the TDS (technical data sheet).
How to Stain and Top Coat Wood Furniture
Normally, to stain or re-stain wood furniture, you will need the following. I say ‘normally’, because you might want to read the next section for how we stained our MCM side table.
- wood stain
- a clean, lint-free cloth, brush, rag or applicator pad
- sandpaper (if the furniture is not already smooth)
- a sealant
After completing all the prep work in the previous section:
- Apply the wood stain* to the furniture with a brush or a lint-free cloth. Be sure to work in the direction of the grain and use long, even strokes.
- Let the stain sit for the recommended amount of time, then wipe off any excess with a clean, lint-free cloth.
- Apply a sealant to the furniture to protect the stain and enhance the overall look. The sealant can be a clear coat, oil or wax. Hemp oil is a wonderful finish over raw wood and milk paint. You can see how to apply hemp oil on this painted rocking chair.
- Allow the furniture to dry completely before using or moving it. Most finishes typically take up to 30 days to fully cure. But instructions will explain when it can be put into light use.
* Note: Always read the product’s instructions before using. Also test the stain in an inconspicuous area of the furniture before applying it to the entire piece.
Using Toned Lacquer or NGR Stains on Wood
Did you know that almost all mass produced American furniture was finished with sprayed, toned lacquer? While we’ve refinished all sorts of furniture, Bob Kennedy is an expert on MCM furniture refinishing and if that’s a particular interest for you, you can read this article and even join his free Facebook group.
Spraying on NGR stain in addition to, or instead of, stain can be a great way to achieve a uniform colour on wood furniture. As you can see on our MCM side table, we need to balance the natural wood tones. Since this piece was so badly water damaged, that’s exactly what Hubs did.

MCM side table before
What is NGR Stain?
So what is NGR stain? Non-grain raising (NGR) stain is a wood finishing technique that colours wood without raising the grain. When wood is stained, the natural fibers in the wood absorb the stain, which can cause the grain to become raised, or “fuzzy.” NGR stains are specially formulated to minimize this effect, resulting in a smooth, even colour on the surface of the wood.
While particularly useful for any wood that has a tendency to raise the grain when they are stained, NGR stains can actually be used on any type of wood. Maple, for instance, is tight pore wood that doesn’t absorb stain well, resulting in blotchiness (especially with dark colours). So NGR can even out that blotchy look. These maple cabinets in my studio are a good example of the blotchiness you get with regular stain. Higher end manufactures would combat that unevenness with NGR.

Maple cabinets
Stains typically work by penetrating the surface of the wood and staining the fibers from within, rather than just colouring the surface of the wood. NGR stains, on the other hand, are transparent stains that change the tone of the wood without hiding the grain.
Keep in mind that spraying on toning is a technique that requires some experience and practice to achieve a professional finish. Hubs has been doing this for many years and recommends you practice on scrap wood or small pieces before attempting to stain a larger piece of furniture.
As with any finish, try the stain in an inconspicuous area of the furniture before applying it to the entire piece. Also, and this goes without saying, always read the product’s instructions before using.
Toning an MCM Side Table
Here is a general overview of the process (do this instead of, or after, step 4 in the previous section how to stain wood furniture).
- Mix the NGR stain or toned lacquer according to the manufacturer’s instructions.
- Set up a spray area by covering the surrounding surfaces and taping off any areas you do not want to be stained. With our piece, it didn’t require any taping.
- Using a paint sprayer, apply to the furniture in thin, even coats. Be sure to work in the direction of the grain. Hubs uses a cup gun with a fine tip for this step. The more you shade, the more you cover the grain (as you’ll see in the pictures ahead).
- Allow the stain to dry for the recommended amount of time.
- Apply additional coats as needed, until the desired tone is achieved.
Now you can proceed with a clear coat.
By the way, you don’t only have to use brown tones of NGR stain either! We shaded our guitar planter with green NGR and got a stunning effect. You’ll see the the shading on the guitar planter is much lighter that we’re doing here on our MCM side table.
Shading the MCM Side Table
Here’s the piece after the first application of stain and shading.
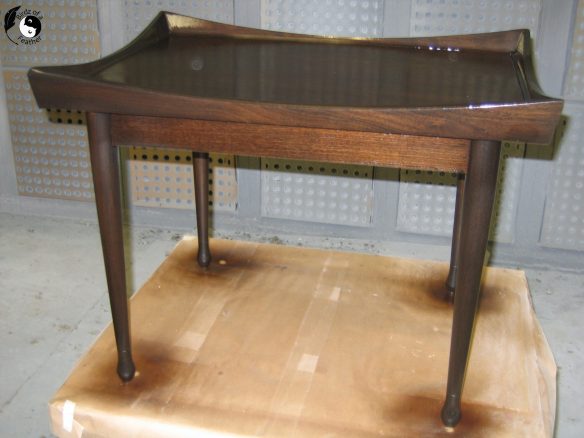 And here it is after the shading is complete and clear coated. See how the red tones are gone, compared to picture above? The dark, rich finish is a far cry from the water damaged piece we started with!

I mentioned earlier that we went the extra mile in protecting our new table top. Since the piece was so water damaged to begin with, we want to preserve our beautiful new finish and prevent that from happening again. We offen have live plants displayed on our MCM side table. So we added a sheet of plexiglass over the top after it was thoroughly dry because we had it. However, custom glass cut to size is a good option too.
By the way, the wooden planter box is a garage sale find, but I’ve seen them in thrift stores too. They’re perfect for holding potted plants, like these poinsettias. And with our little trick, you can water right into them without worrying too much about water damage.

We embrace an eclectic style in our home. So we mix dark and light pieces together. To make it cohesive, we just make sure to have a common element pulling it all together (like the dark legs on the MCM side table, sectional sofa and base of the coffee table).

See how to refinish a coffee table if you like our sewing table makeover above!
Fall Into Fabulous
One of the things I love most about blogging is connecting with other makers , and this Fall we’ve created something truly inspiring together.
Grab 16 digital goodies from top creators — planners, recipes, colouring books & more — including our Beginner Crochet e-Book!
Every dollar of our commission goes straight to Alzheimer’s research — a cause close to our hearts. Your purchase through this link means you’re not just treating yourself; you’re making a real difference.
Grab it now — the bundle is only available for a limited time! Let’s make this Fall fabulous and full of hope. 💜

Mid Century Modern Furniture FAQs
Is it ok to paint MCM furniture?
Yes, unless you like the look of wood, go ahead and paint it to suit your own style or aesthetic (like this record player stand DIY). Or compromise and paint some wood and leave other parts natural.
Is it better to sand or strip furniture?
It’s far better to strip. Sanding a finish will just gum up and waste good stand paper. Also, if you’re working with a wood veneer, you risk blowing right through it by sanding. After stripping, smooth away any remaining finish with a fine grit sandpaper.
Pin MCM Side Table
Pinning is always welcome and appreciated :).

Do It Over Designers
Our talented blogger friends have some amazing and inspiring DIYs for you! Don’t forget to visit these posts for more upcycled do-it-over transformations!
- The Apple Street Cottage
- Birdz of a Feather
- Exquisitely Unremarkable
- Little Vintage Cottage
- Purple Hues & Me
- Southern Sunflowers
- Unique Creations By Anita
- Sum of Their Stories
- Tea and Forget-Me-Nots
Love that shine, Sara! Wow, what a gorgeous transformation!
It’s the one piece in the house that Hubs doesn’t really care for, but I LOVE it lol!
Your table turned out beautiful, Sara and thanks for the information on NGR stain. I’d never heard of it before today!
NGR is definitely in the professional realm, but I was actually using it even before I met Hubs and I’m no where near the expert he is lol!
Love the transformation of your table, Sara! It certainly looks stunning! I can tell from this post you are definitely an expert on refinishing furniture! You’ve given us lots of valuable information! Thanks!
Well, that’s mostly Hubs area of expertise but I hold my own with painting and I’m learning a lot from him too lol!
What a cute little table and great tutorial!!
Thank you Tania!
So much useful information, thank you. This table is certainly transformed into a thing of beauty. I love the reflective shine the plexiglass gives it too.
The best thing about the Plexiglas is that we can clean it and not worry about a few drops of water when we water the plants!
Awesome refurbish that finish is just flawless. You did a great job. 👍
Thanks so much Anita! I love a good before and after!
Cute story of how determined you were to get your table home – subway and bus lol. Your table refurbish looks great! Thanks for the detailed refinishing furniture info.
I honestly don’t know where I got the energy. Oh to be that young and energetic again lol.
What a transformation! You made that table look so classy. And thank you for all the excellent tips too. Lots to remember for my next project.
Thanks Rachel!
Oh wow, that’s an impressive restoration! Love all the tips and tricks you share in your posts, Sara, and now I’m looking forward to your new Tool Talk Tuesdays on YouTube. Happy belated and welcome to Club 60!
Aw, thanks so much for the birthday wishes Marie! I’m in good company lol! You can catch a replay of our first Tool Talk Tuesday here: https://youtu.be/SBrsZK-4JGU
Your table makeover is amazing! You guys are so talented.
Thanks so much Kippi 🙂
So glad you rescued this gorgeous piece!!!
Me too Marie! I think most people would’ve been afraid of the before lol.
Over from PS. I’m about to restore a very large antique bench. Also, if I can get them south, i have 2 MCM side tables to refinish. Very interesting info.
Good luck with your bench! Hope you can get those MCM tables!
Great tutorial. Thank you! Do you have brands of stain and finishes that you like and can recommend? I would very much appreciate the additional detail.
I actually like Minwax products very much. My husband also uses professional products that aren’t readily available to consumers. I’ll ask him about those and update the post for you 🙂
Thanks for sharing with us I’m featuring you this week when the next To Grandma’s house we go Wednesday link party starts!
That’s awesome news Tarah; thank you so much!!
Loving the chest of drawers in your studio! I like the way your end table turned out, and really enjoy the way you have it styled with a repurposed tool box. Thank you for sharing with Whimsy Home Wednesday.
Thanks so much for stopping by Cara!
Sara, this post is packed full of great info! I’m excited to tell you this post will be featured in this week’s Tuesday Turn About Link Party! Thanks for sharing your creativity and we hope to see you at the party this week! Pinned!
That’s awesome Cindy; thank you so much for the feature and for dropping by to let us know 🙂