

When we found this retro style gooseneck lamp at the thrift store, little did I know there was a lampshade makeover DIY in store! I love the orange colour so was going to use it as is for craft studio lighting! But I couldn’t help tweaking it just a bit!
While our lampshade makeover diy has a retro vibe, you could easily do this project with any style lamp or lampshade.

International Bloggers Club
It’s time for another International Bloggers Club (IBC) challenge and this month our theme is Cardboard Creations. The IBC is a group from all over the world who challenge each other every month to make something using a common theme. Our previous challenge was ‘All Bottled Up‘ and we created this unique diy air plant holder!
You’ll find our friends’ upcycled bottle ideas at the bottom of the post. So don’t forget to check them out before you go. And if you don’t have time to browse today, pop back in later in the week to pick up where you left off.
Before we get into the tutorial, don’t forget to get your craft mojo on at Birdz of a Feather and subscribe to our newsletter:
You can also follow us on Pinterest, Facebook, YouTube and Instagram.
Tissue Box Crafts
You’re probably not thinking about tissue box crafts when you’re purchasing your paper products and until now, I didn’t either. However, I do make Hubs move mountains just to get at the pretty boxes I want :). Do you do that too? Anyway, I was just about to recycle this tissue box, when I noticed just how beautiful it is. Tissue box artwork can be amazing, so why let it go to waste?

I love working with cardboard (like this cardboard art). But if you’re looking for easy things to make out of cardboard, it doesn’t get easier than this lampshade makeover.
Watch This Quick Video!
Watch this quick video to see just how easy this project is!
How to Cover a Lampshade with Cardboard
Safety Note:
- Only use an LED bulb for this project
- Do not cover ventilation holes in the lampshade (more about that later)

Materials
- A19 non dimmable LED light bulb (daylight) or soft white are two colours I like. Also be sure to purchase the base that fits your particular lamp (ie an A12 for candelabra size if that’s the bulb your lamp requires).
- Empty tissue box
- 3/4″ circle punch
- Glue tape (this one is a permanent bond). I find the ones from the dollar store tend to break.
Lampshade Makeover DIY
1. Flatten Tissue Box
To capture all that beautiful pattern, we’re going to cover the lampshade with cardboard circles! But first, you’ll have to carefully pull apart the box and flatten it.

2. Punch Cardboard Circles
I’m using a 3/4″ punch to create the cardboard circles. This ‘rabbit’ is from bygone days when I was fashion designer. But any sturdy 3/4″ circle cutter will do.

These circle cutouts are going to be so pretty once combined! If they work on a tissue box, they’ll certainly work on this diy lampshade makeover!

Carefully remove the plastic from the back; the glue does not stick well to the plastic if you leave it on.

Punch everything you possibly can, with the exception of any parts without pattern.
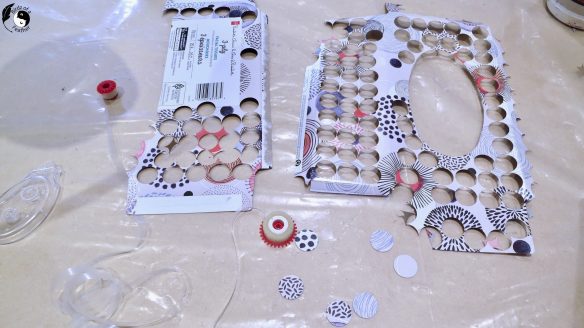
3. Punch Starter Row
For the starter row, I’m taking advantage of the natural bend in the box by letting the crease fall in the middle of the cardboard circle.

4. Apply First Row
Apply the first row of cardboard circles with the crease falling along the edge of the metal lampshade.

To secure them, I initially think that double side tape will do the job but it doesn’t stick well. Translucent tape with adhesive on both sides, like you see below, is one that doesn’t work for this application.

What you actually need is tape glue; it dispenses a thin layer of adhesive only.

I only apply glue on the back side of the cardboard to the very top of the circle; no need to glue any more than that. Learning to apply it takes some getting use to, so practice the technique first.

The one I buy from the dollar store immediately unravels which makes it impossible to use, so purchase a better brand like this one. It’s better to spend the extra money so you get one that actually works. There’s nothing worse than trying to manually transfer the glue from the sheet of film (trust me on that)!
Position them edge to edge as tight as they can go.

Sixteen cardboard circles fit perfectly around this lampshade makeover diy! However the second row is a bit of a challenge.

Remaining Rows of Cardboard Circles
I had to remove the subsequent rows, not once but twice! I find that’s just how it is for the first few days after the time change. Does the move to Daylight Savings time discombobulate you too?
Here’s how to do the second row with a proper stagger. Position the bottom of the circle against the edge of the lampshade in between two circles in the preceding row. Then ensure the circle is centred – envision an imaginary line. Don’t worry that you still see an orange gap. On the remaining rows that gap may getting bigger or smaller. But it doesn’t matter because that gap gets covered up on the next row.
Then the only thing different on the 3rd, and subsequent rows, is that the bottom of the circle should be touching the top of the circle from the previous row, as you see below.

Continue on in that manner for 9 rows.

Then stop. The reason for stopping is that you don’t want to cover up the vent holes with cardboard; even an LED bulb has to ‘breathe’. Ironically, I ran out of cardboard squares so the timing couldn’t be more perfect!

Here’s a closeup of the cardboard circle embellishment. Because of the curve of the lampshade, you won’t even notice that your pattern doesn’t continue all the way. All you notice is the cool scallop effect.

LED Bulb for Lampshade Makeover DIY
Please craft responsibly by inserting an LED bulb into the gooseneck lamp. If all you have is an incandescent bulb, don’t use it – cardboard and heat do not mix.

Before and After Lampshade Makeover DIY
Here’s a reminder of the before.

And now? Would you have guessed what our lampshade makeover DIY is made from?

Lampshade makeover diy reveal
We have one more unique idea on how to cover a lampshade (this one’s a slipcover so you can change it on a whim)! However, visit our lighting upcycles category for more unique lighting ideas.
Fall Into Fabulous
One of the things I love most about blogging is connecting with other makers, and this Fall we’ve created something truly inspiring together.
Grab 16 digital goodies from top creators — planners, recipes, colouring books & more — including our Beginner Crochet e-Book!
Every dollar of our commission goes straight to Alzheimer’s research — a cause close to our hearts. Your purchase through this link means you’re not just treating yourself; you’re making a real difference.
Grab it now — the bundle is only available for a limited time! Let’s make this Fall fabulous and full of hope. 💜

Pin Lampshade Makeover DIY
Pinning is always welcome and appreciated.

IBC Bottled Up Challenge
Want more cardboard ideas? Don’t forget to visit these awesome ‘Cardboard Creations‘ projects from our creative friends below. You’re in for some incredibly fun and creative diy cardboard ideas!
- Kippi at Home – DIY Yarn Carrots
- Interior Frugalista – Easy Cardboard Tube Spring Napkin Rings
- A Crafty Mix – Upcycled Cardboard Vase
- Unique Creations By Anita – Cardboard Bust
- Birdz of a Feather – Lampshade Makeover DIY (that’s us!)

No ways. I thought you’d printed some fancy pattern on your circles. I think I need to examine tissue boxes more carefully next time I go shopping. I love how your lamp turned out. It’s retro chic with so much interest.
I know, right? The pattern is so interesting when it’s all jumbled together!
This is super cute, reminds me a version of decoupage. Such a unique idea.
Thanks Maria! It’s like decoupage, but without the mess :).
Oh my goodness! Who would have thought a Kleenex box could completely transform a lamp! I love it!! And, so many other possibilities!
I love that it can be repurposed again; it’s just too pretty to recycle!
Great idea for so much of my scrapbook paper that isn’t in scrapbooks.
If the paper is too delicate, maybe you could back it with some cardboard? It would increase the time but be sturdier.
I always go through the tissue boxes for the prettiest design too and it drives Mr iF crazy. LOL But I’m guilty of never saving the empty boxes for crafting potential which is crazy because it makes perfect sense. I love your clever and creative use for recycling your cool retro tissue box! Now I’m going to head downstairs to the recycle bin to pull out the tissue box I put in there over the weekend. 😉
Ha ha, that’s great Marie! One more piece of cardboard saved lol 🙂
I’m never going to look at a tissue box the same, now I’m going to have to pick out the box based on the design 🙂 THis is so creative and turned out so beautiful, looks like a piece of art!
Thanks Kristin! I can’t wait to find another design to have fun with 🙂
My son is always asking to save our tissue boxes for crafts. This gives me ideas of things to do with him!
Aw, that warms my heart 🙂
OMG, I would have tossed that box in the recycle, but you made something amazing with it. You are so talented at finding unique ways to upcycle items into gorgeous decor.
Happy spring,
Kippi
Thank you for that lovely compliment Kippi! I really enjoy up cycling. It’s such a fun challenge making something out of things we often think are mundane.
Such a cute and frugal way to update a lampshade.
Thanks Janet! I doesn’t get cheaper than practically free lol when you recycle things you’d otherwise toss!
Well that was a nice surprise, I would never have guessed that was from a tissue box. They are getter fancy over there. This was a very creative project and very unique.
Thanks Anita! So glad I snatched it before it hit the recycle bin 🙂
How adorable is this lampshade, Sara! I was tickled to read about your obsession with tissue boxes! I have one, too! I only buy if the boxes have purple in them and go with my decor! Lol! I know that sounds crazy! Plus, I save them too! They are so easy to flatten and keep. You just never know when you might need a purple cardboard pattern!
Ha, you are a girl after my own heart Gail! I’ll even hunt from store to store to get the ones I want lol!
another amazing creative project!
Thanks Linda!
Oh my goodness…you are so creative! I love this idea! Pinned!
Thanks so much Lynne! Don’t know how these ideas pop into my head, but it sure is a fun ride!
Whaaaa?! Who knew a kleenex box could look so chic! Positively incredible Sara!
Aw, thanks my friend 🙂
This is so cute! They have some amazing tissue box designs these days. I’ve used them for dollhouse wallpaper and Easter baskets, and now I see potential for things like this too!
Doll house wallpaper is an amazing idea Tania! So glad I could contribute to the idea pot 🙂