

If you are considering installing real hardwood in a basement, an engineered hardwood floor should be your only consideration – in conjunction with a dimpled membrane! The membrane will help protect the floor from vapour migration coming up from the concrete slab. It will also protect from minor leaks – as we found out when one of our pipes burst a year after this install!
This video walks you through a tour of our basement before and after engineered hardwood transformed the space.
Before embarking on installing engineered hardwood, you may want to read our post on how to level a basement floor with Levelrock.
Set up and Tools for Engineered Hardwood Installation
Our install was during the winter so we cut all our planks indoors. Hubs set up our chopsaw, workbench and vacuum in the furthest room from where we started. Cardboard can help keep dust off the walls.

First we cleared everything else out of the basement. Here, we still have to move the washer and dryer. Moving them upstairs wasn’t practical so we actually built wheeled dollies for them. The dollies allowed us to easily move them around the basement as we finished each room.
Note the floor drain; we’ll have to cut around that obstruction when we lay the floor.

Underlayment for Engineered Hardwood
Then the DMX 1- Step goes down. Any moisture build-up against a porous surface can easily start mold growing so don’t skip this step in a basement installation! A dimpled membrane will protect the engineered hardwood from dampness coming up through the slab. Engineered hardwood is NOT impervious to mold – even with a membrane – so a dehumidifier is also something we consider essential in the basement to protect our investment!
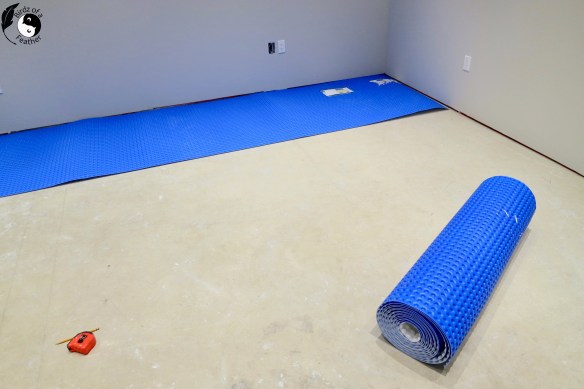
There’s no need to overlap the edges. The seams are just butt together and sealed with tuck tape; the same stuff used to seal vapour barrier underneath our drywall.

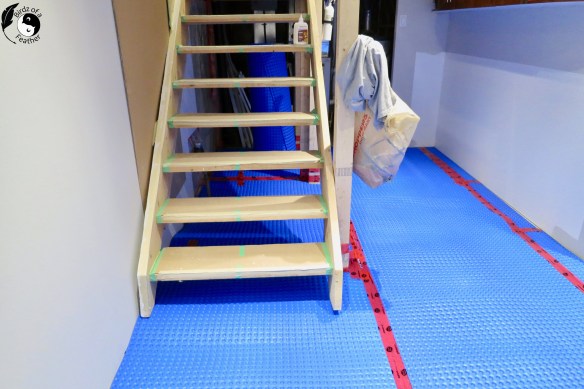
The underlayment went everywhere. Hubs even detached the stairs to lift them up to get the membrane underneath everything but the post; a more watertight solution than cutting around them.
As a side note, when we shopped for underlayment we came across these panels that claim to make the floor warmer. No doubt they do. But personally, I would avoid using any product with a wood component. That’s for the simple fact that you’re just introducing another porous component that could be susceptible to mold.

After letting the flooring acclimate a few days, we did a dry layout of some floor boards. Although it’s not shown, we ran a laser level down the middle and measured to the wall to make sure our lines would be parallel. If you find that you’ll end up with too small a board by the time you get to the other end, you may have to cut the width of the boards you start with. It takes more time, but we found it worth the effort to do a dry layout.

Floor Plan
This floorpan below shows our starting point and the direction we laid the flooring. We started with the longest plank, as the manufacturer recommends. By the way, contact the manufacturer when you purchase your flooring to get the ‘official’ installation guide for your particular product. Read it: it will give you crucial information about your floor that will guarantee a perfect install!
In the middle room of the plan, you’ll notice double directional arrows pointing outward from a red line. That red line indicates a spline to allow us to easily change direction and continue laying the floor around corners.

Luckily our doorways were wide enough to lay the flooring all in one direction. If your doorways are less than four feet wide, you won’t be able to lay the floor as we did. According to the manufacturer, it would buckle with changes in humidity and normal expansion and contraction. To prevent that, you would have to add a ‘threshhold’ and change direction in each room.
Be sure to stagger the end joints as much as possible for a professional looking finish:

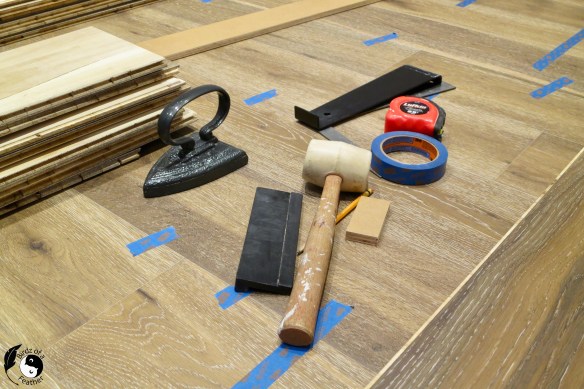
This is the glue we used:

In addition to the glue, these are the tools of the trade. A rubber mallet, an installation kit, blue tape, spacers (Hubs cut his own blocks out of MDF) and whatever heavy items you can use to weigh down the flooring as the glue dries. More about the glue and tools later.
Start with Three Rows
To start, we glued the seams of the first three rows and let it dry before proceeding with the rest. The boards shaded in purple indicate cutoffs from previous boards. In order to stagger the end seams, just start the top of a new row with a cutoff to make the best use of materials and keep waste to a minimum. 
We were so eager to start that I didn’t get pictures until we were halfway through the first room. As the glue sets up, apply blue tape across the seams to keep lateral pressure between the boards. We stacked piles of flooring on top to weigh the floor down too.

Notice the spacer blocks against all the walls above? You MUST leave a space to allow for expansion and contraction. The space gets covered up by the baseboard so make sure your end cuts are accurate so you don’t see the gaps.
Using a Flooring Installation Kit
We borrowed our installation kit from my brother-in-law. The tapping block (in conjunction with a rubber mallet) allows you to distribute equal force across the tongue without any damage to the wood.

For best results, slide the block along the row using tapping strokes to engage the tongue and groove.

The pull bar allows you pull planks together in tight areas – such as installing the last plank up against the wall. The curved end wraps around the edge closest to the wall and then the mallet is struck against the opposite end of the pull bar, forcing the joint together. You can see that in action near the end of the video (posted at the beginning of this post).

Gluing Method for Engineered Hardwood
A bead of glue is what holds the boards together and allows it to ‘float’ over the underlayment.
To apply it, place glue along the topside of the groove – for the full length of the board – and also the end. In other words, invert the plank and apply a bead of glue to the side of the groove nearest the face of the plank. When the plank is turned back over, gravity will allow the glue to flow down the back of the groove which will give you total coverage.
Apply only a thin bead. If the groove is overfilled, it will be difficult to close the seam and won’t allow a tight fit.

CLEAN SPILLS AS YOU GO: Don’t allow the glue to fully dry on the face of the flooring; it will be next to impossible to clean off. If any glue squeezes out of the seams, allow it to dry for 10 to 15 minutes and then lightly scrape it away with a plastic scraper or putty knife, any glue left can be cleaned with a damp cloth. Stick with the method: don’t be tempted to wipe away the glue right away or you’ll just force it into the grain of the wood which you’ll see it once it dries.
I can’t speak for other glues, but the one we use can easily peel off the top of any boards we accidentally spill on (as long as it sets up and is done right away). Believe me – you will appreciate that feature if it’s your first time working with a floating floor!
Transition to New Rooms with a Spline
The picture below shows the spline transition into the next room.

Apply glue on the spline and insert it into the groove. After letting it dry, then you can proceed gluing the rest of the floor boards. Proceed in the opposite direction to the wall in exactly the same way as before! It’s genius!

The install goes very fast until you get to obstructions like the drain pipe in the laundry room and around the stairs.
Hubs used a square to measure and mark the board so we could cut a circle out for the pipe.
He’s a big proponent of making samples first, as you can see by the sample board below. It can save time and materials in the end.

Once Hubs was happy with the fit, he clamped it into his workbench.

Then drilled the hole.

There’s always time for a little peekaboo! This picture also reminds me just how hard Hubs worked on our basement. He dropped so much weight throughout the construction, he practically disappears behind the board!!! I need to fatten him up again before he completely disappears 😉.

A perfect fit!

With that, the laundry room was complete and we called it a day!

The next day we concentrated on the middle room and got it finished.

We extended the spline once again into the next room so we could again lay the floor towards the walls in both the mancave and stairs in opposite directions.

Mancave done!

When it was time to do the stairs, there was a lot of measuring and back and forth, to and from the chop saw.

One last spline so we could lay floor underneath where the freezer goes.

That isn’t Hubs giving me the finger: that’s the signal that there’s only one more board to lay and we are done!

The finishes on engineered floors are so durable these days. I can roll my dress form right over them without worrying about scratches.

Finishing Touches
It was so exciting to finally load in the furniture and make the rooms functional. This is the view from my sewing room looking into the craft studio. (See the making of a craft studio IV – The Final Reveal).

The finished DIY mancave:
And finally, the laundry room makeover:

Get your DIY mojo on at Birdz of a Feather by subscribing! Follow us here You can also follow us on Pinterest, Facebook, YouTube and Instagram.
Fall Into Fabulous
One of the things I love most about blogging is connecting with other makers, and this Fall we’ve created something truly inspiring together.
Grab 16 digital goodies from top creators — planners, recipes, colouring books & more — including our Beginner Crochet e-Book!
Every dollar of our commission goes straight to Alzheimer’s research — a cause close to our hearts. Your purchase through this link means you’re not just treating yourself; you’re making a real difference.
Grab it now — the bundle is only available for a limited time! Let’s make this Fall fabulous and full of hope. 💜

Pin for Later
Pinning is always welcome and appreciated!


I wasn’t kidding when I said installing a membrane can protect from minor leaks. See what happened when we sprang a leak (mold preventation after a water leak).
Wow!!! Such a beautiful basement. Thank you for the fabulous detailed information!!
Thanks Robin!
Is there anything you two can’t do?? Amazing!!
Thanks Kim! We’re ALWAYS up for a challenge! While we put a lot of research into materials and installation methods before we start to help guarantee success, I think the real secret is obtaining – and reading – the manufacturers instructions 🙂 No one knows a product like they do – lol!
Hi….We have also put down the same kind of flooring in kitchen, dinning room and just finished the Livingroom floor, love, love, love it! What also caught my eye is the old sewing machine iron frame. We have one from my husband’s mothers old sewing machine and my husband did the same thing by putting a oak top on it, it now holds our flat screan TV.
Thanks for sharing.
Hi Pat! It sounds like we have the same taste. Great minds think alike 🙂
Oh my goodness Sara, that’s a huge job and it looks so beautiful now. We’ve always wanted to replace the horrible terracotta tiles in our home and then life kinda got the better of us. But your instructions are so easy to follow, we may just have to rethink getting us some.
Engineered wood is a great product; it looks as beautiful as real wood (because it is!) but has properties that allow it to be installed in damp areas. However, it can’t withstand a flood so if your terracotta is above level, I’d say go for it! You might also consider luxury vinyl. These days LVT looks almost as good as the real thing. If the technology and selection was as good then as it is now, we would have chosen that instead! It’s totally waterproof and much more practical for potentially wet areas in the home 🙂
Wow, what a huge job to take on. The end results are stunning. Well done.
Thank you Anita! We built the entire basement but there’s such a big payoff with the flooring when it finally looks finished – lol!
Wow! What a difference! Your instructions are so clear and helpful. I’m showing this to my husband. We are wanting to replace the flooring at our family beach cottage. Pinned!
Thanks Christy! The beach might not be an ideal location for hardwood (even if it’s engineered). If your cottage is prone to getting wet or if there’s high humidity, you may want to consider vinyl instead. It’s totally waterproof and it’s unbelievable how far it’s come. It looks almost as good as real wood these days.
Nice job and so detailed. This is what we have used too!
Thanks Deborah! It’s been my favourite flooring so far!
Love this helpful video. I just grabbed my husband to sit down and watch with me. I think we have our next project!
Awesome Libbie; glad it inspired you!
You have done a fabulous job! Thank you for the step by step details on how you finished off the basement. Congratulations!
Thank you Meegan! We hope it’s helpful to anyone wanting to install a similar floor 🙂
So much work, but the final result is beautiful. Hubs did ours in vinyl tiles and I still wish I had won that argument lol. Looks fantastic.
Thanks Leanna. You might just win the argument after all: when you get tired of the vinyl, you can probably go right over it – lol!
Great project!
I am so glad you informed one of your readers that it’s not a good choice for basements prone to flood.
It’s the first thing I think of when specifying wood in the basement for my clients as an interior designer.
Terrific job with the details!
Robin
Thanks so much Robin! I love the look of real wood but it’s not practical in so many situations :). So glad to hear you’re thinking the same way for your clients!
Such a massive undertaking but it looks amazing! Congrats!