

I’m always looking for interesting ways to display a crochet plant hanger, like these air plant pods. Know a golf lover or wood worker that’s hard to find a gift for? Make them a one-of-a-kind golf themed planter!
Crochet Plant Hanger Inspiration
Inspiration struck at the thrift store when I saw this wooden handscrew. However, I didn’t want to pay $40.

During the same outing we visited Inglewood Antiques where we found this wooden clamp for only $20. Although not a REAL working clamp, it was perfect for a DIY golf gift idea I’ve been thinking about.
Isn’t it ironic that the real clamp could be found in a thrift store, while the antique market was selling a fake? Talk about opposite-land! However, I finally scored at a garage sale and made this cool DIY Pipe Lamp!

Time for our Monthly Blog Hop
It’s time for another Creative Craft blog hop! So if you are visiting from Cecilia at My Thrift Store Addiction, welcome! At the very bottom of this post, I’ll be directing you to the next stop on this venture. But don’t forget to check out the other stops too. Be sure to drop back in throughout the week to visit them all!

Crochet Plant Hanger Materials
* [If you’re looking for some of the things we used, we’ve got you covered (disclosure): Clicking on the affiliate links below means we may receive a commission. But don’t worry, you don’t pay a cent more and it helps us make more unique crafts to share with you! Thanks for helping to support our blog!]
For this project, you will need:
- 12″ wooden handscrew clamp
- Egyptian cotton (I’m using 3764 NE 5/2×3 100% Egyptian cotton yarn made in Greece found in a thrift store!)
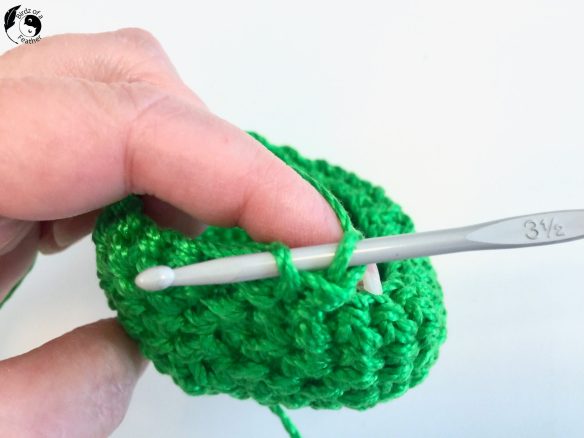
- Crochet hook (3 1/2 mm). I also used a 4.5 mm hook on the video for a slightly larger version (multi size crochet hook set here)
- 2 3/4″ Wood golf tees
- Plastic golf balls (or real golf balls if you prefer)
- Bobby pin or crochet marker
- Scissors
If you’re a visual learner, watch this step-by-step video.
Before we get into the written tutorial, don’t forget to get your DIY mojo on at Birdz of a Feather and subscribe! You can also follow us on Pinterest, Facebook, YouTube and Instagram.
Crochet Plant Hanger Pattern
This is a simple crochet plant hanger to make. You can make it in any yarn, but I do love this particular shade of green as it goes so nicely with the golf gift idea. If you’re looking for a DIY Christmas gift, birthday gift or something for Father’s day, the combination of wood clamp and golf theme might be just what you need! Or for that matter, there may be a woman in your life this would be perfect for too! I know I’d love it if I got it as a gift! This would look great on anyone’s desk to brighten up that office space.
You can display only one air plant holder as below. But as you’ll see near the end, you can have up to 3 crochet air plant hangers on this wooden clamp if you like!

Crochet Abbreviations
- sc – single crochet
- hdc – half double crochet
- sl st – slip stitch
- Sc2tog – single crochet two together
- join (with a slip stitch)
- y/o – yarn over
How to Crochet a Plant Hanger
Rnd 1: make a magic circle.
How to Make a Magic Circle
Cross the yarn over two fingers, insert the hook through the first loop and catch the yarn with the crochet hook pointed down.

Pull the yarn back through the loop.

Yarn over and pull through the loop on hook.

Chain one more time for a total of 2 chains.

Add marker if desired.

Work 8 hdc into the magic circle (watch the video if you’re unfamiliar with this stitch).

Pull on the tail end to tighten the magic circle. Join with a sl st. (8 sts)

Rnd 2: ch 1. Work 2 sc in each st around. Join. (16 sts)
 Rnd 3: ch 1. *Sc in next st. Work 2 sc in next st*. Repeat (*) around. Join. (24 sts)

Rnd 4: ch 1. *Sc in each of the next 2 sts. Work 2 sc in next st*. Repeat (*) around. Join. (32 sts)

Rnd 5: ch 1. Sc in each st around. Join. (32 sts)

Rnds 6-7: ch 2. Hdc in each st around. Join. (32 sts)

The work will start to curve like this.

Rnd 8: ch 1. Sc in each of the next 10 sts. Hdc in each of the next 12 sts. Sc in each of the next 10 sts. Join. (32 sts)
This helps form the teardrop shape.

Rnd 9: ch 1. Sc in each of the next 10 sts. Sc2tog*, 6 times. Sc in each of the last 10 sts. Join. (26 sts).
*Note: To single crochet two together (Sc2tog), insert the hook through the front loops of the next two sts.

Yarn over (y/o) then pull through two loops.

Y/O and pull through last two loops. This completes the decrease.
Here’s how it looks so far.

Hanging Loop:
ch 1. Sc into same stitch.

Make 62 Romanian cord stitches.
How to Crochet Romanian Cord
Use a slightly larger hook or crochet loosely. Chain 2. sc into 2nd chain from hook.
Turn your work. Sc into single side loop. This sets you up for the next repeat as follows:
Turn your work. Sc into two side loops. If using a 3.5 mm hook, repeat for a total of 62 sts. Otherwise, when using a 4.5mm hook, as I do in the video, crochet 52 Romanian cord sts. Sl st to beginning, cut yarn and weave in end.
Here is a comparison in size a difference of 1mm makes in crochet hook size. Notice how the first crochet hook is crooked? Because I sat on it, and bent it all out of whack, I opted for a larger one for this project. Like I really had a choice :)!

Attach Golf Tee
Fasten off yarn, leaving a long tail. Insert a golf tee as shown. Leave at least 3/4″ poking out the bottom.

Starting at the bottom, wrap yarn around; I did about half a dozen wraps toward the top of the golf tee.

Secure yarn in back (a darning needle helps with this). Hide the yarn by weaving in and knot.

Cut end.

The hanger is done! The golf tee is actually integral in hanging these crochet plant hangers as you’ll see below.

Attach Crochet Plant Hangers to Clamp
Bring the hanger around the back of the handscrew. slip it over the tip of the golf tee to secure.

Once hung, it’s time to embellish!

Embelish with real golf balls or plastic ones from the dollar store.

Add air plants.

Display your new crochet plant hanger! When using the plastic golf balls, which are light, you can display the air plants on the bottom of the hanger. Since real golf balls are heavy, insert the air plants on top of them (as shown in the pinnacle image below).

Don’t forget to remove your air plants to water once a week.
More Planter Ideas!
Birdz of a Feather is known for our unique planter ideas! We’ve got something for every budget. Check out these 10 Outside the Box Planter Ideas. Or our recent upcycled planters like, this basketball planter, baseball-themed cement planter DIY and how to make a cement planter!
Want to see ALL our upcycled planters in one spot? Check out these amazing upcycled planters!
Crochet Ideas and Projects
Don’t crochet, but know someone who does? Gift them a crochet e-pattern from our new shop and let them know that 100% of the proceeds from your gift is is being donated to find a cure for Alzheimer’s!
Crochet for a Cure
That’s right! 100% of all e-pattern sales from our shop will be donated to Alzheimer’s so please visit to check us out. You’ll not only get a quality pattern, but can feel good about your money going to a great cause :). It’s a win-win!

Fall Into Fabulous
One of the things I love most about blogging is connecting with other makers, and this Fall we’ve created something truly inspiring together.
Grab 16 digital goodies from top creators — planners, recipes, colouring books & more — including our Beginner Crochet e-Book!
Every dollar of our commission goes straight to Alzheimer’s research — a cause close to our hearts. Your purchase through this link means you’re not just treating yourself; you’re making a real difference.
Grab it now — the bundle is only available for a limited time! Let’s make this Fall fabulous and full of hope. 💜

Pin Crochet Plant Hanger
Pinning is always welcome and appreciated!

Craft Ideas from the Creative Craft Blog Hop
To get into the Fall spirit, you have to check out the DIY Sparkling Beads and Pearls Pumpkin from my friend Gail at Purple Hues and Me. When you’re done, please remember to visit these other amazing talents below:
such a creative craft. Love what you did with your thrift store find. Love working with you on the hop.
Thanks so much Terrie; love working with you too 🙂
How creative, Sara! Love the contrast of the green yarn with the wood! Blessings, Cecilia @My Thrift Store Addiction
Thank you Cecilia!
This is beyond creative Sara! First of all turning an old clamp into an attractive accessory is something I would have never thought of! The crocheted plant hangers, or in this case golf ball hangers with tees are adorable! What a fun decoration and conversation starter, very clever! Thanks so much for hosting our hop once again~
Jenna
Thank you Jenna; it’s such a pleasure to host – I just love seeing all your creative ideas!
How clever! I love vintage tools and you found a fantastic way to reuse one, Sara. I have to tell you – I had a good laugh at the antique store selling a fake…you never know, do you?
Thanks Ann! You really do have to look closely to know what you’re getting!
You come up with the most creative projects to crochet, Sara! I love the plant hangers on the wooden clamp. It’s so unique! My mil tried to teach me how to crochet many times but I just couldn’t pick it up. I love that you’re donating all the proceeds of your e-sales to find a cure for Alzheimer’s. A very worthy cause! My mil suffered with it for ten long years. She was the one who inspired me to craft. And we were friends long before she became my mother in law.
How lovely that you were friends with you MIL before you married into the family! My mom and MIL are the reason I’m donated all our sales to Alzheimers – sadly, they both suffered from this terrible disease.
I learned to crochet from my mom and grandmother when I was very young – as soon as I could hold a hook – lol. They are the ones that inspired me to craft. I hope these traditions continue to get passed down through the generations, which is why I love to share my ideas 🙂
Your crochet projects and air plant hangers are always so unique, Sara! Any golfer, male or female, young or old, would appreciate the creativity of this golf inspired gift.
Thanks so much Marie. I can’t golf but I can go toe to toe with Hubs in mini golf lol!
You always have great tutorials, Sara. I my just have to learn to crochet now!! Su cute!
Thanks so much Lori! Once you know the basics, it’s quite easy; you should give it a try!
Very cute! 🙂
Thanks Susan!
Wow this is lovely what a beautiful planter idea
Thanks so much Maria! Hubs no longer plays golf so the tees and ball were available to upcycle!
Such a fun and unique project. I will have to learn to crochet for our challenge that is coming up next year. lol
Thanks Anita; if you need help, just let me know 🙂
Sara, you have combined so of my very favorite things! Love this and I am pinning for later. xx
That’s awesome Libbie – we must have so much in common 🙂
I love all of your talents. This is just darling! Thanks for the step by step tutorial that can help us “not so great” crochet newbies.
Thanks so much Meegan – I’m a Jill of all Trades and master of none – lol! So glad you found it helpful!
This is such a creative project. I don’t know how to crochet but admire those who do. Thanks for sharing and pulling this hop together.
You’re welcome Donna; I’m so happy you’ve joined our creative craft group – it’s great to be hopping with you here and DIOD too!
This is just beautiful! Thank you for the tutorial, I can’t wait to try this!
Thanks so much Kristin! Hope you do try it 🙂
I’m always so impressed with your crochet projects, Sara. One of these days I’ll take the time to learn how! I love how you upcycled a thrift store find and made a cool and unique air plant hanger. What a wonderful gift it would make! Thanks for sharing. Pinned!
If you ever need help learning, just let me know 🙂
My great-grandmother taught me to crochet but I thought I had forgotten everything. Your excellent instructions brought it all back.
Glad to hear that Janet! I learned from my mom and grandmother. I only started back at it again recently. It’s just like riding a bike and it does come back :)!