

Have you ever seen a Japanese glass float with the wonderful hand knotted netting? I’m talking real glass float netting! We’re going to show you how to get the exact look for home decor with a budget saving thrift store find!
Japanese Glass Float DIY
We spotted this authentic Japanese glass fishing float in an antique store. Blown from glass, it was made in the early 1900’s for fishing. The Japanese fishermen would hand tie these glass floats while on the fishing boats as they travelled out to sea.

Glass float netting; on authentic glass floats, the knots loosen
There are numerous ways to do it in the craft world, like cutting up strings and knotting them together with an overhand or pretzel knot. Like the mason jar below, those are cute, but they’re not the real deal.
In all honesty, I’m not a math whiz. So I just hate to cut up rope or macrame cord only to discover that I cut too little. Or just as bad – cut too much and have to throw away scraps.
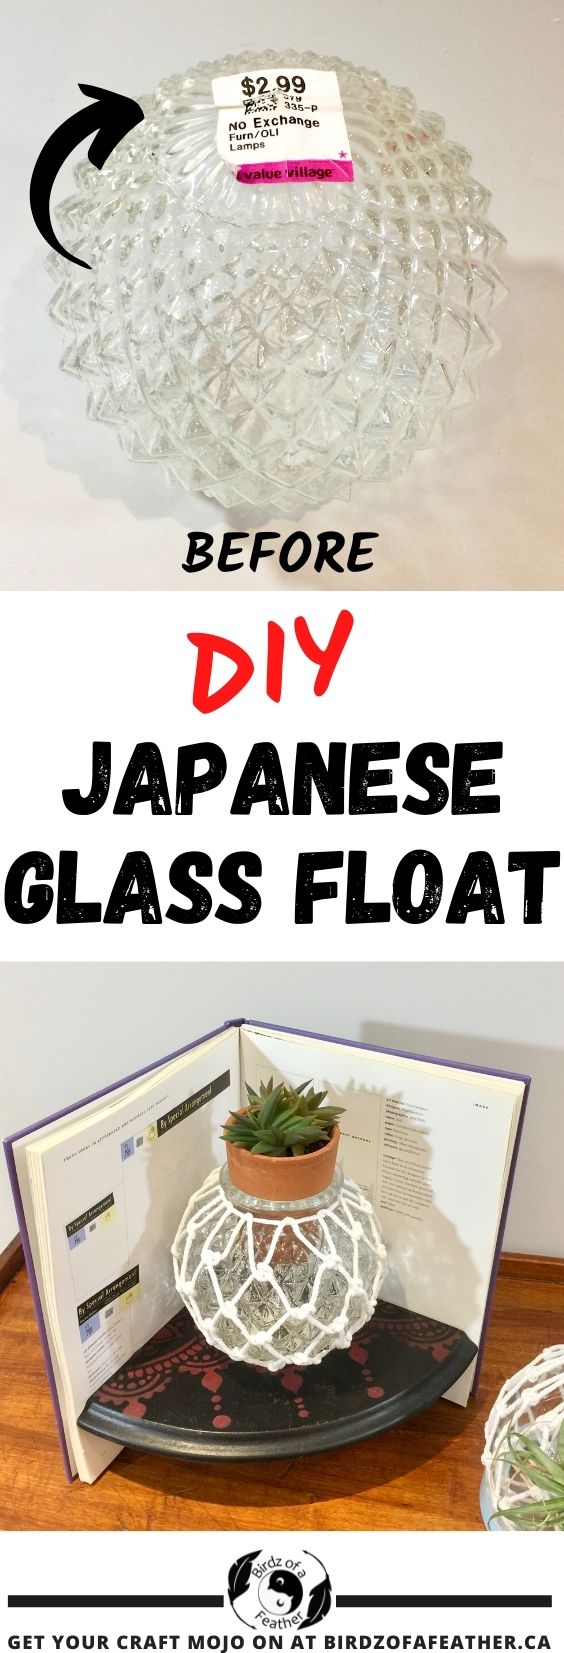
 Glass floats with rope are pricey! See that price tag on the Japanese glass float below? Not only will you get that authentic nautical Japanese fish float look – with only one piece of cord, but for just pennies in comparison. Just the way it’s been done since the turn of last century! As an upcycler, I love that authenticity cuts down on waste.

Glass fishing floats are pricey!
Creative Craft Hop
It’s time for another Creative Craft blog hop! So if you are visiting from Cecilia at My Thrift Store Addiction, welcome! At the bottom of this post, I’ll be directing you to the next stop on this venture. But don’t forget to check the full list because you’ll find plenty more crafty ideas. Be sure to drop back in throughout the week to visit them all!

Materials for Japanese Glass Fishing Float
- 3mm, 4 ply natural cotton macrame rope (note, this one is beige, not bleached white as the one I’m using).
- Thread stand
- Spool of thread (to hold centre)
- Glass light globe (thrifted)
- Scissors
- Paint stick
- Cardboard
- Candle holder base (optional; this one from Amazon comes in two sizes and is pretty & ‘beachy’)
Upcycling a Japanese Glass Float
Speaking about upcycling, I didn’t stumble on a vintage glass float in the ocean (darn!). So I’m doing the next best thing. This glass light globe caught my eye at the thrift store. At a whopping $2.99, it suits my budget just fine thank you!

Glass ball; use a light fixture!
Actually, you’ll find all sorts of inspiration at the thrift store. For instance, I see these round glass light fixtures frequently!

Alternative glass ball light fixture
Or re-envision anything that has a round circular shape. As well as being round, for this project, it’s important that choose something with a hole in the top. That’s because I have something fun in mind!

However, if you’re lucky enough to be in possession of a vintage glass float, this tutorial will instruct you on how to re-knot it!
How to Wrap a Glass Float
There isn’t a comprehensive written step-by-step tutorial in the blogosphere on how to tie a Japanese glass float, so we’re excited to teach you how! If you love the look of nautical decorations for home, specifically vintage glass float balls, you’re in the right place.
Before you read on, watch this video to see each step in action!
Instead of rope, I’m using macrame cord for a fresh look. However, if you prefer jute rope, go ahead and use that!

First Row – Japanese Glass Float

1. To start, form a loop. The picture doesn’t show it, but be sure to leave a 3 foot tail before forming the loop (where you see the green tape).

2. and 3. Wrap the tail end around the loop until back to the beginning.

4. Weave the tail end through a wrap to keep it secure. Flip around so tail is on the left.

5. Form a loop around 3 cm, that’s same width as a paint stick (see #9).

6. Pinching the loop with your left hand, bring the cord around to the back and push through the centre. Push the loop forward, down and around the first loop formed to capture it.
 7. Then pull the cord to tighten the knot.

8. Continue around the centre hole until you have 11 loops.

9. In case you’re having trouble keeping your loops consistent, use a paint stick.

10. When back to the beginning, form a double knot (a half double hitch) to bring the two ends together (this is the twelfth loop).

Second Row
Now let’s form the second row of loops!

11. Since it will help keep your work steady, secure your first row onto something like a thread holder. I also have a thread spool in the centre so the cord just pops right over. This allows you to easily turn the work as you progress.

12. Cut a piece of cardboard 6mm or 2 3/8″ wide. Slip it under the first working loop. Bring the working yarn up around the cardboard.

13. Bring the working cord through the working loop and pull down to allow the spool of cord to pass through. IMPORTANT: ensure that the cord is positioned on the left side as you pull, or your knot will be twisted.

14. Bring the spool under the new loop and pass the spool through from left to right.

15. Pull the cord.

16. Tighten the knot.

17. Remove the cardboard.

18. Consistent loops! At any rate, if your loops aren’t consistent, it just adds character.

19. Continue until back to the beginning. Then double knot the ends once again using the tail end.
 20. After tightening the knot, ensure the tail ends up on the left side.

21. Repeat for as many rows as needed to cover the length of the ball and reach the opening in the light fixture.

Tying off the Knots
How to finish Japanese Glass Float Decor
I hand knotted 5 rows. When you’re ready to secure around the opening, flip the net to the other side so it’s right side up. Then drop the netting around the glass ball as shown.
By the way, if your cord is floppy vs. stiff rope, it’s helpful to temporarily tape the top loops to the glass to hold it in place as you finish off (as shown in the video).

Glass ball netting knot
Flip the ball and net upside down so the opening is face up. Use a roll of tape to under the bottom to stabilize the glass ball and keep it from rolling. Then weave the tail end in and out of the mesh loops and tighten around the opening. Knot the two pieces of cord together.

Cut the working end, leaving a long tail. Because you’ll want to neatly hide the loose ends, use a bodkin to weave between the twisted plies of the cord. Do this a few times with both the tail and cut ends of the cord. However, weave in opposite directions to cut down the bulk.

Lastly, carefully cut the loose ends.

It should look neat, but this will become the back of the glass ball.

Ensure the loops are evenly distributed. Here’s how it looks on the bottom.

Japanese Glass Float Reveal
Below is a reminder of the glass ball before (we found the candle holder base in another aisle and put them together). Because of the diamond texture on the glass, I didn’t paint it. It’s awesome just the way it is. However, if changing the colour of the glass is something that appeals to you, there are many great sea glass spray paints out there you can try.

The starting point forms a base that allows your glass ball to stand. Finally, pop in a succulent plant for a pop of greenery. At last, our Japanese inspired decor is done!
How to Display Glass Fishing Floats
Below, we’re showing it on our upcycled book ‘shelf’. If you want to see a really cool way to upcycle a book, check that project out.

This light, bright and airy glass planter is sitting pretty on our book ‘shelf’.

Upcycle a light fixture into a glass planter!
However, you don’t even have to put a plant in. Here’s a few more options; flip the glass light shade the other way and display it in all its knotty glory on a candle holder base. A star fish completes the nautical vibe!

Or once the weather get’s better, you can add more cord to allow your glass ball to hang and display it outdoors like this one. Just be sure it’s in a covered area that doesn’t catch the wind. That’s because you don’t want your glass creation smashing against the brick!

Nautical glass ball
Want to try this Japanese float technique on another unusual find? Try out this DIY Air Plant Holder! Or visit our lighting upcycles category for more unique lighting ideas.
Want more planter ideas? Check out these amazing upcycled planters!
Fall Into Fabulous
One of the things I love most about blogging is connecting with other makers, and this Fall we’ve created something truly inspiring together.
Grab 16 digital goodies from top creators — planners, recipes, colouring books & more — including our Beginner Crochet e-Book!
Every dollar of our commission goes straight to Alzheimer’s research — a cause close to our hearts. Your purchase through this link means you’re not just treating yourself; you’re making a real difference.
Grab it now — the bundle is only available for a limited time! Let’s make this Fall fabulous and full of hope. 💜

Pin Japanese Float Decor
Do you feel ready to try your hand at hand tying a Japanese glass fishing float? Pin it for later so you remember the tutorial. Pinning is always welcome and appreciated!
And don’t forget to get your craft mojo on at Birdz of a Feather and subscribe! You can also follow us on Pinterest, Facebook, YouTube and Instagram.
Here are the weaving steps in one pin!

Craft Ideas from the Creative Craft Blog Hop
Now it’s time to check out this Plain to Pretty Wood Trinket Box from my friend Ann at The Apple Street Cottage. When you’re done, please remember to visit these other amazing talents below:
- Macrame Mail Stand
- Soft and Cozy DIY Throw
- Japanese Glass Float DIY – Tie One On! (that’s us!)
- Plain to Pretty: A Wood Trinket Box Makeover
- Painted Confetti Bud Vases
- St. Patrick’s Day Lantern
- DIY Faux Wooden Dough Bowl Candle
- St. Patrick’s Day Wreath: Easy, Adorable, & Inexpensive!
- How to Make an Easy Fabric Carrot
Happy crafting!

FAQs
1. What is a Japanese glass fishing float?
While glass floats are popular decor items these days, and a coveted vintage collectible, in the past they were used by fishermen to keep their nets afloat. Although originating in Norway, Japan started using the hollow glass balls in 1910. As the boats sailed to the fishing grounds, the floats would be woven right on the boat using the same rope that was used on the long lines.
In the 60 years these glass floats were in use, many broke away from the nets and were lost at sea. Because they were extensively used in Japan, most of the remaining glass floats originated there and those still adrift are occasionally being found ashore by beachcombers to this day.
2. Can you use a glass jar as a planter?
Plants need drainage no matter what you plant it in. So it’s best to set a plant into a glass container still in a planter pot so it can either be removed for watering or allowed to drip into the glass (the excess water can then be thrown out.
3. Can you upcycle glass?
Glass is one of the most versatile materials to upcycle. It can be cut down into glasses. Mason jars can be used to light up your outdoor space. Wine bottles can be made into lamps, and now Sake decanters can be used to hold a special air plant by adding Japanese style knots around the outside! There’s no limit to what you can do with glass!
Wow! You had me at colored glass. I love this idea. I have some old round colored glass balls that used to float in our koi pond that would be perfect for this craft. I will definitely be digging them out and giving this a try. Thanks so much for sharing!
Those would be perfect Tammy! Never thought to look for these in a pond store.
Sara, I’m so impressed–your DIY float is amazing! Thanks again for hosting!
Thanks Cecilia and you’re welcome 🙂
Absolutely beautiful, Sara! One piece of cord is definitely my style since I’m a ‘measure twice, cut, swear’ kinda gal! LOL
Ha, that’s the best way to put it Ann! I’m exactly the same lol.
Sara, your Japanese glass float picture tutorial looks amazing! I’m completely taken with the designs of the cords despite the fact that they’re made to cover a “floating” devise. I’m inspired to make one just to cover a huge glass ball and put lights in it. Can you imagine the design the lights would create? Thanks for sharing! Your finished float is beautiful – no matter how you use it!
I also want to put lights into one Gail; I have so many idea ‘floating’ around lol! I’ve never done macrame, like you, so this feels like a start.
Wow Sara, it is beautiful and I am so impressed! I could have never figured all that out, you are a macrame master! I can’t believe the price on the Japanese float!!! Thank you so much for hosting our hop 💕
Jenna
As soon as I saw that price, I knew I had to learn how to do it for a price I could afford. This is one of those projects I’ve been wanting to do for a looooong time 🙂
WOW! I like yours so much better! That is so neat watching each step. Thank you for sharing this.
Aw, thanks Terrie! I love hearing that!
I so appreciate your detailed written tutorial Sara as I have two demijohns that I’ve been itching to do this with but too intimidated to try. As an avid recycler/upcycler I appreciate how you recycled a glass light fixture dome to make yours. I love how you turned it into a very cool air plant holder!
If you’re wanting to wrap your demijohns Marie, then tomorrow’s post will be perfect for you because I’ll show you how to do this on a bottle. Be sure to watch the video if you do them; you’ll find it much easier!
I think your glass float turned out cuter than the original ones! This is a great and detailed tutorial. Thanks for sharing it with us! I have a set of small glass jars perfect for this. Pinning. Happy hopping with yout!
Niki ~ Life as a LEO Wife
Thanks Niki; the originals have vintage charm but I do like that I can use this one as a planter. Form and function – more than just decor :).
Boy, is my mind reeling with all the things one can flip into one of these treasures… your knotting instructions are so intuitive! Nicely done, Sara!
Thanks Donna – me too which is why I posted one more ‘knotty’ idea after this one. Hope you check it out too 🙂