

After not quite nailing the Union Jack in our painting vinyl fabric post, we’re back to show you how to paint a union jack once again! This time, we’re making over a vintage mantel clock! And it’s redemption time!
I guess some things are just meant to be! We had an almost identical clock but sold it in a garage sale years ago to make room for other upcycles. I always regretted selling before upcycling it. However I got the opportunity for a second chance! Who doesn’t love a do over?
A few weeks ago, Hubs kindly gave an older gentleman some sewing machine supplies so he could tinker with restoring a vintage machine. We didn’t expect anything In return, but he brought us this mantel clock! How wonderful is that!? It’s missing the glass and the bezel is damaged. But that’s what makes it a great candidate for a clock makeover! Apparently it works too – and we have the all-elusive key that so often goes missing.

How to Paint a Union Jack Video
Watch this video to see the clock transformation come to live!
Material for Clock
[If you’re looking for some of the things we used, we’ve got you covered (disclosure): Clicking on the affiliate links below means we may receive a commission. But don’t worry, you don’t pay a cent more and it helps us make more unique crafts to share with you! Thanks for helping to support our blog!]
- Chalk paint: Fluff, Bunker Hill Blue and Barn Red
- Tack puller
- Magnetizer
- Screw driver, bits and extension
- Fons and Porter chalk pencil
- Pencil
- Union Jack paper template (get it in our Birdz on the Fly library)
- Contour Sanding Grips
- FrogTape
- Delicate surface frog tape
- Fine mist spray bottle
- Mini Angle brush
- Artists brushes
- 220 grit sandpaper
- Easy Peasy Spray Wax or clear top coat (optional)
How to Paint a Union Jack
First, let’s remove the bezel so we can paint the front of the clock with the Union Jack! A tack puller is perfect for getting under the tiny nails holding it on.

Now open up the back door to remove the clock works.

I love that there’s a stamp inside telling me this was made in 1948!

Locate the screws holding the clockworks to the cabinet and remove them.

To reach the screws, we use a screwdriver extension. But before removing them, our best advice is to magnetize the tip of the screw bit so the screws can’t fall and get lost!

Sand the Clock
Before painting, clean and scuff sand the clock case. We have a set of contour sanding grips to help sand challenging parts like this curve. As we show on the video, they are SO handy to have!

A light sand with 220 grit will give enough bite to the finish so the paint adheres well.

Clean well with a damp cloth.

Normally, you would paint a base coat of the white, since white is a big part of the design – and we recommend you do that. However, I’m painting the white later because I want to draw as much of the pattern as I can using chalk on the dark wood. Chalk easily erases and will give a cleaner look than using lead pencil. So lets skip right to the template!
Union Jack Template
This clock is 12″ wide by 8″ high in the centre. If you happen to have a similar size clock, the template is available in our Birdz on the Fly project library (we trim off the pattern to the exact profile of the clock). If you’re not a subscriber, fill out the form at the bottom of this post for access :).

Notice that we’re using a pattern notcher to punch out the ends of each line. You can use scissors instead to ‘V’ notch. We also use an awl to punch a hole through every intersecting line. Then we line the pattern up with the clock and use a chalk pencil to make marks.

Join the marks with a ruler and you have your chalk lines for taping.

Chalk Paint for the Union Jack
I’m using Dixie Belle’s chalk mineral paint to paint the union jack in Fluff, Bunker Hill Blue and Barn Red. Chalk paint dries in about 15 – 20 minutes so it’s ideal for motoring through all the taping and painting!

Paint the Union Jack
Starting with the centre cross, use frog tape to tape outside of the lines. Also tape off other areas like the holes and sides.

Use artist brushes, like this set from Dixie Belle. Although I start off with my mini angle brush, I’m using the largest one to paint the cross of the union jack. I do two coats and then move on to taping and painting the next red section.

When the cross is dry, lift the tape – but re-tape on the inside of the lines (using the opposite side of the tape you painted on).
Now you can tape and paint the remaining red sections. The artist brush is the perfect size for this task.

When you peel back the tape, ensure that you’re lifting it at a 45 degree angle, as shown, to prevent tear out.

Because I didn’t paint a white base coat, I have to tape up all the red bits so I can add the white paint. Since the paint is still fresh, I’m using a low tack Frog Tape for delicate surfaces.

Now it’s ready for white. Be sure to watch the video for tips to prevent paint bleed underneath the tape!

Once the white is on, you’ll have to switch over to pencil (or a darker chalk if you have it) to draw in the blue sections.
Tape Tips
IMPORTANT: When you tape for the blue chalk paint, ensure that the tape falls outside of the pencil lines so you can still see them. This will get painted over with the blue paint so the pencil lines don’t show on the white.
A release cut in the tape can help keep the edge of the tape straight against the raised moulding. A long as you stick to your pencil line, you’ll be fine!
Notice that I switched back to the regular frog tape below? My delicate surface tape is old and I don’t find it as good for preventing paint bleed, so I let the paint dry overnight before taping again.

Blue paint done.

I let everything dry overnight before peeling back the tape and painting the rest of the clock case white – with the exception of the feet. I have something else for those!

The Queen’s Platinum Jubilee
The Queen’s Platinum Jubilee is in June, which marks 70 years on the throne! So how cool would it be to add a splash of Dixie Belle’s Diamond Mousse on the feet of the clock?

How to Paint a Union Jack Reveal
Here’s a reminder of the clock before painting the Union Jack.

And now? It’s pretty stunning. I think it might be time for a spot of tea to celebrate a successful upcycle! 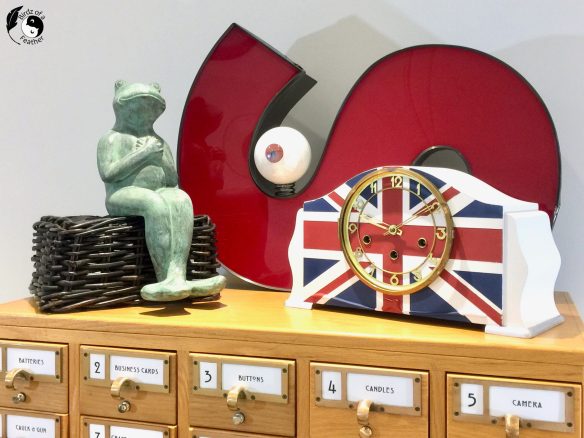
Although we lost mom last year, this clock would have been a wonderful gift to celebrate her British heritage. I think she would’ve loved a Union Jack clock!
If you love a good clock upcycle too, check out how to paint with chalk paint – our very first chalk paint upcycle! Then there’s this wooden wall art DIY, decoupage on wood, the Foghorn Leghorn clock and Hub’s computer hard drive clock. Lastly, this wall clock DIY was a great way to inject our logo into my studio space.
Fall Into Fabulous
One of the things I love most about blogging is connecting with other makers, and this Fall we’ve created something truly inspiring together.
Grab 16 digital goodies from top creators — planners, recipes, colouring books & more — including our Beginner Crochet e-Book!
Every dollar of our commission goes straight to Alzheimer’s research — a cause close to our hearts. Your purchase through this link means you’re not just treating yourself; you’re making a real difference.
Grab it now — the bundle is only available for a limited time! Let’s make this Fall fabulous and full of hope. 💜

Pin How to Paint a Union Jack
Sharing is caring!

Get your DIY mojo on at Birdz of a Feather and subscribe! You can also follow us on Pinterest, Facebook, YouTube and Instagram.
Free Union Jack Template
To gain access to the free union jack template, subscribe by email on the form below if you’re not already a subscriber. Once you confirm your e-mail, you’ll receive a welcome message with the password (be sure to add us to your safe list). We change the password periodically, so check the newsletter often. You’ll find our new freebie library at Birdz on the Fly.

This looks fabulous!
Thanks so much!
What an amazing transformation! You did a great job!
Thanks Donna!
This is a fantastic project! Pinned
Thank you Cindy!
Well that’s a fun makeover! And I love your frog.
Thanks Kim! I have to admit; I’m frog obsessed!
The one quarter English blood coursing through my veins loves this fabulous mantel clock makeover! You did such a wonderful job, Sara, and I especially like how the gold bezel pops against the union jack. So pretty! The platinum jubilee reference on the base is a sweet touch too. Do you plan on keeping the clock? It looks fabulous in the vignette you created on the catalogue cabinet.
I do plan on keeping it; I also have english blood running through my veins :). I think it’s found a permanent place on the card catalogue. I’ll just have to find somewhere to put the stuff that was there!
What luck! Love the date stamp and instructions. Such a cool way to personalize a clock.
It was definitely meant to be to have a second clock fall into my lap!
I love these designs and keep saying I will make something. You’ve given me a great guide on how to do it. Now, I need to find something to paint.
Thanks Rosemary – hope you get an opportunity to try it!
What a great clock, I have one similar that I should do the same. Its amazing how things were made better back then.
You’re right about the quality back then Maria! There’s no comparison to products available today!
I loved the way you transformed this piece. It turned out beautifully.
Thanks so much Jennifer!
I just love this clock so much! I did watch the video and what a helpful step using the cardboard to not scratch any further. Great job Sara
Thanks for checking out the video Brooke; I’m alway happy to hear it’s helpful 🙂
I LOVE finding dates on furniture, 1948! What a treat!
Not only that, but that piece comes from Eaton’s department store (now defunct). They used to have a shop-at-home catalogue and I’d love to find one circa 1948 to see if it was pictured in there!
I love old clocks! You really made it so special! Great job!
Thanks so much Melba!
This looks fabulous. As a brit I give it a big thumbs up 😀 You got the flag the right way up too which is impressive!
So happy to get the thumbs up after messing up my first Union Jack project! – https://birdzofafeather.ca/diy/painting-vinyl-fabric/
Charming. Also thank you for the tutorial
Thanks so much Linda!