

Ever wonder how to decoupage without wrinkles? If you love upcycling thrift store finds and want to try a decoupage technique that gives a smooth, wrinkle-free finish, the iron-on method is a game-changer. Unlike traditional wet glue decoupage, this technique allows you to reposition your design and reduces the risk of tearing delicate paper such rice paper. Today, we’re using it to create a charming “Family” sign that makes a perfect home décor piece or gift.
Some days, creativity flows freely. Other days, it’s like staring into the fridge, hoping inspiration will appear between the wilted lettuce and half-empty ketchup bottle. Lately, my creative spark has been on an unplanned sabbatical.
But just when I thought my craft mojo was gone, I spotted a thrift store “Family” sign amongst my stash that was bland and begging for a makeover. And really, what better word to focus on when you’re stuck in a creative rut? Family is the backbone that sees you through the worst of times; the people who remind you who you are when the world feels like it’s upside down. If any project was going to pull me out of this creative slump, it had to be this one. So, armed with colourful rice paper and the iron-on decoupage method, I set out to bring this sad little sign back to life – and maybe breathe some life back into my creativity while I was at it.
By the way, if you’ve never decoupaged before, this is a great beginner project that will get you professional results on your very first try!

Do It Over Designers
It’s time for another Do It Over Designers blog Hop, hosted by my friend Ann at The Apple Street Cottage. This month we were challenged to use paper in our projects. Be sure to check out the links at the very bottom of this post for more do it over paper inspiration!

Why the Iron-On Decoupage Method?
Rice paper is thin but strong, making it ideal for decoupage projects. But this method will work well with many types of paper.

The iron-on technique offers several benefits:
✔️No Wrinkles or Bubbles – the dry application keeps the paper smooth.
✔️Easier Placement – you can move the design before committing.
✔️Great for Large Surfaces – works well on signs, furniture, and trays.
Watch the Decoupage Video!
Materials
[If you’re looking for some of the things we used, we’ve got you covered (disclosure): The blue links in this post may be affiliate links. We earn a commission from qualifying purchases which we proudly donate to Alzheimer’s research. But don’t worry, you don’t pay a cent more! Thanks for helping to support our fundraiser!]
- Wooden sign spelling “Family” (or any word of your choice) – ours is thrifted
- White chalk paint or acrylic paint
- Rice paper with a design or colour that complements your décor
- Decoupage glue (such as Mod Podge or a similar adhesive like a satin clear coat)
- Small paintbrush or sponge brush
- Parchment paper (we use unbleached)
- A household or travel iron (set to low, no steam)
- Sandpaper (optional, for distressing)
- Rotary blade to trim rice paper borders
- X-acto knife
- Metal safety Ruler
- Self healing cutting mat
- Clear sealer (matte or glossy, depending on your preference) – Spray is preferable

How to Decoupage without Wrinkles
1. Prepare the Wooden Sign
This family sign is two tone so we definitely need to even out the base colour.

Start by painting your wooden sign with a base coat of white or a light colour. This helps the rice paper design stand out. Let the paint dry completely.

2. Apply a Layer of Decoupage Glue
Just with the coat of white paint, it looks better already!
Now, brush a thin, even layer of decoupage glue onto the sign (I’m using a matte clear coat). Be sure to cover the entire surface where the rice paper will go. Let it dry completely; this is key to the iron-on method working properly. Give it a second coat and again let it dry (we left it overnight).

3. Position the Rice Paper
I love how bright and cheerful this paper is! If your rice paper has a white boarder, start by trimming it off. For perfectly straight edges, use a rotary cutter with a self healing mat. Of course, if you prefer, you can cut it with scissors instead.

Figure out how you want to position the pattern on the sign. I find it helpful to lay it underneath to visualize the placement.

But then, I add it on top of the dried glue and crease along the edges. Since the glue is dry, you can move the paper until you’re happy with the placement.
This antique iron acts as a weight to prevent the paper from shifting before it’s ironed down.

4. Iron It On
Along with the thrifted family sign, I also found a small travel iron at the thrift store for only $3. Perfect for crafting!
One caveat to keep in mind: do not use the steam function! Remove any water, if there happens to be some, in the iron. You don’t want to introduce any moisture.

Place a piece of parchment paper over the rice paper.

Using a dry iron (no steam) on a low setting, gently press down and move in slow circular motions. The heat reactivates the glue, adhering the rice paper smoothly to the wood sign. Work from the centre outward to avoid trapped air.

How to decoupage paper to wood without wrinkles
5. Trim Edges
When it’s all glued down, you can trim off the excess.

For the rice paper that extends beyond the edges of the sign, you can either trim it with a fresh sharp blade or use sandpaper to lightly remove the excess.
First, cut into the middle of the cut-outs of the letters and run the blade into the corners.

You’ll be able to crease the paper.

Then, I flipped the sign over with the front facing down and ran the blade along the edges.

You might find it impossible to get into curves on the back, like I have on these letters. So, in that case, it’s best to run the blade carefully along the front – just in that area – so you can get into the tight space better to completely cut away the paper.

If you prefer to sand, sanding downward prevents tearing and gives a cleaner finish. For a vintage look, feel free to lightly distress the edges of the sign.
However, I find that sanding can leave a fuzzy edge and kick up dust that you don’t want in your final clear coat.
6. Seal Your Project
To protect your design, apply a clear sealer over the entire surface. There are no pictures of this step because I prefer to spray the sealer and it’s too cold outside, but brushing is fine too. Only apply a very light coat to avoid bubbling the paper. A matte finish gives a soft, natural look, while a glossy sealer adds shine. Let it dry thoroughly.
If you do happen to get bubbles after sealing, you can always iron again using the parchment paper to reactivate the glue.
Reveal
The iron-on decoupage method is the easiest way to get a professional finish without wrinkles or bubbles. Now that I’ve tried it, there’s probably is no reason to go back to a ‘wet’ method like we used for this decoupage on wood project.
No matter what you’re making, be it a “Family” sign or another decorative piece, this iron on technique gives you the ultimate control over your design while keeping the process stress-free!

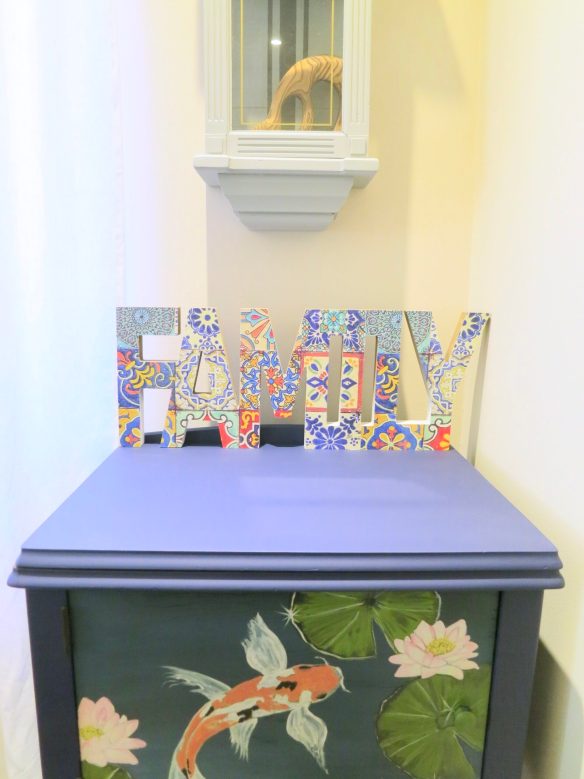
Is it any wonder why I love this decoupage paper so much? The sign just happens to fit perfectly on our hand painted cabinet, so that’s where it will likely stay (see how to hand paint furniture designs).
I wish I had known about this wrinkle free iron on method back when we did this medicine cabinet DIY. Have you tried this decoupage method? Let us know in the comments!
Fall Into Fabulous
One of the things I love most about blogging is connecting with other makers. And this Fall we’ve created something truly inspiring together: 16 digital goodies from top creators — planners, recipes, colouring books & more — including our Beginner Crochet e-Book!
Grab it now — the bundle is only available for a limited time at this price: use the coupon code FALLFUN to get it for $9.99!
As always, every dollar of our commission goes straight to Alzheimer’s research, so treat yourself knowing that you’re making a real difference! Let’s make this Fall fabulous and full of hope. 💜

Pin How to Decoupage

Do It Over Designers
Now, I’m excited to share what this talented group of bloggers is up to. I hope you’ll take a moment to visit each of them and discover the crafty upcycles they’ve created using paper.
- Pandora’s Box
- Purple Hues & Me
- Unique Creations by Anita
- Sum of Their Stories
- Tea and Forget-Me-Nots
- Color Me Thrifty
- Vintage Style Gal
- The Apple Street Cottage
- Birdz of a Feather
- Exquisitely Unremarkable
- Modern on Monticello
How to Decoupage FAQs
Decoupage Paper
What paper is best for decoupage?
The best paper for decoupage depends on your project, surface, and desired finish. Here are some good options:
- Napkins & Tissue Paper – Ideal for a seamless look on curved surfaces like glass or wood but can be delicate to work with. Sometimes these can bleed when wet, so always test first before beginning your project.
- Rice Paper – Thin, flexible, and easy to work with, making it great for both beginners and detailed designs.
- Printed Paper (Scrapbook or Wrapping Paper) – Provides more durability and patterns.
- Book Pages, Sheet Music, or Maps – Vintage-style projects look great with these, but they may need softening with water or glue.
- Fabric is also an option (Thin Cotton or Muslin) – Works for a textured, layered look but needs a strong adhesive.
For best results, use thin, absorbent paper that molds well to your surface without excessive wrinkling.
Decoupage Sealer
What is the best way to seal decoupage?
The best way to seal decoupage depends on your surface and the level of durability you need. Here are some options:
- Decoupage Glue/Sealer (e.g., Mod Podge) – A classic choice that can work as both an adhesive and a sealer. Available in matte, satin, or gloss finishes. Note that I prefer this as a base and use Polyurethane (spray or brush on) to seal over the top.
- Polyurethane or Polycrylic – Great for high-use items like furniture. Polycrylic is water-based and less likely to yellow over time.
- Spray Sealers (Acrylic or Polyurethane) – Provides an even, brush-stroke-free finish. Best for delicate papers that might wrinkle with a brush-on sealer.
- Resin or Epoxy – Ideal for ultra-durable, waterproof, and glossy finishes, such as tabletops or coasters.
- Wax (Clear or Antiquing Wax) – Gives a soft, vintage look, especially on wood-based projects.
Tips for a Smooth Finish
- Apply thin, even coats, letting each layer dry completely before adding another.
- Sand lightly between layers with fine-grit sandpaper for a smooth finish.
- Use a foam brush or soft brush to minimize brush strokes.
Printers
What kind of printer do you need to do decoupage?
If you prefer to print your own design, the best printer for decoupage depends on the type of paper you’re using and whether you need waterproof prints. Here’s a breakdown:
1. Laser Printers (Best for Waterproof Prints)
- Why? Laser printers use toner, which won’t smudge or bleed when wet.
- Best For: Decoupage with Mod Podge or other liquid adhesives.
The only downside is it can’t print on napkins or thin tissue paper directly (you will need to tape it onto regular paper first).
2. Inkjet Printers (Best for Thin Papers & Color Vibrancy)
- Why? Inkjet printers work well for delicate papers like rice paper or napkins.
- Best For: Vibrant colors and detailed prints.
The ink may bleed if not sealed properly. To mitigate any issues, you can heat set the ink first in a 200 degree oven for five minutes – but you must not leave it unattended. Then lightly spray with hairspray or a clear acrylic sealer and let dry before applying glue.
Tips for Printing Decoupage Designs:
- Print on matte or lightweight paper (20-32 lb) for easier adhesion.
- Seal inkjet prints with a spray sealer before decoupaging to prevent bleeding.
- Use tissue paper or napkins by taping them onto a regular sheet before printing.
Decoupage How To
What are the steps to decoupage?
For an easy, no fuss way to prevent wrinkles here are the steps:
1. Prepare the surface – Paint a light colour
2. Apply two Layer of Decoupage Glue letting dry between coats
3. Position the Paper
4. Iron It On using parchment on top of the paper
5. Trim or sand the edges
6. Seal your project
What do you need for decoupage?
Here are some basic supplies
- Paper or Fabric – Napkins, tissue paper, scrapbook paper, rice paper, or printed images.
- Decoupage Glue/Medium – Mod Podge, diluted white glue, or a specialized decoupage adhesive.
- Surface to Decorate – Wood, glass, metal, plastic, ceramic, canvas, or even fabric.
- Brushes or Foam Applicators – For applying glue and sealant.
- Scissors or Craft Knife – For cutting designs.
- Sealer/Topcoat – Spray sealer, varnish, or polyurethane for durability.
- Iron – Highly recommended to prevent wrinkles.
Optional But Helpful Supplies:
- Sanding Block or Fine-Grit Sandpaper – For smoothing rough surfaces.
- Acrylic or chalk Paint – To prep the background before applying paper.
- Tweezers – To handle delicate napkins or tissue paper.
- Plastic wrap – To smooth out wrinkles and bubbles (only if using wet method).
Troubleshooting
How do you keep Mod Podge from wrinkling?
Use the iron on method to decoupage your paper to the surface.
What do you seal decoupage with?
There are many options but our preference is a spray on clear coat.
I love your beautiful and wrinkle free decoupaged family sign, Sarah! It looks perfect over your lovely hand painted cabinet! I love to decoupage and have been doing it for a few years now. There are so many variables in decoupaging – it’s almost like a trial and error when doing it. I have done the iron on method many times but I must say that I usually use parchment paper on top first. I just never know how what’s underneath would react to the hot iron, etc.
I’ve only done a few decoupage projects but would love to do more with this method. The possibilities are endless.
How pretty, Sara!! You know I have that exact decoupage paper and I’ve never used it. Now I want to try your technique with my craft iron and transform something around here!!
Can’t wait to see what you do with it Kim! I thought it would be tricky to work with but the rice paper is so forgiving you really can’t go wrong.
Sara, you must have patience by the loads to cut out each letter. I can’t say I would fare as well as you. Your family sign turned out amazing! I know what you mean, I go through uninspiring times too when it comes to crafting. It’s strange, I think I am plugging along and loving crafting, and then, boom! I am like what now? Glad I am not the only one. Yes, you and I are on the same page, and knowing you also cleaned out two homes, I feel for you. I had the hardest time letting go, especially when we had the auction at my grandma’s house.
I think a lot of my creative block has to do with all the clutter we’re dealing with now. Letting go is still too emotional but the clutter is just as bad. It’s a real catch 22! I guess the only thing to do in the meantime is to upcycle as much as I can and then I can let the reimagined pieces go to someone else to cherish and appreciate.
Your family sign turned out great Sara! I’ve done many decoupage projects, but I’ve never tried the iron method. I love the colors of the paper you used. Whenever I get creative block I have to start purging stuff. Once I’ve lightened the load my creative juices just naturally seem to start flowing again.
I think you’re absolutely right about purging Tuula; I definitely need to do that.
Actually, I have used the iron-on method – with paper napkins. I’ve never tried it with rice paper though. Very pretty!
Thanks Ann! I would love to try napkins too but can’t find any that would be suitable in my area.
Well I learnt something today at aged 56. I had no idea you could decoupage this way. I personally prefer the smooth look and this is the reason I dont do many decoupage projects, the OCD in me need a smooth surface. Thanks for sharing. And I feel your pain with the creativity streak, I am also struggling lately. Keep up the great projects.
I’m so glad you learned something new! I totally get wanting a smooth finish; it’s the reason I haven’t done more decoupage until now lol. And yes, the creative struggle is real sometimes! Thanks so much for your kind words and support Anita! I hope inspiration comes more easily for both of us soon :).
That paper is so pretty, your sign is lovely. Thanks for the decoupage tips too, they’re really helpful.
Thanks Julie! I wasn’t sure how the paper would look but I’m thrilled with the outcome!
I have never tried to decoupage this way and will certainly try it! Your project turned out fabulous! Your choice of paper was perfect!!
I hope you give it a try Patti; I think you’ll love the technique as much as I do!
Great project and this is really nice to know!
Thanks Tania!
The mosaic paper you chose is perfect for this. And a travel iron is a great find!
That little iron does double duty; perfect for travelling and it’s a great size for crafting. Best $3 ever spent lol.
Pinned. Thanks for sharing these tips. It never is as easy as it would seem to be and I have struggled a time or two trying to work with Mod Podge.
I had great results using just a clear coat I’d use to seal furniture so give that a try next time you découpage :).
I’m extending a loving hug your way, Sara.
Sending a hug your way too Alys; I hope your hip is mending well and you’re getting out into the garden!
Thank you, Sara. I’m getting there. Still some pain, but I’m working on a way to lay on a kneeling pad to pull weeds. They’ve had a head start this season.
I knew you’d come up with a workaround :). I wish you continued and speedy healing!
xo
It’s impossible for your craft mojo to disappear, Sara. You have waaaaaaaay to much. It’s probably just hiding for a bit while it waits for Spring 😉
Thanks for the encouragement Michelle!