

Are you tired of re-threading your serger every time you want to change thread colors? Learn this simple trick that will save you time and hassle. Follow our easy steps and never worry about re-threading again!
When I first graduated from fashion school, I thought I knew how to change serger thread. But my instructor didn’t know this little trick and after adopting it, I haven’t had to re-thread my machine in over 30 years!
Not only is it the easiest way to change serger thread, but it’s also foolproof (unless you’re a cat who likes to play with thread). So let’s ‘knot’ waste any more time! Read on to discover the best knot for the serger and how to switch out the yarn cones.
Whether you are using a commercial Juki (like me) or any other model, these principles will work for you. Not sure how it compares to modern Juki sergers, but I’ve had my Juki for over 30 years and it’s never failed me.

My Children’s Wear Line
Before I share my trick for changing serger thread, let me tell you a bit about my first career. After all, it is throwback Thursday!
Not many people in the blogging world know that I was a fashion designer. For a brief time, I worked for a famous Canadian designer, then branched out into my own children’s wear line in the 90’s.
When I was designing my children’s wear line, a serger was an essential tool in making my samples before they were manufactured. Serging makes clothing durable – a bonus when you need it to stand up against the rigours of the factory floor.
Below is a picture of a picture from my Spring collection in the early 90’s. Digital cameras weren’t common back then; it’s amazing to think how far technology has come in all those years. However, I’d never part with my trusty serger for a new one. It’s a workhorse and they just don’t build ’em the way they used to!
Hopefully April showers bring us some may flowers.

Switch out the Yarn Cones
To change serger thread, start by cutting the thread close to the cones, leaving enough slack to tie on the new colour. I’ve had these Wiss snips for years; they’re perfect to cutting thread.

Once you’ve clipped all the threads, switch out the cones for the new color you want to use.

The Best Knot for the Serger
The square knot (shown below) is a commonly taught method for joining the new spool to the old one. However, it’s a slip knot that can easily come undone and result in having to rethread the serger. And that’s the biggest drag! Even if it’s only one thread, we want to avoid a complicated and time consuming re-thread at all costs.

How ‘knot’ to change serger thread
That’s where the surgical knot comes in. Hey, if it’s good enough for surgeons, it’s going to be secure to change serger thread too!
Start by leaving a long tail and bringing the left thread over the right and under. Add an extra half knot by twisting the same thread around again. Then, bring the right thread over the left and under, passing through the loop. Tighten the knot to secure it.

Watch this video to see the easiest way to change serger thread and a demonstration of how to tie the best knot for the serger.
[If you’re looking for some of the things we used, we’ve got you covered (disclosure): Clicking on the affiliate links below means we may receive a commission. We earn from qualifying purchases which we proudly donate to Alzheimer’s research. But don’t worry, you don’t pay a cent more! Thanks for helping to support our fundraiser!]
Remove Each Thread from the Tension Springs
Next, remove each thread from the thread tension springs, using tweezers to grab them. Move each thread completely to the left to avoid getting caught in the tension springs again.

Lift the presser foot lever in the back and swing out the presser foot.

Also, lift the plastic cover plate in the front to see the knot before it reaches the needle. If your needle isn’t fully up, turn the wheel until it’s well above the needle plate and you can see the eye of the needle.

Feed the Threads Manually
Run the serger until the knots approach the tension springs and stop.

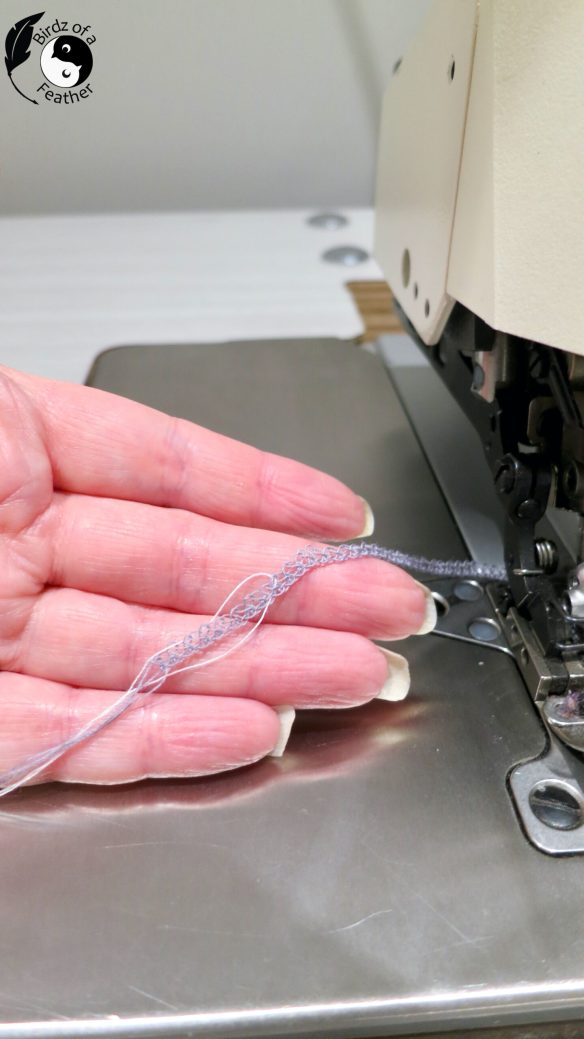
Then, manually feed the old threads until the knots are past their respective tension springs. That way, you have full control. Use your left hand to pull the threads away from the needle plate, advancing the new colour through the serger.

When the knot approaches the needle, guide it through the eye of the needle. Or cut the knot and thread the new end through the eye instead (which avoids the possibility of accidentally breaking the needle).
Reverse the Steps
Once all the threads coming through the needle and loopers are the new colour, guide each thread back into its tension spring. Double check to make sure you have the thread in the right spot.

Swing back the presser foot and re-engage the lever. Turn on the machine and start serging!
I used this pretty blue colour to serge the bottom of a dress I shortened for my niece. Her friend is getting married this summer. Who doesn’t love a summer wedding?! I hope it won’t be too long before it’s her turn to get married :).

Latest of my sewing projects before serging
Although this method does result in some waste, it’s way better than starting from scratch!

Try it out, and happy serging and sewing! For more sewing tips, check out our sewing tutorial on comfy lounging with Jalie 3676.
By the way, if you need a great method for how to start and end your serging, check out this video for 4 ways to finish serger thread tails.
Fall Into Fabulous
One of the things I love most about blogging is connecting with other makers. And this Fall we’ve created something truly inspiring together: 16 digital goodies from top creators — planners, recipes, colouring books & more — including our Beginner Crochet e-Book!
Grab it now — the bundle is only available for a limited time at this price: use the coupon code FALLFUN to get it for $9.99!
As always, every dollar of our commission goes straight to Alzheimer’s research, so treat yourself knowing that you’re making a real difference! Let’s make this Fall fabulous and full of hope. 💜

Pin How to Change Serger Thread

FAQs on How to Thread a Serger
How do you thread a serger easily?
- Cut thread
- Join new cone colour to old thread using a surgical knot. Any other knot may slip.
- Raise the presser foot (and plastic cover on front of serger, if applicable)
- Run the serger until knots reach the thread tension springs. Manually pull the threads the rest of the way through the machine, one at a time
- Pull new thread through eye of needle (or cut the knot first)
- Re-engage presser foot and run the serger with the new color
Does serger thread require special needles?
It’s more about the type of fabric you are sewing with when choosing a serger needle. For instance, if using a knit fabric, use a blunt needle. For all other fabrics, use a sharp needle. Use the proper size needle for the weight of the fabric. A 75/11 will work for lighter weight fabrics, while upward of 90/14 are suitable for heavy fabrics like cotton twill.
Which thread to pull to undo overlocking?
Use a seam ripper to pick apart the running thread that is stitched by the needle (as opposed to looper threads that wrap around the edge). Once removed, the looper threads will easily come away from the fabric.
Can you use regular sewing thread in a serger?
You can use the same types of thread (for instance cotton and polyester). However it’s best to use serger cones vs. thread spools on the serger. Sergers use up a lot more thread than a sewing machine and cones have a lot more yardage so won’t run out as fast. In addition, spools have notches that can catch the thread and break it, whereas cones don’t.
That’s some set up. I don’t have a serger, but have always wondered about them.
They are amazing; once you have one, you’ll wonder how to ever sewed without it!