

Look no further than our DIY air plant holder if you’re on the search for a unique air plant holder idea! As a matter of fact, we’re crafting quite the collection of air plant decor ideas, but here’s a ‘knotty’ one for you. It’s knotty, but oh so nice!

Decanter decor ideas
International Bloggers Club
It’s time for another International Bloggers Club (IBC) challenge and today we’re welcoming two new bloggers to the fold: Marianne from Songbird and Kippi from Kippi At Home. I hope you’ll join me in welcoming them! The IBC is a group from all over the world who challenge each other every month to make something using a common theme. Our previous challenge was ‘Bocacious Books‘ and we created a unique upcycled book unlike anything you’ve ever seen!
If you haven’t already guessed, this month is the Bottled Up Challenge. You’ll find our friends’ upcycled bottle ideas at the bottom of the post. So don’t forget to check them out before you go. And if you don’t have time to browse today, pop back in later in the week to pick up where you left off.
Before we get into the tutorial, don’t forget to get your craft mojo on at Birdz of a Feather and subscribe to our newsletter:
You can also follow us on Pinterest, Facebook, YouTube and Instagram.
Tie Netting with Only One Cord!
My craft dilemma was, and still is, that I dislike the waste of cutting up pieces of cord, like many craft tutorials demonstrate. Instead, I’m showing you how to achieve a knotted glass look with only one piece of cord! As a matter of fact, last week we showed how to tie an authentically knotted Japanese Glass Float by upcycling a glass light globe.
So today we’re taking that project one step further and showing you how to knot a glass bottle using the same hand tied Japanese knots – with variations for a bottle. But not just any glass bottle! This thrifted bottle has a unique hole in the middle! Perfect to hold a special air plant! Now, you don’t have to run out to find this exactly bottle – any upcycled bottle will do. For instance, a demijohn bottle would look fabulous covered in rope or cord!

Ironically, as turns out, our upcycled glass bottle has Japanese origins too – just like a glass fishing float! This is actually a Sake carafe. And that hole in the middle? It’s a reservoir for ice to keep your Sake nicely chilled.

How to Cover a Glass Bottle with Netting
Firstly, I have to say that diy knotted jute net bottles may be the more common way to go. However, looking at this abandoned jute net bottle in the thrift store didn’t inspire me in that direction.

While jute is a popular choice, I’m going with white macrame cord to contrast with the green air plant. I think it will be a fresh look for this glass bottle planter!

Supplies for DIY Air Plant Holder
- 3mm, 4 ply natural cotton macrame rope (note, this one is beige, not bleached white as the one I’m using).
- Thread stand
- Spool of thread (to hold centre)
- Velcro (you won’t need this is you have a bigger spool of thread)
- Japanese Sake Glass Decanter (mine is thrifted of course)
- Scissors
- Paint stick
- Cardboard
- Aluminum round base (optional; again I found something thrifted but it’s not necessary)
Watch DIY Air Plant Holder Video
By the way, there’s nothing better than seeing these steps in action so watch this video:
Row 1 – DIY Air Plant Holder

1. To start, form a loop 4 cm wide – or whatever width will fit over the neck of your particular bottle. The picture below doesn’t show it, but be sure to leave a three foot tail (where you see the green tape).

2. and 3. Wrap the tail end around the centre loop as shown.

4. Once back to the beginning, weave the tail end through a wrap to keep it secure.

5. With the working end (attached to the spool) form a loop approximately 3 cm; that’s the same width as a paint stick.

6. Pinch the loop tight with your left hand, bring the cord around to the back and push through the centre. Bring the loop down and around the first loop formed to capture it.

7. Then tighten the knot. This is your first loop.

8. Continue around the centre forming loops and capturing them in the same manner until you have 11 loops.

9. In case you’re having trouble keeping your loops consistent, to use a paint stick to form them around.
10. When back to the beginning, form a double knot to bring the two ends together. This makes the 12th loop. Every time you finish a row, you will knot the two ends together. Notably, make sure that the tail ends up on the left side – without twisting. If it does, remove and re-knot again.

Second Row
Now, let’s knot the second row!

11. It’s best to secure your first row onto a thread holder like below. My thread isn’t quite wide enough. So I add a velcro strap and the cord just pops right over. Now you can easily rotate the work as you progress.
12. Cut a piece of cardboard 6mm or 2 3/8″ wide. Slip it under the first working loop.
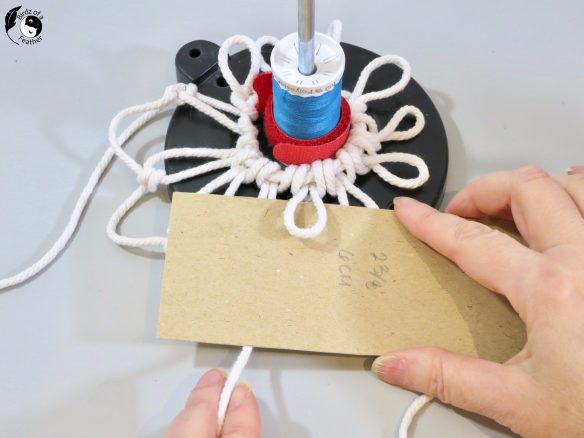
13. Bring the working yarn up around the cardboard.
14. Bring it through the working loop and pull down on the cord to allow the spool with the working cord to pass through. IMPORTANT: ensure that your working cord (the one attached to the spool) is positioned on the left side, or your loop will be twisted.

15. Pass the spool underneath, through the loop from left to right.

16. Pull the cord. Watch the video to see my tips for keeping these loops consistent.

17. Secure the knot.

18. Remove the cardboard.
19. It may take some practice, but try to be consistent with the loops! Mine weren’t perfect because the camera obscures my view :).

20. Continue until back to the beginning and double knot the ends once again using the tail end.
21. As you tighten the knot, don’t forget, the tail end should end up on the left side. If not, the loop will twist so try again.
This is how your work should look after two rows,

In the same way, continue for as many rows as needed to cover the length of the glass bottle and reach the bottom. Aren’t these hand tied knots wonderful?! That’s a rhetorical question of course – I love them!

Test Fit Netting
Check the fit as you go by slipping the hole over the neck of the bottle. Three rows is a touch too short.

Whereas four rows will be just right for this glass bottle!

Just to experiment, for the 4th row, I switch to a small size loop using a 5 mm putty knife as a guide. But you can stick with the cardboard.

How to Close Netting
And this is where the similarity to our last post ends. Instead of closing the opening at the top, like a glass fishing float, we’re going to slip the netting over the bottle neck and close the opening underneath the glass bottle.
Attach Netting to Bottle
Since macrame cord is much softer than jute, tape the loops to the bottom of the glass bottle as shown to hold them in position as you work. Use whatever you have on hand to keep the bottle from rolling around. For instance, a roll of painter’s tape would work well to cradle the bottom of the glass bottle as you work.

Removing the tape as you go, count over five holes counter clockwise and weave the tail end through the loop. Pull the cord to close the gap. Count over another five holes and do the same. Eventually you will form this star shape:

Continue capturing loops in this manner until there are none left. Cut the working yarn leaving a tail and knot the two ends together in the middle. Cut the tails. Or, if you wish, you can weave the tail ends using a bodkin as I showed in our last post.

Create a Stopper
Because I don’t want dust buildup in our bottle over time, you’ll need a way to cover the opening. I don’t think Sake decanters have bottle stoppers (at least this one didn’t) so I upcycled a crystal door knob! Just unscrew the spindle and you should be good to go.

However, if you find your particular door knob doesn’t want to stay upright, like below, try adding a thin piece of foam tape where it will sit in the bottle.

In the end, thin foam tape can make all the difference in upcycling a door knob as a stopper for this glass bottle diy.

DIY Air Plant Holder Stand
Since I have these aluminum rings kicking around, I’m using one as a base for the sake bottle.

Because it reminds me of the beach, I choose a soft blue colour to paint.

Arrange the netting so it falls in the middle of the ice reservoir. Then pop the air plant into place.

The doorknob is great in a pinch as the bottle stopper!

Hand knotting netting helps hold the air plant safe and secure until it needs to be watered.

Sake bottle upcycle
The white macrame cord lends a fresh look to netted glass, don’t you think? Here you see our glass bottle upcycle with our Japanese glass float decor – also turned into a planter, but for succulents!

Upcycled Sake bottle and glass light fixture globe planters
If you enjoy crafting unique planters, you need to see our wall planter DIY!
Want ALL our planter ideas? Check out these amazing upcycled planters!
Fall Into Fabulous
One of the things I love most about blogging is connecting with other makers, and this Fall we’ve created something truly inspiring together.
Grab 16 digital goodies from top creators — planners, recipes, colouring books & more — including our Beginner Crochet e-Book!
Every dollar of our commission goes straight to Alzheimer’s research — a cause close to our hearts. Your purchase through this link means you’re not just treating yourself; you’re making a real difference.
Grab it now — the bundle is only available for a limited time! Let’s make this Fall fabulous and full of hope. 💜

Pin DIY Air Plant Holder!
Pin it for later! Pinning is always welcome and appreciated :).

Here’s are the steps (excluding the closure) in one pin!

IBC Bottled Up Challenge
Want more DIY glass bottle crafts? Don’t forget to visit these awesome ‘Bottled Up‘ projects from our creative friends below. You’re in for some incredibly fun and creative upcycled bottle ideas!
- Glass Bottle Lights
- DIY Air Plant Holder (that’s us)
- Recycled Soda Bottle Easter Bunnies
- How to Add Texture to Mixed Media Art
- Wine Bottle Bird Feeder
- Upcycled DIY Tikki Torch

Such a fun idea to dolly up a bottle and your tutorial was so super easy to follow too. I love that you don’t have to try and cut enough pieces before the time. I always seem to get that wrong, plus you know how feel about anything to do with air plant holders.
I’m with you Michelle. That’s exactly why I HAD to learn how to do this with one piece of cording; I just can’t do the math to get it right and never have luck with cutting pieces 🙂
This sake (if that is correct term) bottle got a complete makeover! I am going to try to make the netting it looks gorgeous!
Happy Spring,
Kippi
That’s awesome Kippi – watch the video before you do; it should help!
Wonderful, now you have a matching set to have on display! Clever idea recycling a pretty furniture knob for a bottle stopper. I’m thrilled to see another fabulous macrame tutorial to follow for my demijohn jars.
This one would be the best tutorial for the demijohns Marie. Be sure to watch the video when you do them – you’ll find it helpful!
Such a great upgrade Sara.
Thanks Janet!
I love this – and has a coastal look to for summer. I have no patience for hand work like this, but it does look fun.
Thanks Rosemary! It is something I’ve always wanted to try so I do find it fun 🙂
What a fun project. Such a transformation and the video is so helpful.
Thank you Brooke! Alway happy to hear when the video is helpful 🙂
This is so beautiful! Thank you for the very detailed tutorial!
Thank you Kristin! I hope the detail will help those that want to try it; it really is easy with a little practice.
Another beautiful and unique idea. Watching the video I felt like lending you my hands, I would need 6 hands to do all that. The end results are stunning and so are you pictures.
Thanks for watching the video Anita! I can assure you that you only need 2 hands lol! It really isn’t difficult at all once you get into it 🙂
It turned out lovely! Perfect for nautical look:
Thanks Marie; glad you think so. It’s not easy to pull off a nautical look when we’re so far from a beach and buried in snow to boot lol!
Love this! Such a great idea. And I never would have known how to go about knotting it around a 3D object like that. Such a great tutorial!
Thanks so much Allison!