

Today we’re working on a bedside table DIY by making over two retro two-tier end tables! Because these retro tables are narrow, they’re perfect when you don’t have a lot of room either side of the bed.
Do it Over Designers
We’re taking part in the Do It Over Designers blog Hop hosted by Ann at The Apple Street Cottage. So don’t forget to check out the other projects at the bottom of this post. And be sure to drop back in throughout the week to visit them all!
MCM Bedside Table DIY
In case you haven’t noticed, I have a sweet spot for mid century modern pieces like these teak chairs! Here’s how we found them at the Aberfoyle Antique Market:

I couldn’t wait to sink my teeth into making these over! However, Hubs and I had a bit of a miscommunication about the execution. See those leather insets on top? They were in fantastic shape so I was going to keep them.

But our wires got crossed. When Hubs stripped the wood so we could re-stain it, he tore off those insets. That wouldn’t have been a big deal, but one got permanently misplaced, sigh!

And so they sat in our spare bedroom after refinishing them – ‘topless’ so to speak.

After some time passed, I had an epiphany to upcycle wallpaper to finish those bare spaces! I came across these free wallpaper books at a street festival and couldn’t snap them up fast enough!
I flipped to a page with a neutral white. Then I made a paper template of the tops and cut out two patterns to replace the insets from the wallpaper.

As these things go, it turns out my project didn’t end here! I found that the white wallpaper was looking pretty bland.

Enter Funky Junk’s Old Sign Stencils!
Houndstooth Stencil
I was inspired to paint a pattern right on the wallpaper when I came across this houndstooth pattern* from Funky Junk’s Old Sign Stencils collection. I think it’s just the touch that our bedside table DIY needs!

* [Funky Junk’s Old Sign Stencils has generously provided us with this complimentary stencil. Of course, all opinions are my own. When you click on the bold Old Sign Stencils/Amazon affiliate links in this post, we may receive a small commission for referring qualifying purchases. If you purchase a product through those links, you don’t pay a cent more! Thank you for helping to support our blog].
You may recall our last stencil project where I showed you how to prevent bleed through on a grain sack stripe. With the houndstooth stencil, I’m switching up the technique I showed you in the video for that project. Instead of using a foam dauber, I’m trying out a 5mm mini lint-free roller.

Test a Sample First
Because painting wallpaper is uncharted territory for me, I’m cutting a test sample from the book.

It’s exactly the same texture as the wallpaper I’m using for the bedside tables, but a different colour.

Because this is just a sample, I don’t have to line up the pattern. But I will show you how to do that later!

Watch the Bedside Table DIY Video
Watch this video – or proceed to the step-by-step tutorial after the trial run on the test sample.
I’m using PPG Break Through paint in a colour called Van Courtland Blue. You might recognize it from the pocket doors we installed in my craft studio and also my Mom’s bathroom vanity makeover. We don’t let anything go to waste our here!
Trial Run
Get the roller saturated with paint and offload onto paper towels so it’s fairly dry.

Then roll away. The big advantage of a roller vs. the pouncer I use in my previous project is speed! It’s a lot faster!

I only did a grouping of three columns to start.

You can really see the texture of the wallpaper in this picture. Because of the unevenness of the wallpaper’s texture, you may never get perfectly crisp lines. But you know what? I’m embracing that and I love how it looks! I don’t want it looking perfect. That wouldn’t be true to the vintage origins of this bedside table makeover!

Tutorial
With the success of the sample, I’m feeling confident to proceed with the actual insets!

Set Up for Bedside Table DIY
Before you can start stencilling, put some scrap paper on your work area. This does double duty to keep your table top clean, but more importantly, it will help you line up the stencil in the next step.
Roll some green tape on itself, sticky side out. Pop it underneath the inset. This will temporarily help keep it from shifing on the paper as you mark the centre point.

Centre Stencil
Centre the stencil by finding the middle at the top and bottom with a ruler or tape measure. Then make a mark – but only on the scrap paper that’s underneath!

Use a straight edge to line up the two marks. Take a pencil and extend the lines onto the paper. Now we have our centre mark. As you can see, I’ve also got two temporary pieces of green tape at the top and bottom. This is added insurance to keep it from shifing. 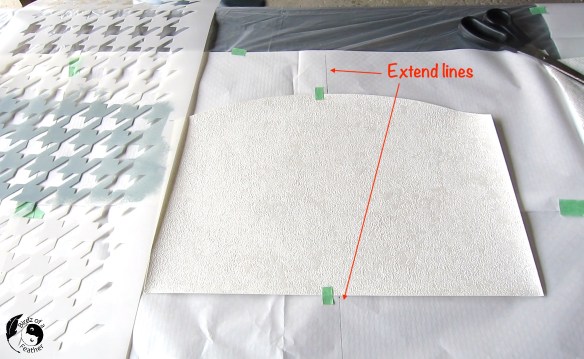
Registration Marks
Line up the registration marks on the houndstooth stencil with the lines. You’ll be able to easily see them right through the cutout.

Carefully remove the temporary piece of tape at the top of the wallpaper shown two pictures above. Use more green tape to secure all the way around the edges of the stencil. Then remove the temporary tape at the bottom and complete taping the edges of the stencil.

Again, pour some paint into the mini paint tray and get the roller saturated. Then offload it onto paper towels so there’s very little paint on the roller itself.

I find I can get more than half the stencil done without having to reload the paint on the roller.

When you’re done, lift the green tape around the edges. But only do half the stencil. You just want to check your work first! Below you can see one of the pointy tips is missing. Lay the stencil back down, stick down the tape again, then re-roll over the parts you want to finesse.
Once that’s done, do the same with the other half to check in the same manner.

When you’re satisfied, let the paint dry (with PPG Break Through, I leave it for about 20 minutes). Then you can remove the green tape and lift the stencil.
The Verdict on the Lint Free Roller – Lessons Learned
As dry as I thought I was getting the roller after offloading the paint onto paper towels, I still got some bleed through. Maybe a lighter touch is in order (I got a little heavy handed at the edges). Or, on a textured wall paper like this, it might be better to use a foam roller instead. I will definitely try that out in a future project because I think a foam roller will be far superior.
If speed is not an issue – and to prevent bleed through – a large stencil brush is still your best bet. Like the houndstooth stencil I did on our tiered plant stand DIY. I find it very easy to control the amount of paint when using a stencil brush.
I knew going in that this project wouldn’t be perfect. However, I wanted to test it out for myself and in the process show you what to expect with a lint free roller. In spite of a little bit of bleed through, I love how rustic the stencil looks so will still go ahead and use these insets!

Prep the Bedside Table DIY Insets
Here’s a tip that can save you some time. When you’re staining the table, be sure to stain a border around the inset too so there’s no contrast at the edges! We didn’t do that. As accurate as you think your template is, you might end up with small gaps. When that happens, and you lay the insets in, the lighter colour can show through at the edges. Not a problem! To camouflage that, I use these touch-up markers.

Try them out to see which one comes closest to your stain colour first. Then apply around the entire perimeter. I settled on raw umber.

Bedside Table DIY – Insets
MDF loves to suck up dust so ensure you have an abolutely clean surface before you stick down the wallpaper.
I applied double sided adhesive on the back of the wallpaper. Peel back a corner, then position in the corner. When you’re good to go, peel a little more of the adhesive and rub it down with your hand. Continue until the entire backing is removed and the wallpaper is stuck down.
MDF is a challenging surface to adhere. In retrospect, it’s probably a good idea to seal it first with primer. If you run into any problems at the edges, like I did, you may have to apply additional strips of double sided tape. 
Just lift it enough to get the tape on – one side at a time.

The additional tape does the trick! However, I may just add pieces of custom-cut glass to finish it off at some point; we’ll see. If I do this, I can swap out the inset under the glass whenever the mood strikes! No need to permanently adhere it.
Bedside Table DIY – Before and After
Here’s a reminder of the before:

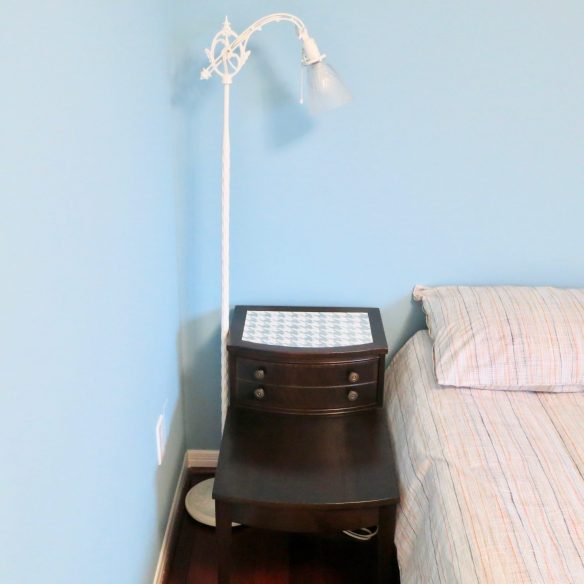
It’s great to finally have our bedside table DIY complete!

I really do love how these two-tier ends tables look as bedside tables. There’s just enough drawer space for reading glasses etc. and surface area for books and magazines.

They look great in our guest bedroom, alongside one of our bridge lamp makeovers. A bridge lamp is great for reading by – and it keeps our stencilled surface clutter free.
Seeing them in the space just makes me realize that now we really need to create a headboard behind the bed. But we’ll save that project for another day :).
Please Subscribe and Pin
If you enjoyed our bedside table DIY, please pin. Pinning is always welcome and appreciated :).

Do it Over Designers

Visit these other talented bloggers for more do-it-over makeovers!
WOW – what a great makeover. I have seen this style table at local thrift stores for low prices and now that I have seen what you have done, I am inspired to try one (after i complete the many other projects I have on hand!!). Well done!
And, here I was thinking you were just going to adhere the wallpaper! The stencil looks great, Sara. I prefer a stencil brush too. Wonderful project – thanks for sharing!
Thanks Ann! In retrospect I wish I had used the stencil brush but I did have fun experimenting and as long as I’m having fun that’s all that really matters :)!
Those turned out great! Love the houndstooth!
Tania
Thank you Tania! I used to be in the fashion industry and houndstooth has always been a favourite pattern 🙂
What a lovely transformation, Sara! I love that you stenciled the tops with a houndstooth pattern. It certainly takes the tables up a notch in creativity and design! They are quite unique!
Thanks so much Gail! I do love how they turned out. I’d love to try the same technique again on something else but try the stencil brush instead!
I think hubby knew that you would come up with an amazing plan for those insets <3 And you did!!! They're modern and sleek with a classic hint added by Donna's houndstooth stencil. It's one of the few times I'm grateful my kids live on your side of the planet, Sara. I can shop all her beautiful things and they can slip the stencils in their luggage for when they come visit 😉
Thanks for the heads up about stencilling on raised/patterned wallpaper BTW. That's really good to know. I'll be keeping my eye out for on of those sample books.
Ha ha, maybe the inset mysteriously disappeared on purpose :). I know Donna ships internationally so I’m surprised you can’t get her stencils (unless shipping is cheaper here?). Hope you find one; I have to think up more things to do with my sample books now :).
The shipping to South Africa is almost 5 times the price of the stencils. Donna and I almost fell off our chairs when we saw the costs, so it’s much easier for the kids to stuff one or seven in their suitcases and bring them home to Mommy. No COVID must just go away so they can come visit.
In 1992 my parents had very similar a coffee and two side tables refinished with the leather insert. They had hoped to have the leather replaced. Sadly, the refinisher told them that the thickness of the leather is no longer used and that to source more would be very cost prohibitive. Instead he encouraged them to use laminate. While durable (we had 7 kids in our family) as a teenager I knew that it ruined the tables. They looked ok but laminate is cheap and most certainly devalued the tables. My parents aren’t concerned with that though so I guess it was a good choice? I like that you can easily change out the paper and if you ever come across the missing piece you could replace it.
I’ll likely change it out again when I get bored of the paint colour in that room. Sadly, I think the piece was accidentally tossed. But I can have fun with this and just keep stacking with different pattern stencils whenever the whim strikes – lol!
You did a really grand job on these. I love this vintage style they are so practical.
Thanks Anita; we come across this style all the time. I’m pretty sure my grandmother even had a version of these :). I do love the functionality of them!
Your table looks amazing! Thank you so much for sharing and wonderful hopping with you.
Thank you Chas; wonderful hopping with you too!
Sara,
How awesome is this project! Great idea to use the stencil. I would have grabbed wallpaper books in a second too. So much you can do for projects.
Hope you’re feeling better.
Cindy
Sara, your bedside table is gleaming !! The stencil board is giving it a highend look. Love such amazing makeovers.
Dropping by from the Do it over designers blog hop.
Have a fabulous week.
Naush
Thank you Naush!
Great job and explanation! Pinned it for easy access:)
Thanks Melanie!
You had me at houndstooth! What a lovely transformation. This DIY project is just perfect. Thank you for sharing
This s an excellent job! I love the stencil insert! That was a great idea!
Thank you Maria!
The houndstoof is really pretty. The change gave it an elegant look!
Love the nightstand refresh! Such a unique way to upcycle them.
Thank you Libble! I’m happy that inspiration finally struck :).
What a lovely transformation to this unique bedside table!
Thank you Maya!
Great job! How creative is that! Don’t have such a piece to do this to, yet, but now I’ll hit the thrifts. I need a night table anyway.
Thanks Bill! Hope you find something. Happy thrifting!