

Sandblasting on glass is something anyone can do if you have access to a sandblaster. If you can spray paint, you can sandblast! Call up your local stained glass studio to see if they have lessons on sandblasting. I guarantee you’ll have a blast!
Of course, if you don’t have access to a sandblaster, there are plenty of way to achieve the look as you’ll see below and at the very end of this post. So, whether faux or real, just imagine all the things with glass you can upcycle by adding a unique etched design!
Sandblasting on Glass
When I made this custom clock for Hubs I used sandblasting to great effect: for the clock face, VW logo and road division. The sky’s the limit for what you can do!

Over the years, I’ve tried out different techniques, so today I’m showing you a variety of examples and will tell you a bit about each one. Then I’ll show you how to carve glass to build dimension (more about that later)!
IBC – Glass Etching
It’s time for another International Bloggers Club (IBC) challenge and this month our theme is Glass Etching.
The IBC is a group from all over the world who challenge each other every month to make something using a common theme. You’ll find our friends’ glass etching ideas at the bottom of the post. So don’t forget to check them out before you go. And if you don’t have time to browse today, pop back in later in the week to pick up where you left off.
Before we get into the tutorial, don’t forget to get your craft mojo on at Birdz of a Feather and subscribe to our newsletter:
You can also follow us on Pinterest, Facebook, YouTube and Instagram.
Types of Glass Etching
Sandblasting
Etched glass can be achieved by a chemical or mechanical process. Both sandblasting and chemical etching use abrasives which eat away at the surface of the glass to produce a frosted appearance.
Sandblasting requires a compressor and closed cabinet to house the glass and sandblast medium. Then air, along with sand, walnut shells or another abrasive is blown through a nozzle, while directing the flow at the areas of the cut mask you want to etch. Unless you have this kind of setup at home, you’ll need to rent a sandblaster at a local shop.

Glass Etching
Glass etching can be done at home instead using a product called Armor Etch. Like this amazing Harry Potter etched mirror by my friend Anita:

Or, my friend Janet demonstrates how to make etched glass gifts with Armour Etch and a Cricut.

As you see above, you can create some awesome projects. However, you must use extreme caution when using this corrosive chemical so I think personal protective equipment (PPE) is essential (gloves, mask and goggles) to keep it off your skin and out of your lungs and eyes.
So which type of glass etching is better? This article will give you an idea of the differences between the two and the pros and cons of each.
Faux Etching
A faux effect can be achieve with a spray paint that imitates glass etching. Be sure to read to the end for a link to an amazing example by my friend Michelle!
Supplies for Glass Etching
* [If you’re looking for some of the things we used, we’ve got you covered (disclosure): Clicking on the affiliate links below means we may receive a commission. But don’t worry, you don’t pay a cent more and we add all Birdz of a Feather earnings into our Alzheimers’ fund drive at the end of the year! Thanks for helping to support our cause!]
Sandblasting on Glass – Resist
When sandblasting, you’ll need a resist that can withstand the pounding of the sand against it. The best product for this is a rubbery, thick material. The resist shown below is already sandblasted, but it starts out white.

Type of Glass for Sandblasting
Here’s the glass I used for the fish pattern above. Once the sticky back resist is on the glass, you can transfer your pattern using carbon paper to trace. Then cut away the areas you want to blast.
This particular glass is a flash glass, meaning only a thin layer of the glass has colour. Once you blast that layer of colour off, you’re left with a stark contrast.

Here’s another sample of flash glass in a different colour and pattern.

The sample below is a glue chip glass with the design etched on the smooth side of the glass. It has a light surface etch, giving it a frosted look. With single stage designs like this, it’s not really necessary to use a thick resist because you’ll only sandblast for a brief time. You can trying using a Cricut to cut your design in vinyl.

This glass is a much thicker bevelled glass. With a thicker glass you can hold the sandblaster on the glass for much longer, resulting in a deep carved effect that throws shadows. Again, the thicker the resist, the better when carving deep patterns like this.

Mirrored Glass
Traditional mirror glass can be fun to play with! Here, hot glue was applied on the back. Then the mirror backing and silvering was blasted off. Lastly, spray some gold spray paint for colour and contrast.

This glass is called dichroic. It reflects multiple different colours and is constantly shifting depending on the angle you view it at. This horse design is slightly deeper than the glue chip sample above.

As you can see by all the samples above, you can create some really fun and interesting effects with sandblasting!
Sandblasting Mirror
Once you learn the basics, you can add the drama! For instance, sandblasting can create a strong contrast to shade the glass, like this portrait of Marilyn Monroe on mirror by artist Harish Dewani. You’ll find more of his incredible artwork on his Shri Glass Arts facebook page.

But my favourite technique is carved glass!
What is Carved Glass?
Similar to surface etching, carving glass involves creating a design, transferring it on to glass masked with a rubber resist, hand cutting sections of the resist and removing areas of it to be sandblasted. Where the technique differs is in the depth of the sandblasting, so this isn’t a one shot process. Carving at different depths and at various angles creates a 3D effect in your design with lots of detail, dimension and texture.
Essentially, you do the deepest carving first and work backwards to the lightest, shallowest depth. As a result, carving glass gives you a sculptural quality. This article describes the multi stage process of carving glass.
Carved Glass Basics
I’ve always wanted to learn how to carve glass, so when I had the opportunity to take a course with Fernando Reyes – a local tattoo artist and sandblaster – I was excited to learn more!
The Quickest Way to Transfer Design
Carving is done from the reverse side, so be sure to mirror your pattern.
While the transfer method Fernando uses is fast, you’ll need to use acetone which is pretty stinky so only do this in a well ventilated area. If that’s a no go for you, use a sheet of carbon paper and trace your design onto the resist.
First, print your mirror image design to scale on a laser printer. Place face down on the rubber resist. Cover a credit card with a shop towel, dip it into the acetone and rub it onto the back of the paper printout. The outline of your design will magically transfer.
Once you transfer your pattern onto the rubber resist, determine the order to remove the pieces as you blast. Hand cut the details as you go and blast in stages by removing parts of the rubber resist, blasting, then moving onto the next.

How to Cut a Circle
This horse design is enclosed in a circle. You can find compass cutters like this to cut perfectly smooth lines.

However, this particular gadget uses a dowel with a pin at one end and knife blade in the other so you can cut whatever diameter you desire. You’re only limited by the size of the dowel – and reach of your arms!

On the other end, instead of a pencil you can insert your craft knife. Unfortunately, I’ve only found this handy tool in Canada, even though it’s made in the U.S.! I think it’s probably discontinued.

Find the centre of your pattern position the pin on it. Then cut into the rubber resist around the perimeter.

Before sandblasting on glass, note that the things you want to appear to be in front of the drawing come off first. So peel away those areas to start. Work progressively backwards – deep carve first, then light shading as a last step.
 When everything is sandblasted and you flip it around, you end up wth a well defined foreground and background.

See how the rein appears in the foreground because it’s deeper, with the face and body of the horse regressing? This example belongs to our instructor Fernando! He’s been at it well over 30 years and his experience shows!
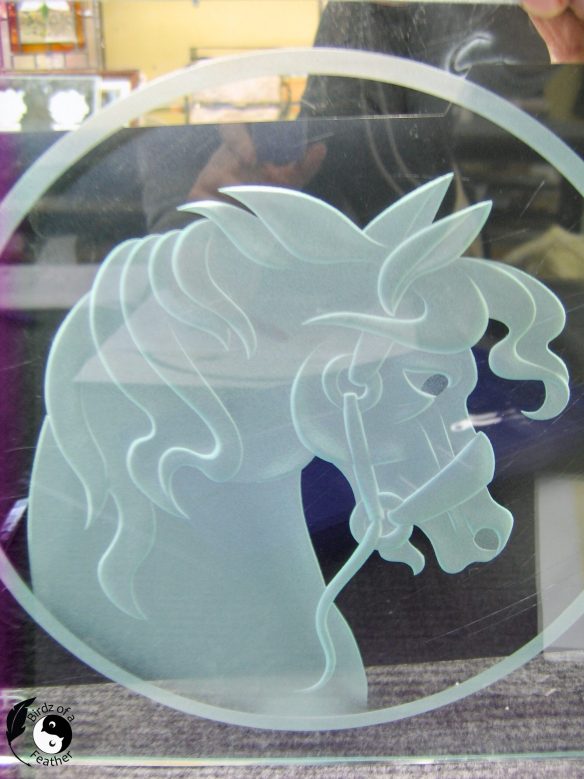
However, this is what a good teacher can teach! This is my sandblasting on glass horse! And I think it turned out pretty good for a first timer. What do you think?

Sandblasting on Glass by Sara Allen
We’ve got our glass horse displayed right below our floor lamp makeover.

More Glass Techniques
There’s one more way to get a deep carved look effect without blasting. And that’s to fuse it in a kiln using fibre paper. You can see a full tutorial on this cool technique in glass mini blocks-an unconventional christmas tree.
Fall Into Fabulous
One of the things I love most about blogging is connecting with other makers , and this Fall we’ve created something truly inspiring together.
Grab 16 digital goodies from top creators — planners, recipes, colouring books & more — including our Beginner Crochet e-Book!
Every dollar of our commission goes straight to Alzheimer’s research — a cause close to our hearts. Your purchase through this link means you’re not just treating yourself; you’re making a real difference.
Grab it now — the bundle is only available for a limited time! Let’s make this Fall fabulous and full of hope. 💜

Pin Sandblasting on Glass

Glass Etching Challenge – IBC
Don’t forget to visit these awesome ‘Glass Etching‘ projects from our creative friends below for more unique ideas!
- Tabletop Greenhouse Faux Etched Glass – A Crafty Mix
- DIY Sliding Door Safety Decals – Unique Creations by Anita
- Sandblasting on Glass (that’s us!)

Oh my goodness, Sara, didn’t your hubby say a while back that you’re not an artist? Wow your horse is beautiful. I don’t think I’d manage that on my first attempt. And I never realized how many possibilities there are for etching on glass. I’m so keen to experiment now.
Sand blasting really is a fun hobby! If there’s a stained glass studio in your neck of the woods with a sandblaster, you really should try it. If I had room for an actual sand blaster, I’d get one in a minute lol.
Oh wow Sara, you did an amazing job!!! One would never know that was your first attempt. Thanks for the education on sandblasting glass, I had no idea there were so many options.
Thanks so much Marie! I was so pleased with the result. Fernando was a great teacher 🙂
Your talent blows me away Sara!
Aw, so sweet, thanks Janet!
Thanks for the informative tutorial I had no idea about sandblasting but I would like to know more now. And well done on your horse. I could not see much difference between yours and the instructors.
Thanks so much Anita!
I just love all things glass and this is so right up my alley. Thank you for sharing your beautiful glass with us.
Glad you like it Brooke!
Great project for a protective glass on a table. I will have to give this project a try.
Happy Fall,
Kippi