
January calls for a dessert that feels indulgent but won’t leave you in a post-holiday sugar spiral; enter Lemon Pudding Cake! It’s tangy, velvety, and refuses to play by the rules of boring winter desserts. Gluten? Who needs it. Refined sugar? Hard pass. This cake is all about bright flavours and cozy vibes, because if winter won’t end soon, at least dessert can feel like a fresh start.
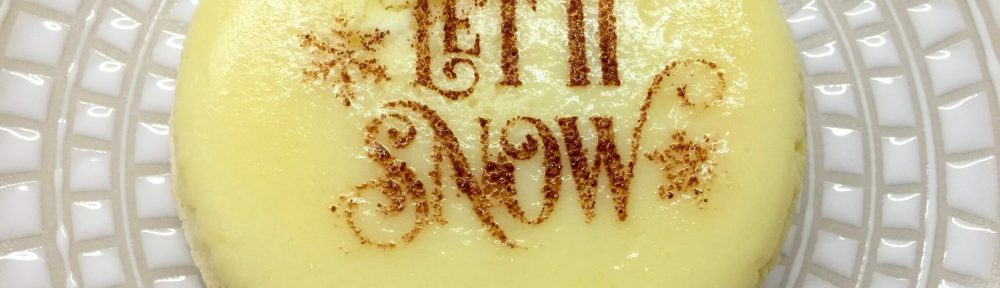
Speaking of winter not ending, this is a dessert to have fun with! Just before the holidays, I learned how to make stencils on my Cricut. So we’re embracing the drama of winter with our cheeky stencils: “Let It Snow” and its sassy sibling, “Make It Stop!”
Here they are stencilled on the lemon pudding cakes. As you can see by the first example, it’s important to butter the baking dish well so it comes out cleanly, like the following cake!

For those still in the festive spirit, “Let It Snow” adds a charming touch of whimsy to your dessert. But if you’re already over the slush and shoveling, “Make It Stop” channels your inner snow-day grump with a dusting of cocoa that says what we’re all really thinking by mid-January.

Whether you’re team snowflake or snow-fed-up, these stencils bring a laugh, and a little extra flavour, to the table!
What is Lemon Pudding Cake?
I first came across a similar recipe on a Canadian reality TV show called Recipe to Riches, where Glo McNeill took home the win (you can check out the chimichurri pizza recipe I auditioned for the show). Glo’s version of the lemon pudding cake (available here) features a generous layer of creamy lemon pudding at the bottom with a more liquid consistency. However, for our purposes, we need a more custard-like texture to support the stencil design.
Lemon pudding cake is a dessert that magically separates into two distinct layers as it bakes: with a fluffy, spongy cake on top and a lemony custard on the bottom. There’s no ‘pudding’ in the mix; this unique texture is achieved through a simple process where the mixture of eggs, sugar, lemon juice, kefir, zest and flour creates a perfect balance.
Although its light and tangy profile makes it a favourite for spring and summer gatherings, it’s perfect year-round— especially when it brings levity in the doldrums of winter with our custom stencil! To highlight that, once it’s baked, we’ll flip it so the lemon layer is on top, then use the stencil to dust it with a cocoa mix for a humorous and decorative touch.
Our version is gluten-free, refined sugar free and we’re using Kefir drink for extra tang because it’s always in our fridge. Of course, feel free to swap in regular flour and sugar and use buttermilk if that’s more your style!

Gather Lemon Pudding Cake Ingredients
We’re using meyer lemons for this recipe.

But it doesn’t matter what lemons you use. What really matters is that you use the zest.

Don’t skip this important step; the zest is where all the favour lies. We’re using a microplane zester.

Even though we’re adding the lemon juice, your lemon pudding cake will fall flat without the zest!

Juice the Lemon
The best way to get every drop of lemon juice is with this Dreamfarm Lemon Fluicer. It was featured in Time magazine and folds flat for storage.
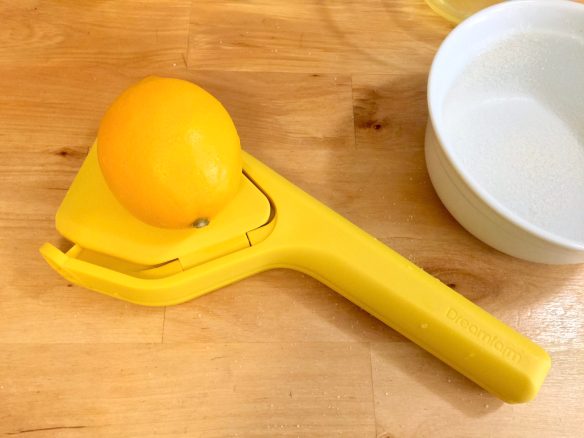
After zesting, pop the lemon half in and fold it; simple as that!

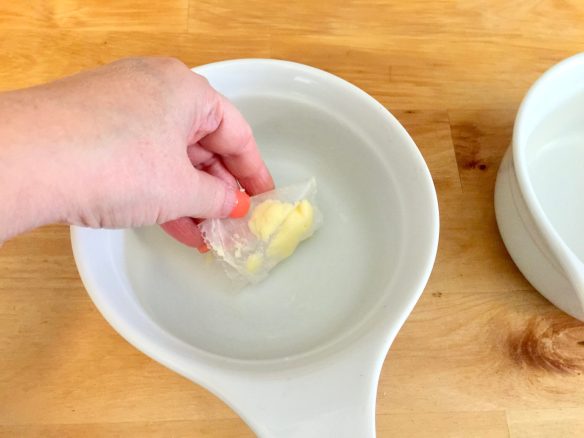
Prepare the Baking Dishes
Because we’re stencilling these, we’re opting for 2 larger soup bowls to bake our lemon pudding cake. But you can easily make four of these by using 8-ounce ramekins instead.

Butter the bottom and side of the dishes well so they release cleanly (we only had a 50% success rate).
Add some sugar into one of the baking dishes.

Rotate it around until you have an even coating of sugar sticking to the butter. Pour the excess into the second bowl, adding more sugar if necessary and repeat.

All done!

Now, place the dishes into a roasting pan; we’ll be baking these in a water bath.

Separate the eggs and set aside the whites. Mix the remaining wet ingredients in one bowl and the dry in another. Mix the dry into the wet ingredients and set aside.

Beat Egg Whites
Beat the egg whites on high with a hand mixer.

The egg whites provide the light airy texture to the lemon pudding cake.

Beat until you have stiff peaks. I find it takes about 3 minutes, but don’t over whip.

Carefully combine the two mixtures by folding in the whites in two batches so you don’t deflate the air.

Bake and Unmold
Divide evenly into the ramekins and bake in a water bath. The water should fill about halfway up the side of the ramekins.

Let the lemon pudding cakescool until they are just warm and you can invert them onto individual plates.

This is how they should look when you flip them upside down onto a plate (my first one did get a little stuck so the surface wasn’t perfect).

Stencil Time
Time to break out those stencils! For anyone interested in learning more about how to make a Cricut stencil, we’ll have a post on that soon.

Lemon Pudding Cake is often served warm, sometimes with a dusting of powdered sugar, a dollop of whipped cream, or a few fresh berries on top for added elegance. But, as you know, we’re putting our own spin on it!

To get a crisp, clean design, make sure the stencil is positioned directly onto the top of the lemon pudding. No need to press it down, the moisture will ‘vacuum’ it on.

Then, carefully lift straight up to reveal your artwork and adorn with some fresh berries!

With your stencil masterpiece revealed and the cake ready to serve, you’ve just elevated a simple lemon pudding cake into a show-stopping dessert that’s as fun to make as it is to eat. Whether you’re embracing the charm of “Let It Snow” or laughing at the relatable “Make It Stop,” this sweet treat is sure to be the highlight of your table. So grab a fork, dig in, and let the compliments roll in. A dessert this good deserves a little fanfare!
Want more fun and whimsical winter dessert ideas? Try our Christmas Bark Recipe or ice cream sandwich recipe.
Or if you’re raring to craft, check out our how to stencil posts.
As a total aside, I tried the stencil out on Eggnog during the holidays too!

But it didn’t work very well. You really have to fill the mug to the brim to close the gap between the stencil and the surface of the eggnog. And that’s just not practical. So my advice, when it comes to stencilling food, is to stick to lemon pudding cake and cookies!

Turns out the cocoa powder mixture makes a great coconut milk cocoa you can drink (recipe coming soon)!
Get your cook on at Birdz of a Feather and subscribe! You can also follow us on Pinterest, Facebook, YouTube and Instagram.
Fall Into Fabulous
One of the things I love most about blogging is connecting with other makers, and this Fall we’ve created something truly inspiring together.
Grab 16 digital goodies from top creators — planners, recipes, colouring books & more — including our Beginner Crochet e-Book!
Every dollar of our commission goes straight to Alzheimer’s research — a cause close to our hearts. Your purchase through this link means you’re not just treating yourself; you’re making a real difference.
Grab it now — the bundle is only available for a limited time! Let’s make this Fall fabulous and full of hope. 💜

Pin Lemon Pudding Cake
Pinning is always welcome and appreciated.

Lemon Pudding Cake
Ingredients
- 1 tablespoon unsalted butter
- 2/3 cup Swerve powdered sugar plus more for dusting
- 2 eggs separated
- 2/3 cup drinkable Kefir
- 2 tablespoons lemon juice
- 1 tablespoon lemon zest
- 1/4 cup all-purpose gluten free or regular flour
- 1/4 teaspoon salt
Cocoa Mix for Stenciling (Optional)
- 1 tbsp cocoa
- 1/2 tsp cinnamon
- 3 tsp coconut powder
- 2 1/4 tsp Powdered Swerve or powdered sugar
Instructions
- Preheat oven to 325 degrees F. Butter and lightly sugar 4 ramekins (about 1-cup size).
- In a medium bowl, add egg yolks, kefir, lemon juice and lemon zest and beat with a fork until well combined. Reduce the speed to low and sift in flour, sugar and salt. Continue to mix until combined. Beat egg whites until you get stiff peaks then combine the 2 mixtures by gently folding them together, a little at a time. Divide evenly amongst ramekins then bake in a water bath - set ramekins in a roasting tray and fill with water halfway up the sides of the ramekins.
- Bake for 45 minutes. Allow to cool slightly, then run a knife around the edge and carefully invert onto a plate.
- Mix all the ingredients for the Cocoa powder. Lay stencil onto the surface of the inverted lemon pudding cake. Put cocoa powder into a mini sieve and dust on above the stencil, ensuring full coverage. Carefully lift the stencil away.
- Serve with fresh berries and dust with cocoa mix or powdered sugar.
That looks and sounds so yummy, Sara. I’m no baker, but I’m going to give this one a try. We’re having a heat wave at the moment, so it will go down a treat. Plus, I have a Cricut Joy to make some fund stencils too. Love the idea.
I don’t imagine you get much, if any, snow there in the winter time! Would love to see what you come up with for your stencil!!
I clicked to read (visiting from the Talking About it Tuesday linkup) because your stencil looked so cute–and impressive, let’s be honest–but now after reading, I have to make this lemon pudding cake!! I *love* lemon, and the fact that this doesn’t have sugar and does have kefir in it really makes me want to taste it. 🙂 Printed and Pinned! I will say, too, that the “make it stop” is my favorite! 🙂 (I’d love to see this post at my own linkup as well, if you’re interested: https://lifetalesbooks.blogspot.com/p/calling-fellow-bloggers.html)
Thanks so much for visiting Jennifer! I’ve blinked up to your post, so thanks for letting me know! Hope you like the recipe!
Amazing, love the stencil work.
Saw your post at Will Blog for Comments.
My entries this week are numbered #20+21
Thanks so much Esme!
I always think of lemons in January since January is my mom’s birthday month and she loves most desserts made with lemons. This cake sounds yummy!
What a coincidence; anything with lemon is my fave and my birthday is also in January!
I’m so glad you shared this post with us at the Will Blog for Comments #53 linkup–we hope to see you next week at #54, too! 🙂 I have the printed recipe on my desk–can’t wait to try it.
Awesome; hope you like it!
Stopping in again with congratulations! 🙂 This post was one of the most popular at the Will Blog for Comments #53 linkup, so it will be in the spotlight for the next 2 weeks (starting today) and has been Pinned to Pinterest, too. (And I followed you on Pinterest, too.) There’s a “This Blog Post Was a Featured Favorite” image there at the blog that you can save to share here with your readers to celebrate, if you like. Thanks so much for sharing this wonderful post with the readers at WBFC. We’d love to see you again next week, too!
That’s awesome, Jennifer! Thanks for stopping by to let me know. I will grab that image as soon as I can and definitely be back next week to post again :).