

I love using thrifted yarn and scraps so this crochet pendant light is the perfect way to do that – and to create a boho style statement in your home. I combined a very thin synthetic yarn with an off white cotton. The stitch is a simple basic single crochet throughout and it’s wrapped around a core of sisal. This project is an easy crochet idea that even a beginner can handle!
Creative Craft Hop
It’s time for another Creative Craft blog hop! So if you are visiting from Cecilia at My Thrift Store Addiction welcome! At the very bottom of this post, I’ll be directing you to the next stop on this venture. But don’t forget to check out the other stops too because you’ll find plenty more craft ideas. Be sure to drop back in throughout the week to visit them all!

Before we get into the tutorial, don’t forget to get your craft mojo on at Birdz of a Feather and subscribe to our newsletter:
You can also follow us on Pinterest, Facebook, YouTube and Instagram.
Crochet Pendant Light Materials
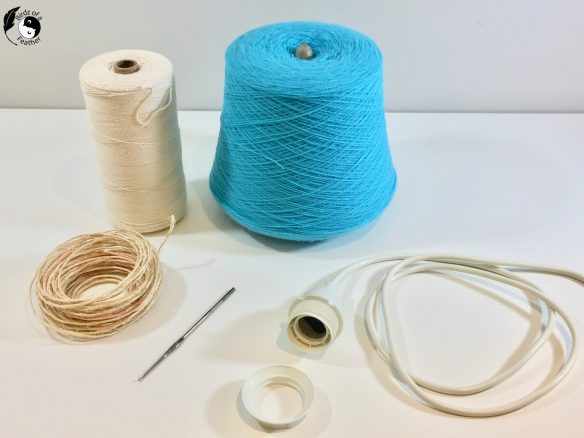
- Cord set. I used a Hemma Cord Set (Ikea) but if you want one that plugs in with an on/off switch, Strala would work too (or this one from Amazon)
- LED light bulb (do not use incandescent!)
- Cotton yarn 4/8
- Thin synthetic yarn 2/24 (thrifted). This type is likely used with a knitting machine, but any thin yarn will work!
- Thread stand (if necessary)
- Sisal
- Sewing ham (if you wish to steam)
- Crochet hook (size 3)
- Stitch marker
You’ll notice the colours in the tutorial pictures that follow change between pink and blue. That’s because I made several of these crochet pendant lights using yellow, hot pink, and blue yarns.
Combine Two Yarns
Combining two yarns will give your lampshade an eclectic boho look with a variegated pattern.
Bring the two separate yarns together by pulling them through your thumb and forefinger.

Although I find a thread stand to be helpful for this step, you could get away without using one. But it will prevent the spool from falling over as it’s unwound.
Combine several feet to start, them keep running them together as needed.

You can also add an arm to the thread stand to hold the combined strands together to prevent tangling.

Make a slipknot in the combined yarn.

Slip onto crochet hook.

If you are right handed, keep the roll of sisal off to the left side and the combined yarn on the right. Furthermore, be sure to keep them a good distance apart so the yarn tail can’t snag on the sisal as you crochet.

How to Single Crochet
Since single crochet (abbreviated as SC) is the only stitch you need for this pattern, here’s a demonstration in case you’d like to practice before we start the actual crochet pendant light. You can also follow along this video to learn this easy basic crochet stitch.
Normally you will make a chain to the desired length. However, with the pendant light, we’ll be working with the sisal instead as you will see below.
Step 1: Insert the hook under the top loop of a chain. See the direction of the arrow below.

Step 2: Wrap the yarn, bringing it over the hook from the back to the front, and draw through the loop.

Step 3: There are 2 loops on the hook. Now bring the yarn over the hook again from back to front, and draw through both loops on the hook:

1 loop now remains on the hook and you have made one single crochet stitch.

To make the next stitch, continue to work in this same manner.

Now onto the pattern for the crochet pendant light!
Single Crochet Around Sisal
To start this crochet lampshade, loop the sisal as shown at attach your combined yarn with a single crochet stitch.

Sc around sisal loop until there are 55 sts in total. However, keep in mind that if your cord kit is a different size, the number of stitches you actually need may vary.

Before pulling on the sisal end to reduce the circumference, insert the head of the hemma cord in the centre. Then tighten the sisal around it to fit – not too loose or too tight.
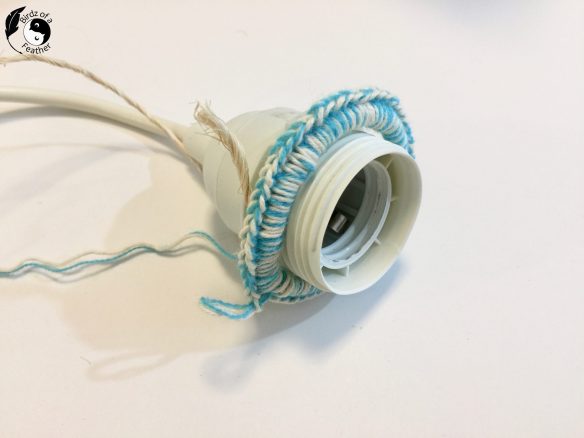
When the project is complete, the nut you see below will screw on to hold the crochet pendant light in place.

Second and Subsequent Rows
Slip stitch into the first st, sc, then add a stitch marker (do this for every row of the project.

Crochet second row in single crochet. Remove the marker, slip st. into that st, then sc. Replace marker and continue with sc for the third row.

As you add rows, they will start to curl inward.
 Continue with sc for 8 rows.

Here you see how it curls inward.

After the 8th row or so, flip the work in the opposite direction of the curl (instead of convex like above). Notably, this is to form the pendant with the right side facing outward (look at the third picture of the turquoise one below to see what I mean).
In addition to the turquoise, I had fun making this pending in hot pink and yellow too!

Increase Rows
To increase stitches, simply sc in the same stitch twice. You will increase on rows 9-11, as follows. After every increase row, count the stitches to ensure they match the number in the bracket:
Row 9. sc, place marker. Increase every 4th and 5th stitch (sc in the same stitch twice). [66 sts]
Here’s a closeup of the increase (2 sc) done in plain yarn so you can see it better.
Row 10. sc, place marker. Increase every 7th st (end with 2 sts). [75 sts]
Row 11. sc, place marker. Increase every 8 sts. (end with 2 sts. [84 sts]
As shown below, it will start to flare out again.

For example, here’s how it should look from the side.

Row 12 – 42: sc.
As you start to single crochet subsequent rows after the 3 rows of increases, the work will start to curl upward again.

Once the curl becomes too steep again, flip those rows outward as you did at the start. Here’s how it should look after completing row 16 and flipping outward.

Crochet Pendant Light Tension
Note that you can get a lot of variation in the shape and size depending on how tight or loose you crochet – and also how much slack you give the sisal. Notice how tight the work is above compared to the one below. Each pendant can be different and have it’s own unique shape and charm.
Some are bulbous, and some take on a bell shape. As you become more familiar with how to tension this pendant, you can control the shape you want to achieve! As you crochet, try flipping the rows out or pull on the sisal and distribute the stitches evenly around the row. Both ways will work to tighten/relax and shape the curvature. Experiment with it and, most importantly, have fun!

Crochet Lamp Shade Edging
On the last row add a loopy feature to the edge. To complete the edging, sc around the sisal only. Then count over 7 sts on the pendant, and do 2 sc in that st to anchor the loop. You can experiment with the number of sc stitches you use to cover the sisal to your own taste. More sc stitches will give you a deeper scallop effect.

After fastening, sc sts around the sisal once again, but this time position the loop in the opposite direction so you get this up and down configuration around the edge. Anchor once again in the 7th st with 2 sc.

Do these two steps a total of 6 times (12 sections). When back to the start, sc 10 times around the cord. Position the cord on the inside as shown. Cut the sisal as well as the yarn end leaving a tail. Secure the sisal using a darning needle. Knot the yarn, then hide the end and cut. Trim back the sisal.

Here’s how it will look on the inside.

Blocking the Pendant
Since sisal tends to be stiff, blocking can help soften the look. When complete, if you wish, you can use a steam iron to shape.

Inserting a sewing ham will support the pendant as you steam and form the curves.

I didn’t find it necessary, but if you find that the loop edging doesn’t want to sit nicely, you can add a stitch where it meets a row of crochet to hold it in place.

Attach Cord Set
Depending on which cord set you choose, you’ll either plug this in or hard wire it.
After letting the piece dry, insert the Hemma cord set according to directions and add an LED light bulb. For safety reasons, do not use a incandescent light bulb.

Hang and enjoy your whimsical crocheted light fixture!

Here’s a closer look at your new boho crochet decor! Visit our lighting upcycles category for more lighting ideas.

Crochet Pendant Light FAQs
What is Boho Style Decor?
Boho home decor is an eclectic mix of natural elements that combines different colours, textures, layers and patterns. Crochet is a great way to introduce elements of this style into your home. Our house would in no way be considered ‘Boho’. However, you will find ways to include this decorating style with plants (see our ideas for planters), macrame (or try this ‘mock-rame’ crochet wall hanging pattern), pillows (like this crochet pillow cover) etc.
Fall Into Fabulous
One of the things I love most about blogging is connecting with other makers , and this Fall we’ve created something truly inspiring together.
Grab 16 digital goodies from top creators — planners, recipes, colouring books & more — including our Beginner Crochet e-Book!
Every dollar of our commission goes straight to Alzheimer’s research — a cause close to our hearts. Your purchase through this link means you’re not just treating yourself; you’re making a real difference.
Grab it now — the bundle is only available for a limited time! Let’s make this Fall fabulous and full of hope. 💜

Pin Crochet Pendant Light

Creative Craft Hop
Now it’s time to check out this Upcycled Magazine Holder from Niki at Life as a LEO Wife. When you’re done, please remember to visit these other amazing talents below:
- Dollar Tree Mirror with Jenga Blocks
- Patriotic Party Table Free Printables
- Tin Wall Pocket
- Bumblebee Wall Decor DIY
- Shells on the Beach Canvas
- How to Make a Fabric Bowl with Mod Podge
- How to Make a Paper Cone Flower Basket
- Faded to Fabulous Garden Sign Refresh
- Crochet Pendant Light
- Upcycled Magazine Holder
Sara, this is such a creative pendant look and I love the boho vibe! Thanks for hosting! Blessings, Cecilia @My Thrift Store Addiction
Thank you Cecila;; such a pleasure to be back 🙂
How adorable. I love how these turned out and look on your globe. A perfect touch, Sara!
Thanks so much Terri; it was fun experiementing to make these.
Wow! I haven’t crocheted in a long time… but realize the skill it takes to make these. Such a great job and they look so pretty!!!!
Thank you Tammy; it easy to do because it’s only single crochet. Once you master that basic stitch, you’re golden. You’d probably have no problem picking it up again 🙂
Your crochet pendant lights look quite lovely, Sara, and a perfect addition to the Boho design! My mil tried to teach me how to crochet many years ago and I was unable to learn then and despite your very clear and easy instructions, I don’t think I can pick it up now, either. I have too many senior moments, lol! Thanks anyway and welcome back!
Thank you Gail; it’s so nice to be back and catching up again with you and the other ladies!
I have too many senior moments too so I really do sympathize lol!
Well, I’ve never heard of this type of project so I’m really impressed. You are very talented when it comes to working with yarn. Love the colors you chose. Thanks so much for hosting. Glad you’re back.
Thank you Carol – so glad to be back with you wonderful ladies again 🙂
Wow Sara, you’ve got mad skills! How brilliant to use the 2 colors of string to create a varied look, and the way you created this piece is just amazing, I would never have the patience or foresight to imagine this! It looks so pretty! I’m so glad you are able to be back hosting today, thank you!
Jenna
I’m so happy to be back too Jenna; I really missed you all during this hiatus!
Wow Sara, this is simply amazing! Using the 2 different color strings is a brilliant idea, love the color variation~ I would never have the patience to try something like this, or the foresight to think it up! It looks so pretty, I love the scalloped edge! I’m so glad you are able to be back and host today, thank you!
Jenna
Great project Sara, very unique. 😍
Thanks so much Anita!
My little boho heart did a crazy dance when I saw this beauty on IG. I seriously have to up my crochet skills from basic flowers to actually following a pattern. I’m in love with this idea.
You can do it Michelle; you’ve already got the basics down 🙂
You’ve got some mad crochet skills, Sara! How clever and unique is this pendant light, especially the scalloped detail. A conversation piece with a very cool boho vibe.
Thanks Marie! I guess I’m a yarn whisperer; I’m just inspired by what I happen to find!
Wow, your pendant light looks great! I didn’t know something like this could even be handmade. You’re so creative and talented!
Thanks so much Allyson! I always say ‘you never know until you try’ :).
Beautiful Sara. I love the colors and the look. I really need to learn how to crochet.
Thanks Kim! I’ve been meaning to put together a beginner crochet how-to but it keeps falling onto the back burner 🙂