

You may know how we love to upcycle beverage cans to create unique home decor but this aluminum can art may just be our favourite project with the way it shimmers in a breeze! With Christmas coming up, it’s a budget friendly DIY gift!
This round is 7 1/4″ and would be a great budget-friendly Christmas gift that’s as environmentally friendly as it is beautiful!
I’m painting the wood round with watered down paint to create a stain effect, but a solid colour would be great too.

Fall Into Fabulous
Before we get into the tutorial, one of the things I love most about blogging is connecting with other makers, and this Fall we’ve created something truly inspiring together.
Grab 16 digital goodies from top creators — planners, recipes, coloring books & more — including our Beginner Crochet e-Book!
Every dollar of our commission goes straight to Alzheimer’s research — a cause close to our hearts. Your purchase through this link means you’re not just treating yourself; you’re making a real difference.
Grab it now — the bundle is only available for a limited time! Let’s make this Fall fabulous and full of hope. 💜

Creative Craft Hop
Welcome to another Creative Craft blog hop!
If you’ve come from Ann at the Apple Street Cottage, we’re so glad to have you here! Wasn’t Ann’s illuminated wreath beautiful? At the end of this post, we’ll guide you to the next stop on this journey. Make sure to explore all the other stops for a wealth of creative inspiration. Don’t forget to revisit us throughout the week to visit them all!

Before we get into the tutorial, don’t forget to get your craft mojo on at Birdz of a Feather and subscribe to our newsletter:
Wash the Cans
On recycle day we can easily grab 40 cans on just our street alone. Since it’s a beautiful sunny day, we fill up a container with water. Add a little soap and give the cans a good soak.

Pour out the water and dry the cans to remove any water marks. Then let the water in the bottom evaporate so you can break down the cans.

Aluminum Can Art Supplies
[If you’re looking for some of the things we used, we’ve got you covered (disclosure): As an Amazon Associate, we earn from qualifying purchases. Clicking on the links in this post means we may receive a commission. But don’t worry, you don’t pay a cent more. Thanks for helping to support our blog!]
- X-Acto knife
- Titanium Scissors
- Aluminum cans
- Black craft paint
- Mini angle paint brush or foam brush
- Birch wood round (we cut our own from 3/4″ plywood, but you can also find various sizes and thicknesses online)
- Microplane cut resistant glove
- Rubber coated glove
- 3/4″ rabbit punch or available in 3/4″ EK tools circle punch (which also comes in a 1/2″ EK Tools Circle punch size too)
- 1.5mm Beadsmith metal hole punch plier
- Uvex Safety Googles
- Microfibre cloth (for cleaning spots on cans)
- Nail Guide or needle nose plier
- 1/4″ Spacer (diy from wood or plastic)
- Hammer
- 18 gauge 5/8″ nails
- Awl or metal push pin (for pilot holes in soft wood)
- Veritas plunge base for rotary tools with optional light – only for pilot holes in hard wood (available at Lee Valley in US) watch this video
Safety First with Aluminum Can Art
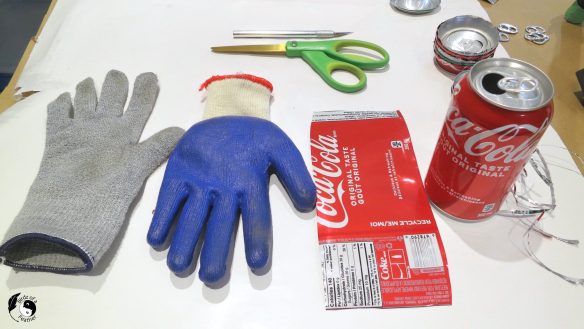
After my health scare earlier this year, of course I chose one of the most dangerous crafts to ease back into things! Even if you’re not on blood thinners, like me, you should still take precautions against cutting yourself. After all, thin metal can be sharp! I wear gloves and goggles whenever I’m breaking down the cans.
More specifically, I wear a Microplane cut resistant glove on my right hand to have more dexterity. Then, on my left hand, I don a rubber coated glove. When we get to flattening the cans, you’ll understand the advantage of the rubber glove!
Before cutting, I remove and save the tabs for a future project.
Breaking Down the Aluminum Cans
The best way to explain how I break down the cans is to watch this one minute video short specifically showing how. Or watch the full video below for all our tips and tricks.
Score down the side first with an X-Acto knife (where the nutritional info is).

Then rock the blade at the top of the score until it pierces the tin. Once you have a starter hole, continue piercing around the top of the can. Keep to just below where it creases at the top.

With the top off, pinch and crease along the score at the side until you break along the score to the bottom.

With a little bit of coaxing it should easily tear. Once near the bottom, grasp both sides to pull and it will pop open right to the bottom.

Then, finish off with scissors (I use Titanium Scissors) to cut the bottom portion away.

Because the top of the can can be jagged, it’s best to also cut along the top with scissors so there’s nothing to catch when you flatten the cans. Another option would to take a hard object and rub it flat instead.

Flattening Cans for Aluminum Can Art
Here’s where the rubber glove comes in handy! With the can face down, run it along the edge of a table. Use the glove to put pressure as you near the edge. Rotate the can around and do the same on the other end. You may have to do this a few times until the can is flat.
You can see below that I didn’t cut the top edge of the can; that can cause it to catch. The only reason I don’t cut it off sometimes is because that little bit can make a difference of getting another row of punches from the can (I’m using a 3/4″ punch). So that may be where the ‘rubbing it flat’ option comes in handy.

Other Options for Flattening Cans
I find it a lot faster to flatten with gloved hands right away as I’m breaking down the cans.
There are various other ways to flatten the can. I’ve seen Cindy from Upcycled Design Lab iron the cans flat or even put them in the oven under a heavy object like a dutch oven (here are three methods she demonstrates). But again, this is a more time consuming option. And, as Cindy notes, the oven method can dull the print graphics which defeats the purpose of this craft. I tried the iron method and it just scratched the graphics and melted the protective coating, so I’m sticking to flattening by hand.
Punching Aluminum Can Art
I use a rabbit punch to punch 3/4″ circles similar to this one. This is a piece of equipment from my days as a fashion designer. Its prime purpose is to punch a hole in paper patterns to hang them. Once you remove the adjustable T-guide, it works amazingly for aluminum can art because then it has a long reach! With other punches, you’ll have to cut the aluminum cans to punch deeper into the cans, which is a pain.
Truth be told, this project is a lot of work. So this 3/4″ EK tools circle punch is a very inexpensive alternative if you just want to try this out to see if you even like doing aluminum can mosaics! I did try a 3/4″ EK punch I linked above, but found that the cut isn’t nearly as clean as my rabbit (a good example getting what you pay for).

With my rabbit punch, I stagger the circles between rows so I can get the most out of each piece of aluminum can. With this particular Bubly can, I can get 36 ‘usable’ disks (i.e. with the yellow background colour). That’s the other thing to love about a rabbit punch; you can get the most out of every piece of aluminum.

Punching Second Hole for Aluminum Can Art
Each round punch has to be punched a second time for the nail hole.

The best way to do that is to make a circle template and punch a hole about 1/8″ from the top (use a piece of plastic or use one of the metal punches; plastic tends to be more durable with continued use). Then you position the template over a stack of 3 aluminum disks and punch through with this 1.5mm Beadsmith metal hole punch plier.

Nail Holes
I designed a radial template on Illustrator to the size of my wood round and taped it down. Then I take a sharp tool like an awl or a push pin and hammer each nail hole so I know where to position my aluminum can art disks. In all honesty, I prefer the push pin over the awl; I find it sharper and, since the head is flat, easier to use.
Another caveat: if you use a push pin, get a metal one. In my experience, the constant tapping with a hammer will break a plastic one.

Once all the holes are done, lift the paper.

Then I use the template again to position my colours. Before nailing them down, I’d rather play with the punches on paper first so I can see how the finished product will look.

Hammer the Nails
The nails I’m using are 18 gauge x 5/8″. I found a handy little nail holder to hold each nail so I don’t accidentally hammer my fingers as I’m hammering.

Once I start the nail, I also use a scrap piece of plastic, 1/4″ thick, that Hubs made me with a slot in it. It allows me to set the height of each nail so they evenly stick out of the wood 1/4″. That spacing between the board and end of the nail is what allows the punches to shimmer in the breeze!
Add Picture Hanger
The last step is to add a picture hanger on the back.

I use a short screw to fasten it (be mindful of the length and position so it doesn’t hit any of the nails on the other side).

Fall Into Fabulous
Before the reveal, here’s another reminder to 👉 Grab your Fall bundle here!
Reveal
And here is in all its boldness on the wall! But you REALLY need to watch the video so you can see how pretty it is when it shimmers with a breeze!!!

Re-Use Aluminum Can Art Template
Reusing the template without having to waste printer ink is simply a matter of taping a sheet of colour paper behind the original one! Now, you’ll know where to pierce each hole because you can see it again!

Here’s another colour option using La Croix cans. And you can see a peek of another project in the background.

Once you’ve done one aluminum can mosaic, you’ll find that the second one will go so much faster!

Stay tuned because we’re working on a DIY tool to make cutting cans faster and easier. UPDATE: see how to cut tin cans. In the meantime, check out this can craft mosaic art piece (wait ’til you see what I upcycled for the background!) and tin can crafts using tuna cans.
Pin Aluminum Can Art
Pinning is always welcome and appreciated; grab one of these to save for later! And don’t forget there are links for the Creative Craft hop at the very bottom – so keep scrolling!

Creative Craft Hop
Now it’s time to check out this DIY Christmas Memory Ornament from Tammy at Patina and Paint. When you’re done, please remember to visit these other amazing talents below:
Wow, Sara, that is beautiful! I just love the iridescent colors and can’t wait to see your next project.
Thank you Ann; it’s so addicting. I just want to try out every colour can we can find lol!
This is so cool, Sara! What a fabulous project! I love making soda can crafts but mothing like yours which is quite elaborate and sophisticated! I checked out some of your other creations and WOW! You take this type of recycling crafting to a whole new level! You go!
Thank you Gail! I’m just crazy for can crafts! And thanks for checking out our other projects 🙂
What a creative idea. This could be such a cute idea to make for our son, he has a man cave that this would be so cool to hang. Thanks for sharing. Looks like I will be saving my cans for awhile!
We have a recycle program in your neighbourhood so we get what we can on garbage day. I’ve also asked for donations on some of my facebook groups and that can be a great way to collect – especially when businesses volunteer to collect for you!
BTW, if you really want to see something cool for your son’s man cave, you should visit us again on Monday 🙂
Sara, when it comes to beautiful and unique art, you always deliver! I haven’t seen this technique before and the results are lovely! Thanks again for hosting us and I wish you a joyous holiday season! Cecilia @ My Thrift Store Addiction
Aw, that’s super sweet of you to say Cecilia! Happy holidays to you too!!
Wow is right! I am amazed at how pretty these are from used tin cans! Your patience and skills always amaze me Sara, this is above and beyond creative! I’m so glad you’re feeling better and are able to be our wonderful hostess 🙂
Jenna
Thank you Jenna – you have no idea how happy I am to host and craft again with you guys! Being creative can really get you through the healing process so it’s great to be productive again.
I love these. They remind me of Kaliedoscopes. So colorful and pretty! Thanks again for hosting the hop!
My pleasure Tammy!
I’ve never made anything out of soda cans, but what a colorful DIY. I love the shimmer, especially during these dark winter days when I crave color! Well done!
Yes, that shimmer sure does have me captivated. And you’re absolutely right; they do brighten up these dark days. That’s must be why I can’t stop making them!
It turned out really beautiful Sara you guys did a brilliant job. It was so interesting to see how different people come up with different ways to do a project. Well done.
Thanks Anita and I know what you mean. I checked out your project too and it was completely different! I guess great minds think alike except when it comes to execution lol.