An air plant magnet can add some much needed greenery in the kitchen when you don’t have a window over the sink to display plants.
If you saw our last post, hanging air plants, I promised you a warmer version you could hang on your fridge. It’s easy when you know how to crochet i-Cord.
What is i-Cord Used for?
i-Cord is just a fancy name for a crochet rope, drawstring or strap that can be as long you want. However, you ca also embellish wire with it or use it in amigurmi creations. See some examples of our i-Cord Ideas.
If knitting is more your thing, watch this video for how to knit i-Cord instead of crocheting it!
How do You Crochet an I-Cord?
Watch this video to see how easy i-Cord is to make.
iCord Supplies
You’ll need:
- Paton’s Hempster yarn or similar
- Place card holder
- Magnet
- Crochet hook (I’m using a #10)

How to Crochet i-Cord
Here are the steps:
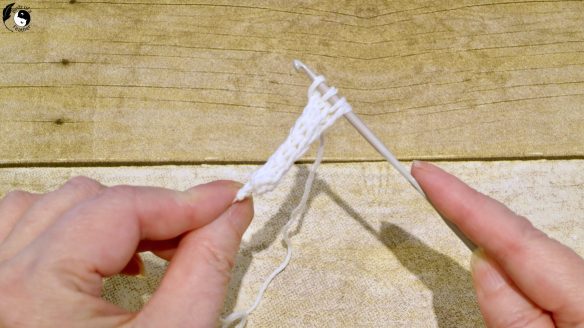
- Make a slip knot and chain 4.

- Draw up loops. Insert hook into the next stitch, yarn over and draw up a loop. Do the same for the remaining 2 stitches.

Now, you have 4 stitches on the hook.

- Pinch all loops but one and remove from hook. Be sure to hold onto the 3 stitches by pinching them between your thumb and forefinger before slipping them off the hook.

- Yarn over and pull though loop on hook. While holding the 3 stitches between your thumb and forefinger, yarn over and pull through the one loop on the hook.

Then transfer the next loop back onto your hook, yarn over and pull through. Repeat until all loops are once again back on the hook and there are 4 worked loops on hook.

- Repeat the from step 3 until you have the length you need. To recap, at the end of each round, you’ll have 4 loops on the hook

Pinch and remove 3 stitches.

Transfer one stitch back to hook at a time and work them until you once again have 4 stitches on the hook

Once in a while, give the end a tug to encourage the tube to form. You can also roll the cord between your hands.

For this place card holder, I crocheted about 26″ in length.
Air Plant Magnet
At the starting end, guide the i-Cord onto the end of the place card holder. I leave the other end with the stitches open just in case I need to add or remove rows. Then I cut the yarn, knot it and weave in all the ends with a darning needle.

Use a magnet that has a knob.

If the magnet has some space around the opening of the card holder, you can cut up a thick elastic band.

Wrap the elastic around the magnet and cut it to fit. Now, when you insert the magnet, it should be good and tight so the weight of the place card holder doesn’t make it flop around.

Before, our fridge was pretty cold and sterile.
So add the air plant. And stick your new air plant magnet to your fridge (or any other metallic surface).

Air plant holder on fridge
The air plant will be happy in her new home until it’s time for her weekly soak. She does look a little lonely there, but I plan to make more and soon she’ll be joined by more of her air plant friends!

Want more planter ideas? Check out these amazing upcycled planters!
Pin Air Plant Magnet
Pinning is always welcome and appreciated!


That’s so cute! What a great idea for decorating a fridge door. I have to show my avid crocheter and plant loving daughter this idea!
Awesome; hope she likes it! I need to make more of these for the fridge; luckily I have a few more place card holders.