

This DIY sewing kit really comes in handy as a sewing travel kit or just to keep around home. After being cooped up for the last few years, it’s time to get out again and travel! Fall is my favourite time of year to travel; how about you?
But who hasn’t had a button pop at an inopportune time? Over the weekend when my own button popped, I went searching for the scissors, thread and sewing needle. These were all scattered around my studio so it was a real time waster to find them.
DIY Sewing Kit Video
As I was looking at an empty container of dental floss, I had an epiphany: a portable sewing kit! It already has a built in ‘thread’ cutter! Have a look at this quick short:
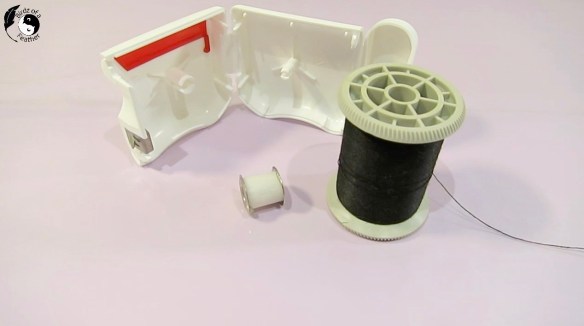
Sewing Kit Supplies
* [If you’re looking for some of the things we used, we’ve got you covered (disclosure): Clicking on the affiliate links below means we may receive a commission. But don’t worry, you don’t pay a cent more and it helps us make more unique crafts to share with you! Thanks for helping to support our blog!]
- Dental Floss
- Metal grommets (can also substitute a washer)
- Thread (black and/or white)
- Sewing needle
- Elastic
Creative Craft Hop
It’s time for another Creative Craft blog hop! So if you are visiting from Terrie at Decorate & More with Tip welcome! At the very bottom of this post, I’ll be directing you to the next stop on this venture. But don’t forget to check out the other stops too because you’ll find plenty more ideas. Be sure to drop back in throughout the week to visit them all!

Before we get into the tutorial, don’t forget to get your craft mojo on at Birdz of a Feather and subscribe to our newsletter:
You can also follow us on Pinterest, Facebook, YouTube and Instagram.
DIY Sewing Kit
First, peel off the label from the face of the container.
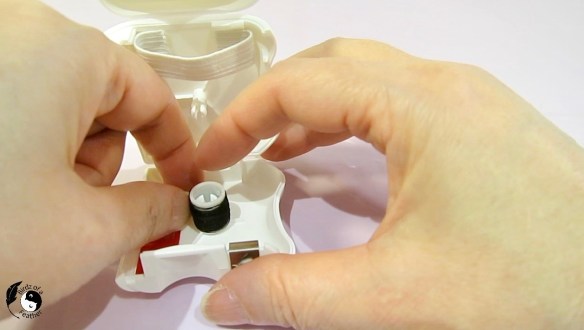
Reuse the little tube that the dental floss was originally on by gluing a grommet to either end. That’s so you can wind some thread on it.

Only add small dots of glue to hold it on temporarily. If you add too much glue, it will be difficult to pry off later.

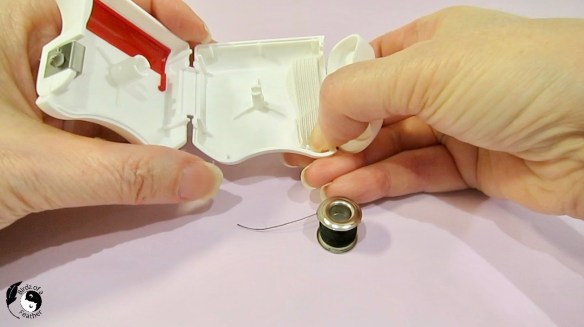
Wind on Some Thread
Once the grommet is glued, wind on some black thread. The grommet keeps the thread from falling off the edges as it’s being wound.
After the thread is on the spindle, the grommet can be removed. Unfortunately, it will interfere with the closing mechanism of the container if it’s left on.

Add a Sewing Needle
No DIY sewing kit is complete without a sewing needle! Cut a small piece of elastic. Alternatively, you could also use a piece or ribbon or something similar. Add a dot of hot glue to one side of the container, turn the end of the elastic under and glue it into place.

Then bring the elastic over to the other side, once again turning under the end, and secure it with another dot of glue.

Try not to burn yourself!
Now there’s something to attach the needle to so it won’t jiggle around the inside of the kit when it’s stored. It also won’t accidentally fall out when you open it!
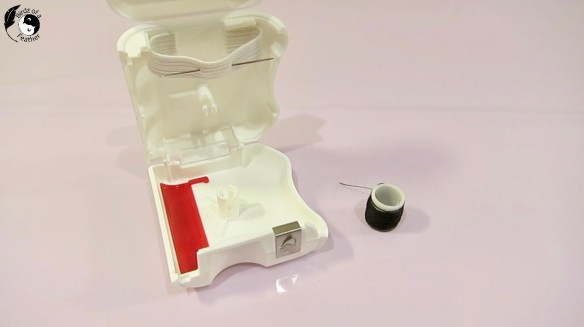
Insert Thread
After removing the grommet from both ends, put the ‘bobbin’ on the spindle with the thread running counter clock-wise.
Line up the thread with the hole in the top of the container and snap it shut.

All you have to do is pull and cut the tread the same way you would dental floss whenever you need it.

When your sewing is complete, just return the needle to the container and snap it shut again.

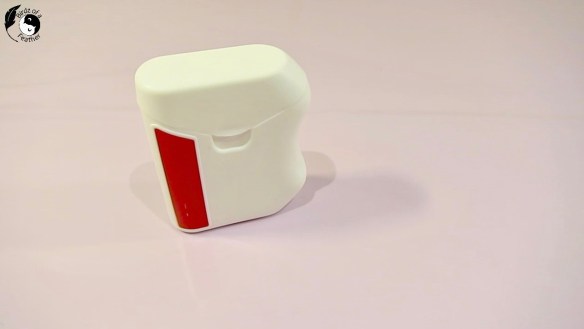
DIY Sewing Kit Label
So you can’t mistake its use, print out a label to add to the front.

Now the next time a button pops, or a hem falters, you’ll have a readily accessible kit ready to go! 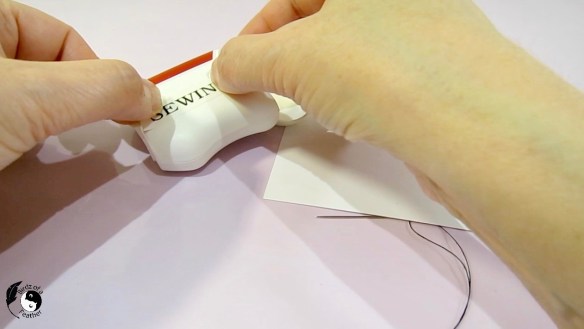
You could make a few kits up with different colour threads (at least black and white), or merely save the tubes and wind on different colour threads so they are interchangeable in the one kit.

Once the kit is complete, I decide to swap out the label for big, bold Letraset letters instead.

They’re actually too large for the container so I move them to the front.

Cut and sculpt around the lid. Then apply Mod Podge seal them on permanently. I love how the red colour ties in with the container. Now you really can’t miss it!

I love my new DIY sewing kit organizer! Now I’ve got all my sewing kit essentials in one spot. A kit like this would be great to carry in a purse for minor sewing repairs on the fly. It would also make a great travel item. While airports don’t allow actual scissors on board a plane, a little kit like this would likely be acceptable for air travel.
More Sewing DIYs
Do you love the look of those old thread cabinets? Check out this vintage hand painted sewing box to keep your notions in.
We’ve also done a number of sewing table upcycles and have plenty of sewing table ideas!
Are you into machine sewing? Check out how to sew these comfy Jalie Lounge Pants.
Pin Sewing Kit DIY
Get your craft mojo on at Birdz of a Feather and subscribe here if you don’t want to miss another unique idea! You can also follow us on Pinterest, Facebook, YouTube and Instagram.
Happy sewing! Pinning is always welcome and appreciated.

Creative Craft Hop
Now it’s time to check out these DIY Crystal Balls from Niki at Life as a LEO Wife. When you’re done, please remember to visit these other amazing talents below:
- DIY Crystal Balls from Dollar Tree Supplies
- How to Decorate a Glass Vase with Twine
- Halloween Shadow Box
- DIY Clay Fall Leaf Dish
- A Denim Pumpkin Sign
- Scrap Wood Black Cats for Fall
- Dressed Up Dollar Store Pumpkin Place Cards
- Haunted Halloween Mansion
- Faux Terracotta Pumpkin Tutorial
Pingback: How to Decorate a Glass Vase with Twine - Bluesky at Home
Pingback: Scrap Wood Black Cats for Fall - Modern on Monticello
Sara what a great idea. Functional and cute too! Going to make one as soon as my next floss container is empty!
It really is handy Tammy and you can’t beat practically free!
This is so creative Sara. I would love to have this for my purse, I am always out somewhere and need a needle and thread for some reason. Perfect for a purse. Thanks for sharing!
Thanks Terrie – I’ve made a few to carry and keep in our suitcase. They always come in handy!
Wow Sara, how clever are you!! what a perfect size to keep with you for emergency repairs! Great upcycle too! Thanks for the crafty fun every month!
Jenna
Thanks so much Jenna! I love our craft hop; always look forward to seeing everyone’s amazing makes!
Sara, this is brilliant! I can’t wait to try this clever idea–pinned! Blessings, Cecilia @My Thrift Store Addiction
Thanks Cecilia – hope you do try it 🙂
Very ingenious, Sara. Would never in a zillion years thought of making this. Thanks for hosting.
Thanks Carol and you’re welcome; it’s always a pleasure to host our hop 🙂
OMG, Sara! How unique and creative! I need one of these to keep in my handbag!
It’s perfect to carry in a handbag!
This is such a creative idea! Perfect for on the go and travel. Pinned.
Thanks Niki; I love to upcycle whatever I can!
What a clever idea, Sara. This is the best little sewing kit I’ve seen – no need for scissors – Love it!
Exactly! Would probably be fine to carry on a plane.
This is a great little hack!! Very clever.
Thanks so much Kim!
You are full of creative ideas, Sara. This is cute and practical
Thanks so much Alys! It’s always a fun challenge to make something practical out of an item that would normally be tossed!
Agreed. I take part in a ScrapHappy meme most months, were mostly sewers and quilters make from scrapes. I generally make something from paper, some sewing, etc. It’s fun. You should join us.
We’re still busy getting houses cleared out but I’ll keep that in mind when we have that behind us and get a larger chunk of free time! I’m long overdue for some sustained fun 🙂
I didn’t know you were emptiying out houses (plural). Wow you must be swamped.
Yes; both our moms passed away from Alzheimer’s last year and probate took a long time due to Covid. Clearing two houses at once has been pretty stressful.
Oh Sara, I can well imagine. It’s not just “two houses” but homes of people you loved. I wish I could be there to help. xo
You are so sweet :). xo